How to Build React Native Android apk files using Expo CLI
The react native community at Github is one of the strongest communities. Also, since it is open-source, the preference of developers to develop apps with React Native development company is increasing. Here, we are to cover a crucial segment of building and running react native Android apk files with Expo CLI.
Expo CLI is quite an effective tool in terms of creating a react native app. Unlike React Native CLI or the bare app development workflow, Expo CLI automates the process of react native app building and running. If you want to get detailed insight into the difference between expo CLI and React Native CLI, check this article.
If you are wondering what an APK file is in Android? APK refers to Android Application Package or Android Package Kit. It is simply the format of the file that Android OS uses to install and distribute apps. APK is the archive file that includes different files along with related metadata. APKs are the variant of Java Archive or JAR file format. APKs are somewhat similar to ZIP files but the former file format contains added data to function as APK. Moreover, APK files let users install applications on Android devices.
Let’s get started with the steps.
What are the prerequisites that you should consider?
Create a react native expo app.
Since I have already finished creating such an app, I will focus particularly on building apk files of a react native app using Expo CLI. You should check the article, where I have discussed the step-by-step process of how to create a react native app using Expo CLI.
2. Creating an account in the Expo app Store
You have to create an account on expo.dev/signup and login. Follow the tutorial article to create an account and then move forward with the following mentioned steps.
Step 1:Considering a React Native Expo app
- Here, I have considered a demo app named ‘sample-app’ and run it on my Android by scanning the generated QR code.
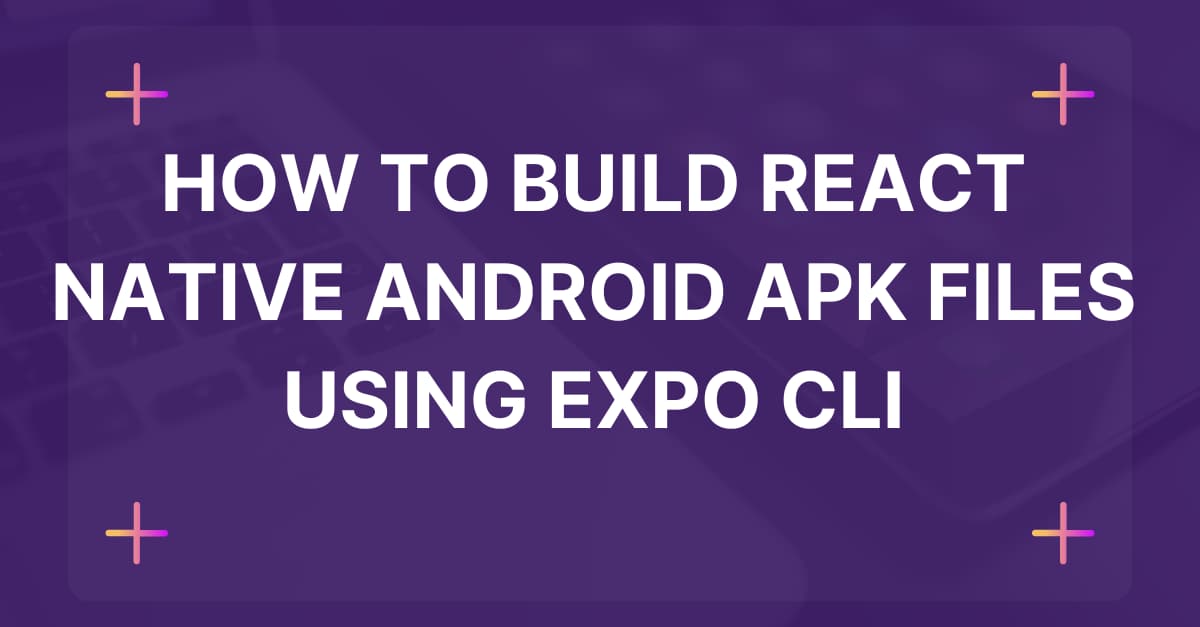
Step 2:Login to Expo account
You have to add the login details in the system by passing expo login.
- Open the command prompt from the project folder. (Here, for my project, I have opened the cmd from the folder of ‘sample-app’).
- Run expo login and hit enter. You will be asked to provide your login details such as password and email-id. Follow the steps as asked in the cmd and hit enter.
- Here, since I am already logged in with my account, I am getting the following display in the cmd stating “You are already logged in as tanusree247”.
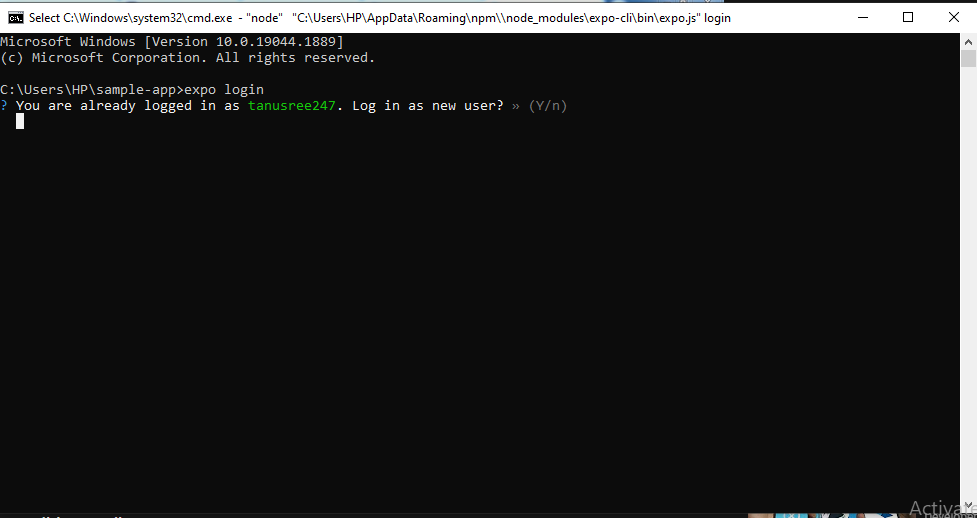
Image 1
Step 3:Changes in the app.json file
- Now, you have to make some changes to the app.json file.
- Change the section of “name” in the app.json file as a proper name that users will get to see. Considering image 2, I have changed it to “Sample App”. This name will also appear on the home screen where you install the app on a real device. So based on the functionality of the app, make the name presentable.
- You can also change the “slug” similar to the app. Make sure that you put a dash or ‘-’ in between all the used words. Referring to image 2, I have put a - between ‘sample’ and ‘app’. This is the URL name that the app JavaScript files will be published.
- If needed, you can also change the icon of your app in the asset file of your project folder. Here, I have kept it as it is.
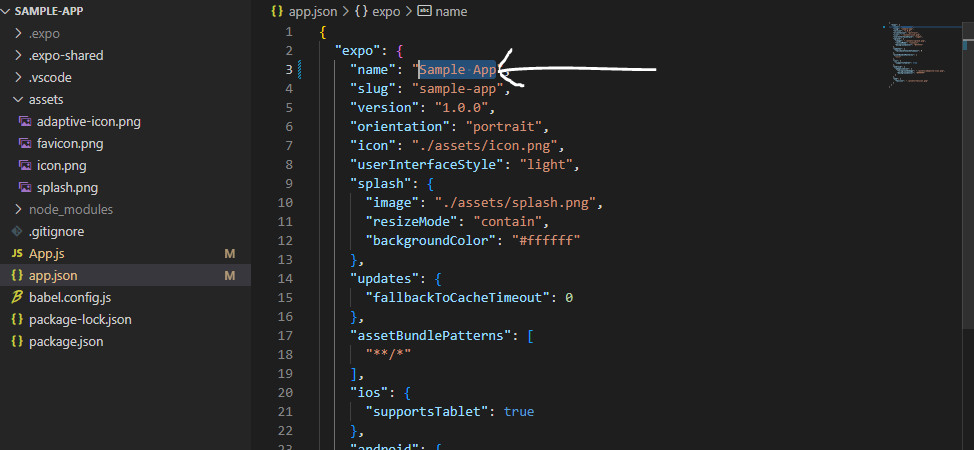
Image 2
Step 4:Changes in the Android platform
- As you need to generate an apk file for the android platform, you have to make changes under the android platform. Refer to image 3.
- For the current project (Sample App), I have added a package key as shown in image 3.
- This package will take a value that seems to be a domain. However, it should not be a real domain pointing to any website. So you are free to use any domain that may fit your app functionality.
- For my app (Sample App), I have used “
relatedtoanysample.sampleapp”. Don’t forget to save the entire process so far. Refer to image 3.
Image 3
Step 5: Starting the build of the app
- Let's open the command prompt from your project folder.
- Use the command expo build to build the APK of your app. Also, you have to pass certain options to it.
- Consider the entire command line as
expo build:android -tapkand run it on the cmd opened from the app folder. - Note that without a stable internet connection, your apk files will not be created.
- You will be asked to input a Keystore value. If you don't have one, you have to allow Expo to build one. I have also allowed Expo to build a Keystore value for my project.
- Wait till the Javascript bundle is built. In the running cmd, you can see that publish is completed and the Javascript bundle has been uploaded to your Expo account. Refer to image 4.
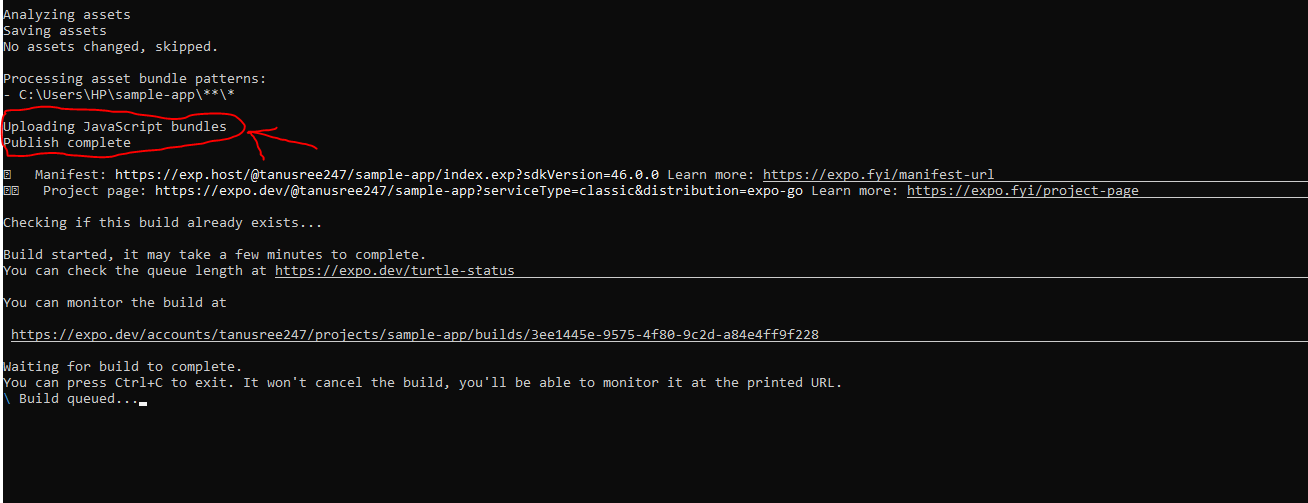
- As you can see in image 4, you will be provided with a link to monitor the build.
- Open your browser and paste it into the URL panel. Here, I am provided with (https://expo.dev/accounts/tanusree247/projects/sample-app/builds/3ee1445e-9575-4f80-9c2d-a84e4ff9f2280) to track the build of my project.
- If the Android Play Store build is not created, you will see a similar page as image 5, where the status of the build is “Queued”.
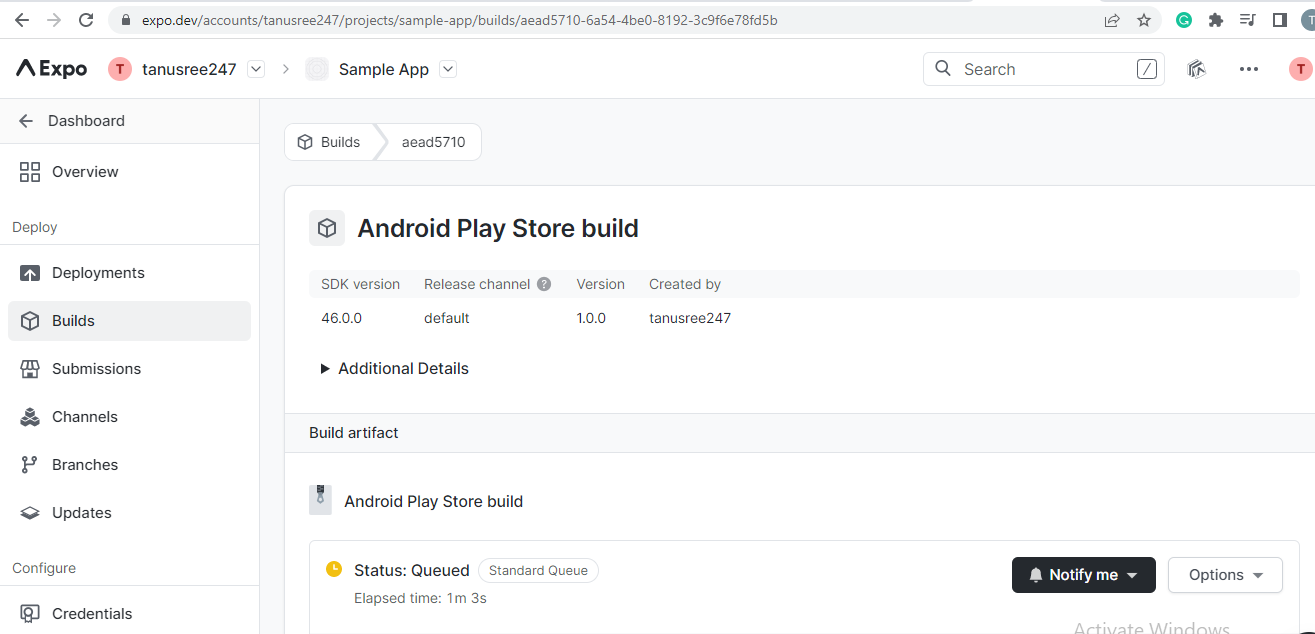
Image 5
- It may take a long time. For my case, it took about 1 hour.
Step 6: Downloading the build
- After the build is created, you will see a message on the running command prompt that says “Successfully built standalone app”.
- Copy the link provided to download the apk. Refer to image 6.
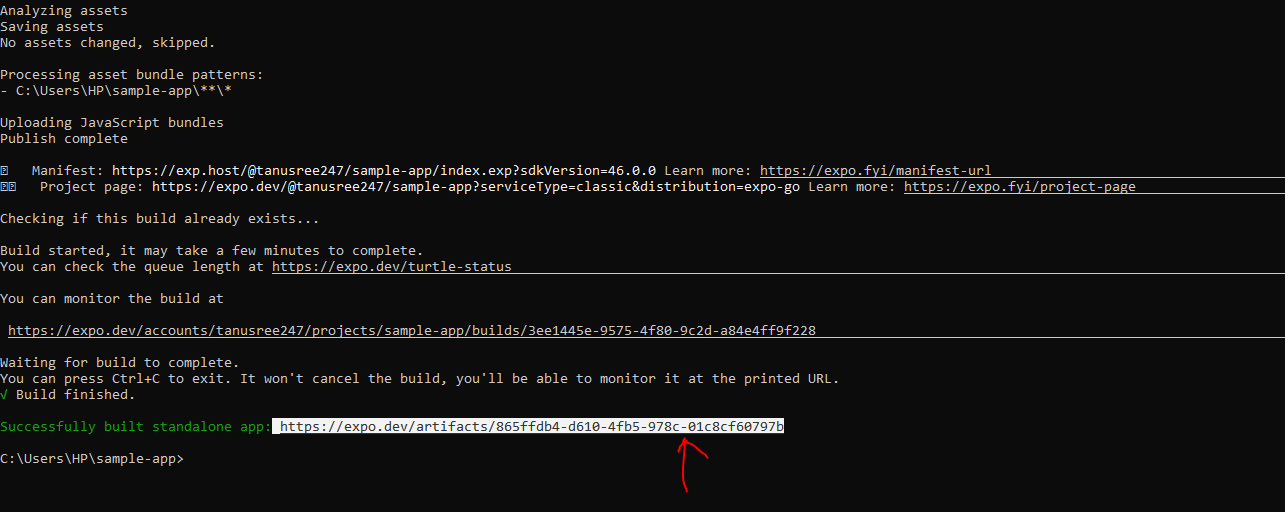
Image 6
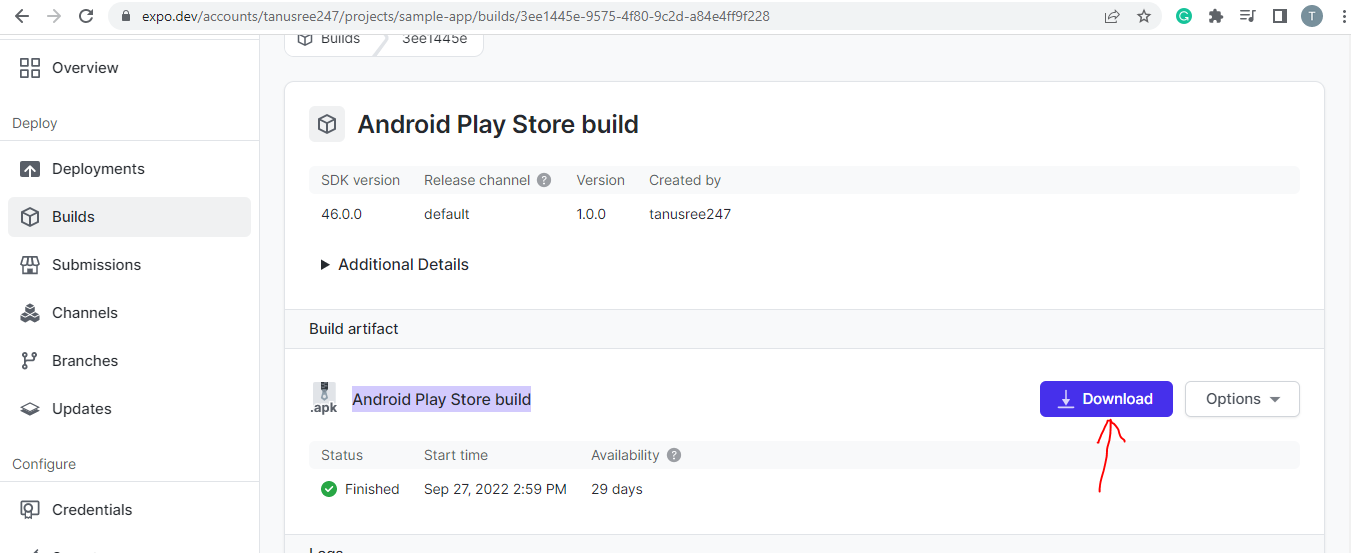
- You can also download theapk files simply by clicking on the ‘Download’ option as shown in image 7.
- After you have downloaded the apk file, make sure to save the Keystore values of the application.
- For this, open the same cmd and pass a command
expo fetch:android:keystore. - The Keystore credentials along with some other files have been created as shown in image 8.
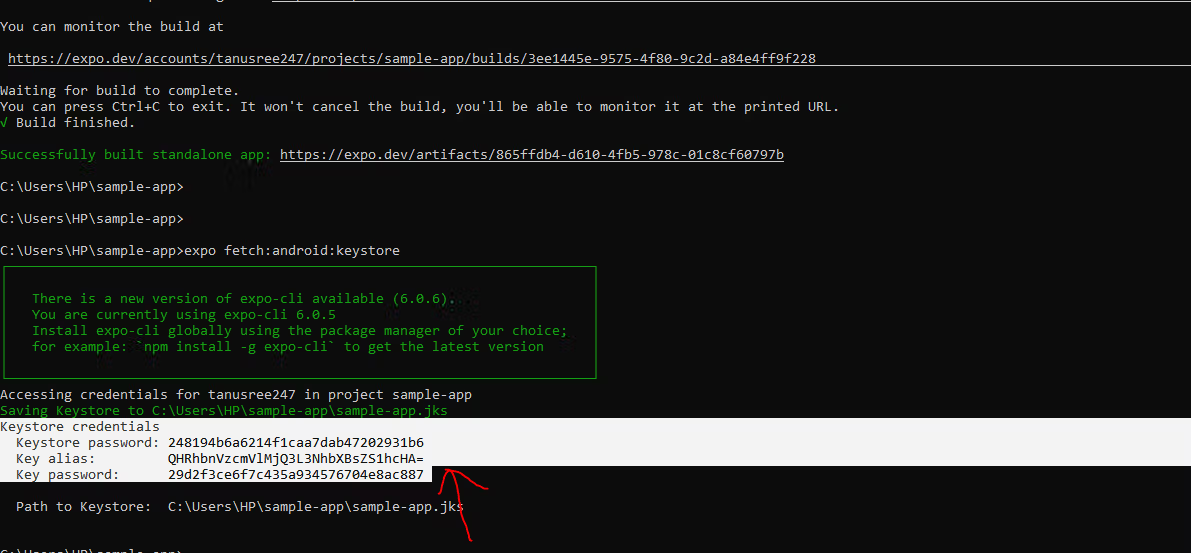
Image 8
- Save these values and back up the given file to a secure place.
- As you can see from image 9, the apk file has been built in the root directory of the project.
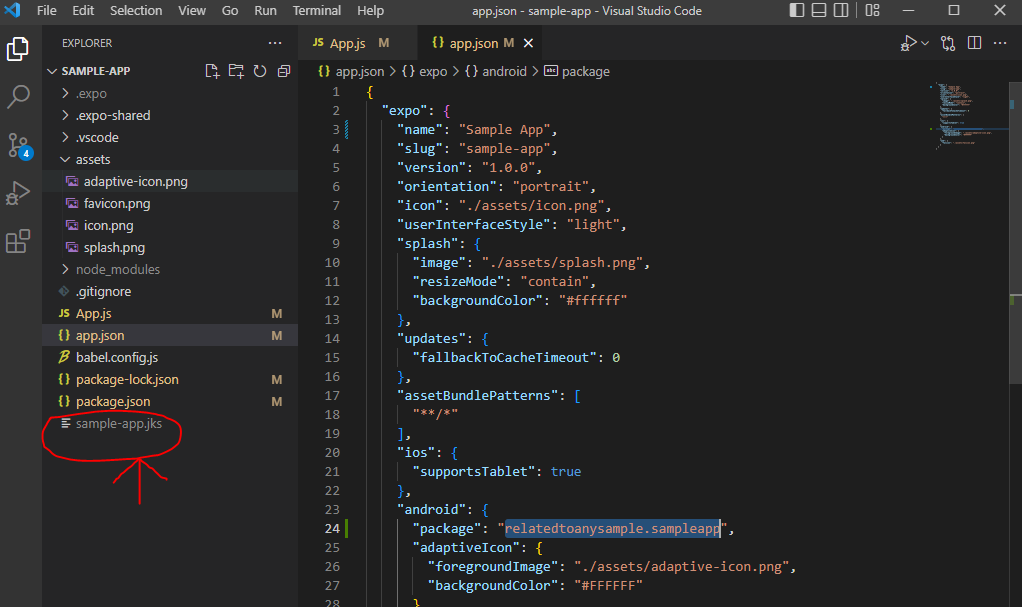
Image 9
Congratulations! You have successfully built your apk file for your react native expo app.
Step 7: Running the apk file
Enabling the developer option
- You can run the apk file in two ways. Either you can run it on an emulator or on the actual device.
- Here, we will see both processes. First, we will see the process to run the built apk files on a real Android device.
- For this, you have to enable the developer mode from your phone’s settings. It will vary from one model to the other.
- You have to go to the ‘settings’, then go to ‘About the phone’. Under the ‘software information’ press the ‘Build number’ seven times. A message will pop-up stating that ‘You are now a developer’. If you have already enabled the option, you will see a different text saying “No need, developer mode has already been enabled.”
- In my case, it is different. I have a Redmi 9A and the process to enable the developer mode is also different.
- Settings → About the phone → seven times click on the ‘MIUI version’. And it’s done. My developer mode has been enabled.
Enabling the USB debugging
- Now you have to go to ‘Developer options’ or ‘Developer settings’ which you may find under ‘Additional settings’.
- In the Developer options, scroll down to the ‘USB debugging’ option and enable it.
- Also, you have to switch on the option of ‘Install via USB’.
Connecting the phone to the system
- Connect your device with the development system or PC with a USB cord.
- To make sure that the phone device is connected to the PC, open the cmd from your project folder and pass
adb deviceson the cmd. - Please note, if you have set up react native and expo correctly, you won’t find any issues in this step. If you have not, check the tutorial blog to understand the steps of setting up your react native environment.
- You can see the list of devices connected to your development system. In my case, both the emulator and the Android phone are connected. Consider image 10.
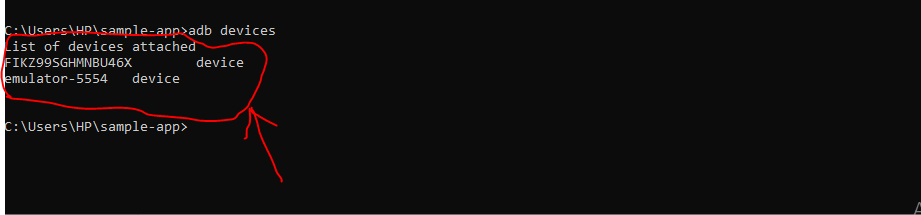
Image 10
- Installing the app on the Android device
- Save the apk file in a different folder under your main project folder.
- Here, I have saved the apk file of my developed app in the ‘others’ folder.
- Go to this ‘others’ folder on your local disk and open cmd from this folder.
- Open the directory which includes the apk file and copy the name of the apk file.
- Since two devices are connected to my system, I have to pass the command
adb -d installsample-app-b8e630b02fce4ea892e3c0febb4268b3-signed.apk, as you can see, I have added the name of the apk file in the command. The ‘-d’ in the command line indicates that we are directing it to install it on the real android device. Consider image 11.

Image 11
- Wait for some time and your Streamed Install will be successful as shown in image 11.
- Open the connected phone and search for your app among other installed apps. Here, I have found the ‘Sample App’ in my app panel. Look at image 12.
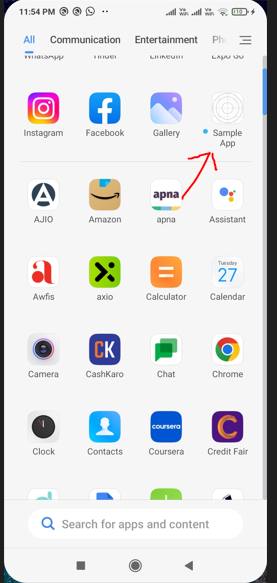
Image 12
Congratulations, you have installed or run the developed apk file on your real Android device.
Let’s consider the emulator
- Run the emulator. Here, image 10 is showing that the emulator is running or connected with my system.
- Open the emulator and ‘others’ folder in your app directory side-by-side as shown in image 13.
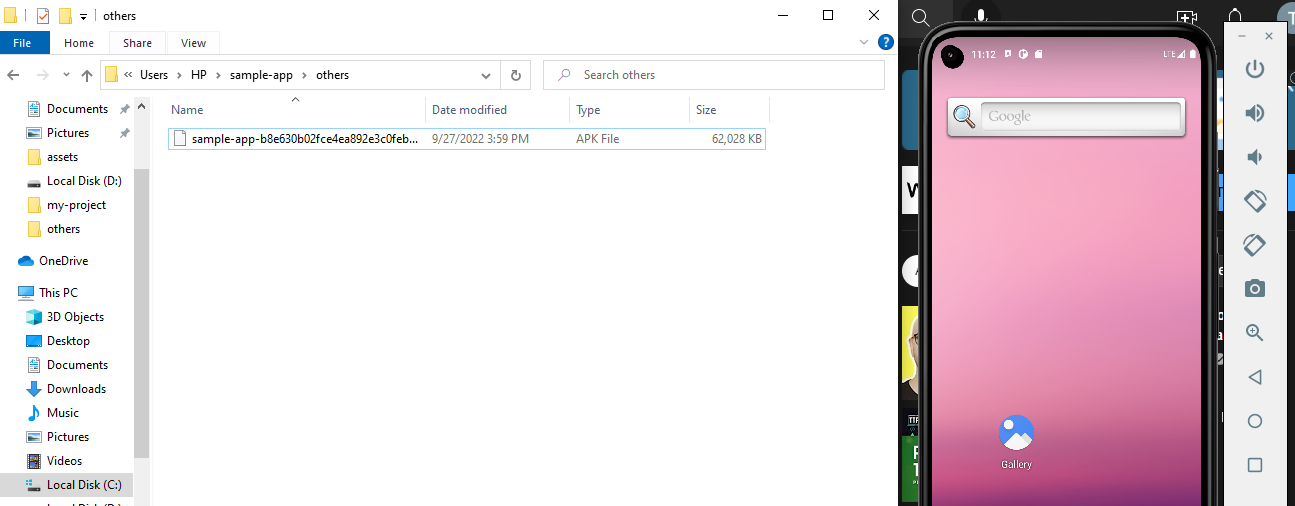
Image 13
- Now, simply drop the apk file onto the emulator and you will get a pop-up on the emulator stating “Installing APK..” Refer to image 14.
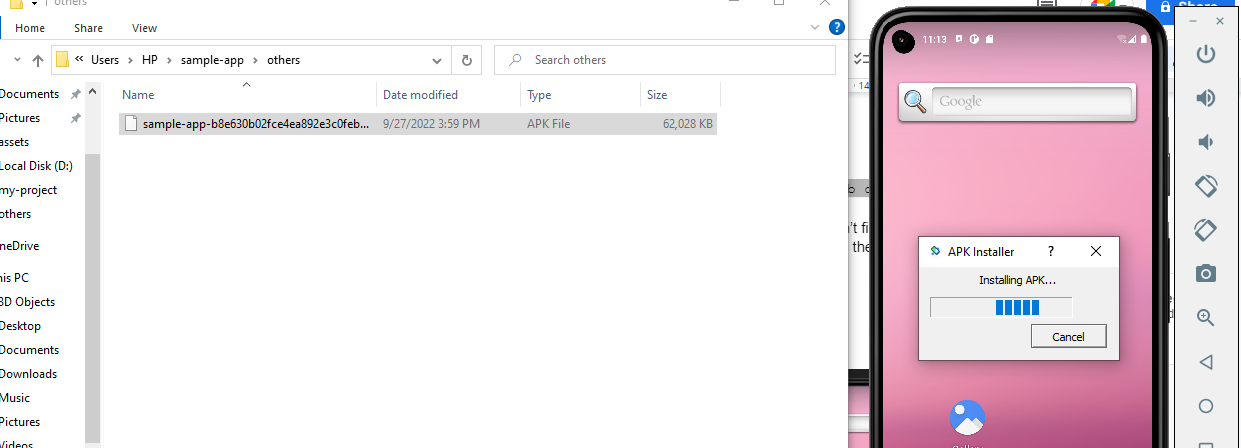
Image 14
Here, following the above process, I have successfully installed the apk file or run it on the emulator. Consider image 15.
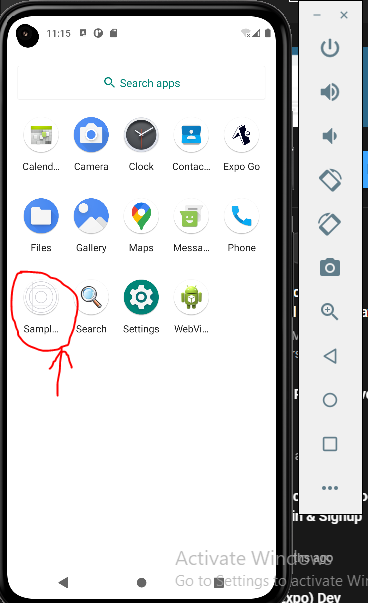
Image 15
Conclusion
Expo CLI offers the benefits of creating react native apps with ease. However, you have to build the apk file separately to run the same on your Android device and any emulator.
This article will provide a detailed explanation of how to build an apk file for the created app and run the same.

A science graduate who has a keen interest to lean about new technologies and research area. With an experience in the field of data analytics and content writing, she aims to share her knowledge among passionate tech readers.

