How to set up the React Native Development Environment
Step-by-Step Guide for Setting up a React Native Development Environment
React Native is arguably one of the best cross-platform UI software frameworks available to developers in 2022. Launched by Meta in 2015, it currently enjoys the status of the most popular UI framework for cross-platform software. React Native allows us to develop software for nearly all known OS for mobile, web, and even Smart TVs, including Android, iOS, macOS, Android TV, tvOS, and Windows. Irrespective of which platform you are developing on, setting up the React Native Development Environment would be the first step of your project. In this blog, we shall learn how to set up React Native Development Environment on Windows. You can also set it up in iOS, but that we will learn in another blog!
Why do we need a Development Environment?
We need a Development Environment to build and manipulate our codes locally, before deploying them. This allows a great deal of flexibility and independence while coding.
A development environment is simply a workspace where we perform development. A development environment usually consists of a collection of tools and services that assist us to develop the code or write the code, for our desired application. This assistance comes in many forms and usually encompasses most things we might need while building a code for our projects.
- Development environments normally come with in-built debugging and patching functions.
- They also often assist with maintenance and updating activities in our codes.
- Presently, we are used to working on IDEs, or Integrated Development Environments, which provides us with a coordinated interface to view our codes as we develop them.
- The overall process of developing, that is, writing, testing, and packaging is made much more convenient for developers.
It is important to note here that Development Environments can be single-language-oriented or toolkit environments (which support multiple programming languages). Given that React Native is multiple languages supporting framework, it is rather obvious that we opt for toolkit environments for React Native app development services.
Setting up React Native Development Environment
We normally use React Native CLI or Expo CLI paired with Android Studio or XCode, while programming on React Native. You can use either for your project, but if you are wondering which one of the two is better for you, this blog might come to your aid.
Snack

Snack is a development environment, or as its developers like to call it, a playground for React Native Development, that is available from your browser. That is right, you do not have to install any IDEs, configure them, install CLIs and be fully committed to React Native from the very beginning. You can simply go to the Snack browser environment and start building your React Native project. It is perfect for beginners, as well as oldies who want to play around a little! It allows you to build, test, and package your codes hassle-free.
However, we are here for a more committed journey. We are going to discuss how to set up a development environment in your system for React Native. There is one easier path and one less easy path. Let’s check them out!
Expo Go

This is the easy path.
Expo Go is advised for setting up a React Native development environment for mobile UI development if you are new to mobile development. It is very easy to set up Expo Go as we will see shortly. Expo Go comes with a bunch of useful features that are built around React Native. All you would need to set up Expo Go is an emulator and the latest version of Node.js, and you will be all set.
Let us create a React Native project called “MyfirstProject” in Expo Go!
If you are using npm, you can start a development server simply by:
1
npx create-expo-app MyfirstProject 1
2
3
cd MyfirstProject
npm start
# you can also use: npx expo startTo create a similar development server using yarn:
1
yarn create expo-app MyfirstProject1
2
3
cd MyfirstProject
yarn start
# you can also use: yarn expo startThe Pitfalls of Expo Go
Albeit it is easy to start working on your new React Native project using Expo Go, it does have its fair share of caveats that will limit your coding capacities on React Native in the long run.
- It does not allow using native codes
- Several Android and iOS APIs are unavailable in Expo Go
- Not always suitable if you want to develop apps of lean size
- Sometimes, your free builds can get queued in Expo Go
Keeping these in mind, it would be wiser to figure out how to use React Native CLI to set up a development environment for React Native in your system. Let’s get to that.
React Native CLI
React Native CLI is not super complicated in comparison to Expo, only, it requires XCode or Android Studio to set up. If you are familiar with mobile development, React Native CLI would be a cakewalk for you to set up and get working. However, if you are a beginner and do not have either XCode or Android Studio pre-installed, you would have to spend some time installing and configuring either of the IDEs. This can get a little daunting, especially if you are a beginner.
However, fret not!
Here is a detailed guide on how to set up your project in React Native CLI. We will be working on Android Studio for the demonstrations here as we will be setting up a development environment for a project targeted to Android OS. It would be important to note here that the steps of setting up are a little different for different Development OS. In this blog, we will cover the steps for Windows, macOS, and Linux.
Development Environment with React Native CLI on Windows
Installing Dependencies
Along with React Native CLI, you would need Node.js, Java SE Development Kit (JDK), and Android Studio installed. You should install an LTS version of Node using Chocolatey, a popular Windows package manager. However, if you need to switch between LTS and other versions of Node, it would be better to install Node using a Node version Windows manager, nvm-windows. For installing JDK, Chocolatey can be again used:
1
choco install -y nodejs-lts openjdk11Setting up the Development Environment
Setting up the development environment itself can look a little complicated, given that there are quite a few steps. Android Studio has to be installed and configured before we set up the development environment. Let us go through the steps one by one so that they are easier to follow.
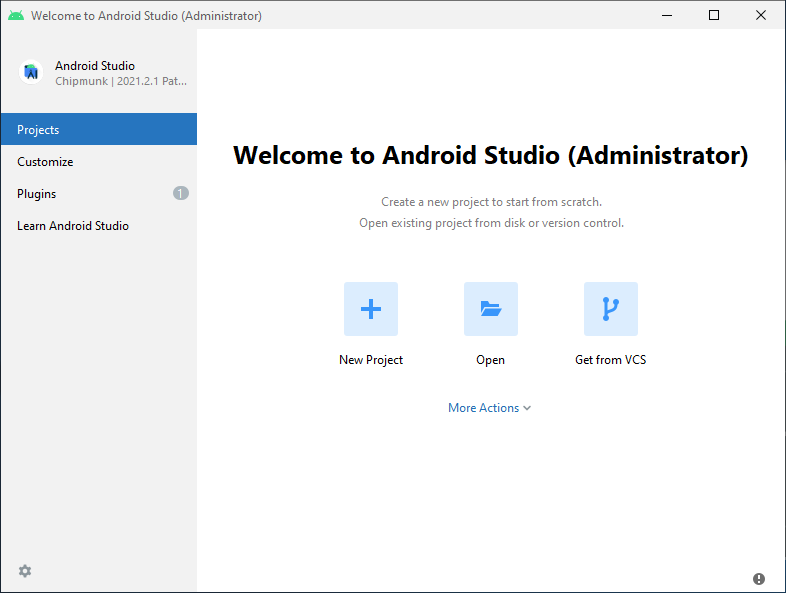
Step 1: Installing Android Studio
You have to download and install Android Studio and during installation, note that the following boxes are checked in the installation wizard to install these components:
- Android SDK
- Android SDK Platform
- Android Virtual Device
- Performance (Intel ® HAXM)
Finalize the setup to get taken to the Welcome Screen.
Step 2: Installing Android SDK
React Native needs the Android 12 (S) SDK. To install this:
- Go to the “SDK Manager” option by clicking on the “More Actions” button.
- At SDK Manager, click on the “SDK Platforms” tab.
In this tab, check on the “Show Package Details” box and expand the Android 12 (S) option. Here, you need the following items checked:
- Android SDK Platform 31
- Intel x86 Atom_64 System Image/Google APIs Intel x86 Atom System Image
- Additionally, under the “SDK Tools” tab, check if 31.0.0 is selected for “Android SDK Build-tools”.
Now, your Android SDK and other required tools will be installed once you click on the “Apply” button that appears on the Welcome Screen of Android Studio.
Step 3: Configuring ANDROID_HOME
ANDROID_HOME is an environment variable necessary for working with React Native. To configure this:
- First, go to the “Windows Control Panel”.
- From there, go to “User Accounts”, and then again to “User Accounts”.
- Now click on “Change my environment variable”.
- To create a new user variable of ANDROID_HOME that directs to your Android SDK path, click on “New…”
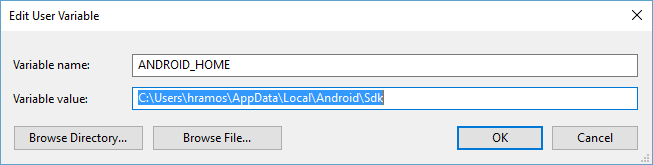
This would install the SDK automatically in this location: %LOCALAPPDATA%\Android\Sdk
To ensure that the new environment variable is installed properly, you can open Powershell from a new Comand Prompt window, and into Powershell, paste “Get-ChildItem -Path Env:\” and check if ADROID_HOME is added there.
Step 4: Adding platform tools to Path
- First, go to “Change my environment variable” from User Accounts in the Windows Control Panel as we did in the previous step.
- Now, click on “Path” and then select “Edit”.
- Next, click on “New” to add this Path to platform-tools.
- This folder would be automatically created at %LOCALAPPDATA%\Android\Sdk\platform-tools.
Now, your Android Studio is fully configured. To complete your Development Environment set up, simply execute React Native CLI using:
1
npx react-native <command>And, now you, the Windows user, is all set to start your React Native project! Create a new project with:
Development Environment with React Native CLI on macOS
Installing Dependencies
For macOS, besides React Native CLI, you would need Node.js, Watchman, JDK, and Android Studio installed. Watchman, by Facebook, is a tool that simply “watches” changes in your filesystems. This tool is advised as it dramatically enhances the performance of your code. You can install Watchman as well as Node using Homebrew. Ensure that you install Node 14 or above. To install Watchman and Node using Homebrew, type the following in a Terminal:
1
2
brew installnode
brew install watchmanTo work on React Native, you need JDK 11 or higher. To install your JDK, again use Homebrew to install Azul Zulu, an OpenJDK distribution, by using the commands:
1
2
brew tap homebrew/cask-versions
brew install --cask zulu11Setting up the Development Environment
With all the necessary tools needed to set up our Development Environment, we can now move on to setting up the Android Development Environment. Just like in Windows, Android Studio has to be first installed and configured before we set up the development environment. Let us go through the steps one by one so that they are easier to follow.
Step 1: Installing Android Studio
You have to download and install Android Studio and during installation, note that the following boxes are checked in the installation wizard to install these components:
- Android SDK
- Android SDK Platform
- Android Virtual Device
Finalize the setup to get taken to the Welcome Screen.
Step 2: Installing Android SDK
React Native needs the Android 12 (S) SDK. To install this:
- Go to the “SDK Manager” option by clicking on the “More Actions” button.
- At SDK Manager, click on the “SDK Platforms” tab.
- In this tab, check on the “Show Package Details” box and expand the Android 12 (S) option. Here, you need the following items checked:
- Android SDK Platform 31
- Intel x86 Atom_64 System Image/ Google APIs Intel x86 Atom System Image
- Google APIs ARM 64 v8a System Image (for Apple M1 Silicon only)
Also, under the “SDK Tools” tab, check if 31.0.0 is selected for “Android SDK Build-tools”.
Now, your Android SDK and other required tools will be installed once you click on the “Apply” button that appears on the Welcome Screen of Android Studio.
Step 3: Configuring ANDROID_SDK_ROOT
Much like ANDROID_HOME, ANDROID_SDK_ROOT is also an environment variable that you would need to set up to develop applications using native code.
- To do this, add the following commands to $HOME/.bash_profile or $HOME/.bashrc:
1
2
3
export ANDROID_SDK_ROOT=$HOME/Library/Android/sdk
export PATH=$PATH:$ANDROID_SDK_ROOT/emulator
export PATH=$PATH:$ANDROID_SDK_ROOT/platform-tools- Next, load the config into bash using source $HOME/.bash_profile
- Or, load it into the current shell by usingsource $HOME/.zprofile
- Now, you must run echo $ANDROID_SDK_ROOT to ensure that ANDROID_SDK_ROOT is set properly.
- Also, run echo $PATH to verify whether the correct directories are added to the path
Android Studio is now fully configured from your macOS system. To complete your Development Environment set up, simply execute React Native CLI using:
1
npx react-native <command>You can now create a new React Native project from macOS with:
1
npx react-native init MyfirstProjectDevelopment Environment with React Native CLI on Linux
Installing Dependencies
If you are working from Linux, along with React Native CLI, you would need Node.js, Watchman, a JDK, and Android Studio installed in your system. Install Node 14 or later versions of Node by following the installation instructions for Linux. For your JDK, you need version 8 or above of JDK. You can use your system packager or AdoptOpenJDK to install OpenJDK. Otherwise, you can also choose to install oracle JDK 14 if you want.
Setting up Development Environment
Setting up the development environment, much like in Windows and macOS, is a little lengthy, albeit, very similar to the process followed in Windows or macOS. Just as we did before, Android Studio has to be installed and configured before we set up the development environment. Here is the step-by-step guide to setting up Android Development Environment for React Native on Linux:
Step 1: Installing Android Studio
You have to download and install Android Studio and during installation, note that the following boxes are checked in the installation wizard to install these components:
- Android SDK
- Android SDK Platform
- Android Virtual Device
- Performance (Intel ® HAXM)
Finalise the setup to get taken to the Welcome Screen.
Step 2: Installing Android SDK
React Native needs the Android 12 (S) SDK. To install this:
- Go to the “SDK Manager” option by clicking on the “More Actions” button.
- At SDK Manager, click on the “SDK Platforms” tab.
In this tab, check on the “Show Package Details” box and expand the Android 12 (S) option. Here, you need the following items checked:
- Android SDK Platform 31
- Intel x86 Atom_64 System Image/Google APIs Intel x86 Atom System Image
- Additionally, under the “SDK Tools” tab, check if 31.0.0 is selected for “Android SDK Build-tools”.
Now, your Android SDK and other required tools will be installed once you click on the “Apply” button that appears on the Welcome Screen of Android Studio.
Step 3: Configuring ANDROID_SDK_ROOT
Much like ANDROID_HOME, ANDROID_SDK_ROOT is also an environment variable that you would need to set up to develop applications using native code.
- To do this, add the following commands to $HOME/.bash_profile or $HOME/.bashrc:
1
2
3
export ANDROID_SDK_ROOT=$HOME/Library/Android/sdk
export PATH=$PATH:$ANDROID_SDK_ROOT/emulator
export PATH=$PATH:$ANDROID_SDK_ROOT/platform-tool- Next, load the config into bash using source $HOME/.bash_profile
- Or, load it into the current shell by usingsource $HOME/.zprofile
- Now, you must run echo $ANDROID_SDK_ROOT to ensure that ANDROID_SDK_ROOT is set properly.
- Also, run echo $PATH to verify whether the correct directories are added to the path
Once again, your Android Studio is now fully configured, but this time, for a Linux system. To complete your Development Environment set up, simply execute React Native CLI using:
1
npx react-native <command>Get onto building your first React Native project on Linux by simply adding:
1
npx react-native init MyfirstProjectWhat’s Next?
Now that you have, hopefully, successfully set up your React Native Development Environment in your system, and have even started your very first React Native Project. MyfirstProject, all there is left to do is run it! React Native uses Metro, a JavaScript bundler that is shipped with it to run applications. Check out the Metro Docs to understand how to start and run your applications in React Native using the Metro Bundler. Also, if you want to incorporate your newly developed React Native code into an existing application, the Integration Guide by the React Native Team might be of some help to you. Otherwise, you can always come back here, for another detailed discussion on these!
Until then, hope you have a great time working with React Native.

Sam took the long path into the world of IT. A post-grad in Bioinformatics, she started coding to build better programs for protein sequencing. Currently, Sam actively writes blogs for 4 Way Technologies. She's always excited about all the new technologies and updates in software development. Sam also writes coding tutorials and beginners guides for, well, beginners.

