Use of React Native FlatList component in React Native app

Getting content or data in a structured format is possible with the FlatList component of React Native. Here, in this tutorial blog, we will see how you can use the FlatList in your app to get a scrollable list of images.
You can also check the current project @Github.
Utility of FlatList component in React Native
FlatList is the performant interface that you can use to build simple flat lists of contents. This content can be lists of texts, images, graphics, and videos. It supports features like Header, Multiple columns, and Footer. Besides, it also supports scroll loading, cross-platform, Viewability callbacks, ScrollToIndex, and Pull Refresh.
If you want to present a large amount of data in a list, you have to import the FlatList component from the react-native library. However, note that the data should be in a structured format.
We will see how you can import and use it in your codebase later in this blog. So, stick to it!
Although in this project, you don't need to install any third-party React Native plugin for any particular components. All the required components are accessible from the react-native library. However, two important props of FlatList components that I want to emphasize are renderItem and data.
RenderItem is used as a function that takes a single item from embedded data and returns it to the list. It is usually used in a format: renderItem({item, index, separators});
On the other hand, data is used as an array, where you have to add all the structure data or elements you want to show on the app screen in a scrollable list format. Note that, you have to add all the elements as objects with curly braces, separated by commas. Refer to image 1 under the demo object.

Image 1
Pre-required learning parameters
Since you have chosen the React Native framework for creating a Flat list interface, you need to set up the environment of React Native in your system. In this step, you have to install software like Node.js, Android Studio, and others. Check the attached article for further details.
Also, you have to learn about the procedure of developing React Native app. This will give you a practical understanding of how an app is built and run on a device. It will, in hand, allow you to get a strong grasp on the current project. You can visit the attached link and go through the segment of React Native CLI to learn the build process of a React Native app.
Also, you will need this basic React Native app or template to embed the codebase for the scrollable FlatList view.
Creating a codebase for the project
Before getting into the crucial part of the codebase, you have to import the components that you will need to create the project. If you need any expert advice into it then you go with React Native app development services.
Note that, the most important part of framing the codebase is importing the required components. Without this, you cannot proceed further in the codebase.
In this project, you need StyleSheet, Text, View, Image, FlatList, and TouchableOpacity. For this, you have to use import { StyleSheet, Text, View, FlatList, Image, TouchableOpacity } from 'react-native'
Also, you have to import all the components of React. You can execute this by the codeline: import React from 'react'.
Now, introduce all the elements you want to render as a scrollable list in the object form. Here is how you can execute this operation.
1
2
3
4
5
6
7
8
9
10
11
12
13
14
15
16
17
18
19
20
21
22
23
24
25
26
27
28
29
30
31
32
33
34
35
36
37
38
39
40
41
42
43
44
45
46
47
48
const demo = [{ id: 0, name: "A", image:
'https://images.unsplash.com/photo-1614160859544-177611d11f6b?ixlib=
rb-4.0.3&ixid
=MnwxMjA3fDB8MHxwaG90by1wYWdlfHx8fGVufDB8fHx8&auto=
format&fit=crop&w=686&q=80' },
{ id: 1, name: "B", image:
'https://images.unsplash.com/photo-1614160859544-177611d11f6b?ixlib=
rb-4.0.3&ixid=MnwxMjA3fDB8MHxwaG90by1wYWdlfHx8fGVufDB8fHx8&auto=
format&fit=crop&w=686&q=80' },
{ id: 2, name: "C", image:
'https://images.unsplash.com/photo-1614160859544-177611d11f6b?ixlib=
rb-4.0.3&ixid=MnwxMjA3fDB8MHxwaG90by1wYWdlfHx8fGVufDB8fHx8&auto=
format&fit=crop&w=686&q=80' },
{ id: 3, name: "D", image:
'https://images.unsplash.com/photo-1614160859544-177611d11f6b?ixlib=
rb-4.0.3&ixid=MnwxMjA3fDB8MHxwaG90by1wYWdlfHx8fGVufDB8fHx8&auto=
format&fit=crop&w=
686&q=80' },
{ id: 4, name: "E", image:
'https://images.unsplash.com/photo-1614160859544-177611d11f6b?ixlib=
rb-4.0.3&ixid=MnwxMjA3fDB8MHxwaG90by1wYWdlfHx8fGVufDB8fHx8&auto=
format&fit=crop&w=
686&q=80' },
{ id: 5, name: "F", image:
'https://images.unsplash.com/photo-1614160859544-177611d11f6b?ixlib=
rb-4.0.3&ixid=MnwxMjA3fDB8MHxwaG90by1wYWdlfHx8fGVufDB8fHx8&auto=
format&fit=crop&w=686&q=80' },
{ id: 6, name: "H", image:
'https://images.unsplash.com/photo-1614160859544-177611d11f6b?ixlib=
rb-4.0.3&ixid=MnwxMjA3fDB8MHxwaG90by1wYWdlfHx8fGVufDB8fHx8&auto=
format&fit=crop&w=686&q=80' },
{ id: 7, name: "I", image:
'https://images.unsplash.com/photo-1614160859544-177611d11f6b?ixlib=
rb-4.0.3&ixid=MnwxMjA3fDB8MHxwaG90by1wYWdlfHx8fGVufDB8fHx8&auto=
format&fit=crop&w=686&q=80' },
{ id: 8, name: "J", image:
'https://images.unsplash.com/photo-1614160859544-177611d11f6b?ixlib=
rb-4.0.3&ixid=MnwxMjA3fDB8MHxwaG90by1wYWdlfHx8fGVufDB8fHx8&auto=
format&fit=crop&w=686&q=80' },
{ id: 9, name: "A", image:
'https://images.unsplash.com/photo-1614160859544-177611d11f6b?ixlib=
rb-4.0.3&ixid=MnwxMjA3fDB8MHxwaG90by1wYWdlfHx8fGVufDB8fHx8&auto=
format&fit=crop&w=686&q=80' },
{ id: 10, name: "AB", image:
'https://images.unsplash.com/photo-1614160859544-177611d11f6b?ixlib=
rb-4.0.3&ixid=MnwxMjA3fDB8MHxwaG90by1wYWdlfHx8fGVufDB8fHx8&auto=
format&fit=crop&w=686&q=80' },
]
This code is creating an array of objects called "demo". Each object has three properties: an id, a name, and an image. An id is a number, the name is a string, and the image is a URL. There are 11 objects in the array, each with a specific id and name.
You have to create an alert message. Refer to the following syntax.
1
2
3
const paginationData = () => {
  alert('Reload Data')
}
The code defines a paginationData function. If called, it will display an alert message ‘Reload Data’. This function can be used to allow the user to reload data when a certain action is taken. On the other hand, you can also add an API key under this function (paginationData) to get a large amount of data.
As the data for our project is limited, I have designed the codebase in this manner (created an alert notification when the user reaches the end of the scrollable list).
Going forward, you have to build the main function App for the project. Refer to the syntax mentioned below.
1
2
3
4
5
6
7
8
9
10
11
12
13
14
15
16
const App = () => {
  return (
    <View style={styles.container}>
    <Text style={styles.Header_Text}>FlatList Implementation</Text>
      <FlatList
        data={demo}
        contentContainerStyle={{ flexDirection: 'column' }}
        numColumns={2}
const App = () => {
  return (
    <View style={styles.container}>
    <Text style={styles.Header_Text}>FlatList Implementation</Text>
      <FlatList
        data={demo}
        contentContainerStyle={{ flexDirection: 'column' }}
        numColumns={2}
The App renders the FlatList.
The data is stored in the demo variable created at the beginning of the codebase.
In this current project, the FlatList is designed in a way to render two columns and each item in the list is rendered with the name property of the item. The keyExtractor is used to give each item a unique key.
Also, the Text component is used with inline styling. It is a text element “FlatList Implementation” placed at the header of the screen.
The styling parameters are used to style the components.
Use the renderItem and onEndReached for more functionalities. Refer to the below-given syntax.
1
2
3
4
5
6
7
8
9
10
11
12
13
14
15
onEndReached={() => paginationData()}
        renderItem={({ item, index }) => {
          return (
            <View style={styles.cartBox} key={index}>
              <TouchableOpacity>
                <Image source={{ uri: item.image }} style={styles.image} resizeMode='contain' />
              </TouchableOpacity>
              <Text style={styles.Text_name}>{item.name}</Text>
            </View>
          )
        }}
      />
    </View>
  )
}
The onEndReached prop is a function. It is called when the user scrolls to the end of the embedded list.
The renderItem prop is another function used in the codebase. It is called for each item in this list. It returns a View component, which further has an Image and Text component.
The Image component has a source (uri) prop set to the image of items. The Text component has a value that is set to the name of items.
The View component also has a style prop. It indicates the styles.cartBox object and a key prop specifying the index of the item.
The TouchableOpacity component wraps the Image component and lets users interact with it.
Use the export default App to export App as a component.
For styling the FlatList interface, you need to consider four styling objects namely container, Header_Text, CartBox, image, and Text_name.
Here is how you have framed the codebase for the styling objects.
1
2
3
4
const styles = StyleSheet.create({
  container:{
    flex:1
  },
Start with the StyleSheet component. First, the container has 1 as its flex value.
1
2
3
4
5
 Header_Text:{
      color:'#000000',
      fontSize:23,
      alignSelf:'center'
  },
The text at the header has a fontSize of 23, and elements inside it are aligned at the center position. It is colored with the code #000000.
1
2
3
4
5
6
7
8
9
10
  cartBox: {
    width: 180,
    height: 202,
    backgroundColor: '#ffffff',
    borderRadius: 10,
    borderWidth: 2,
    borderColor:'#BB8D61',
    marginLeft: 12,
    marginTop: 10
  },
The cart box has a width of 180 pixels, a height of 202 pixels, a left margin of 12 pixels, a margin at the top of 10 pixels, a border at a radius of 10 pixels, and a border width of 2 pixels. The background and border color are specified with a unique code.
For styling the image and Text_name, the parameters are mentioned below in the syntax. You can change it as per your preference.
1
2
3
4
5
6
7
8
9
10
11
image: {
    width: 180,
    height: 140,
    marginVertical:10

  }, Text_name: {
    colour: '#000000',
    fontSize: 20,
    alignSelf: 'center'
  }
})
Executing the program on the emulator
It does not need much effort. You just need to create a terminal from your app folder. Then run npm install. After all the dependencies are installed, you need to execute npx react-native run-android.
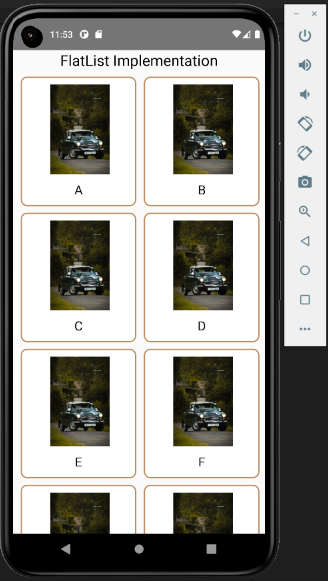
You will get the output on the emulator screen as shown in image 2.

Image 2
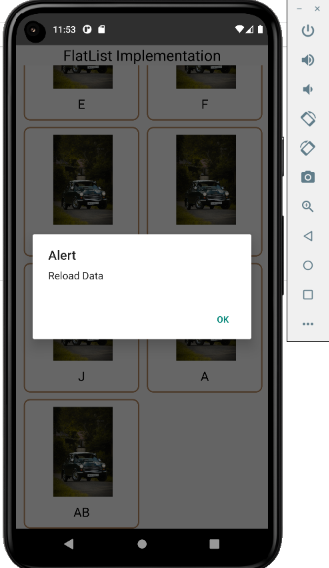
You can scroll on the emulator to see all 11 images arranged vertically. As you scroll down to the last image, you will see a notification box popped up on the emulator stating ‘Reload Data’ (Refer to image 3).

Image 3
This is a way of reloading more data. In this current project, we have not added images further. However, in place of this ‘alert’ message, you can embed an API key in the codebase to store a huge volume of data and call whenever users continue scrolling.
Exceptional criteria: Creating scrollable list in horizontal format
The codebase already mentioned in the previous section will give you the list in the vertical format (refer to image 2). To get in the horizontal format, you need to make some changes in the codebase and save it.
The change in the code syntax is given below.
1
2
3
4
5
    <FlatList
        data={demo}
        // contentContainerStyle={{ flexDirection: 'column' }}
        // numColumns={2}
        Horizontal
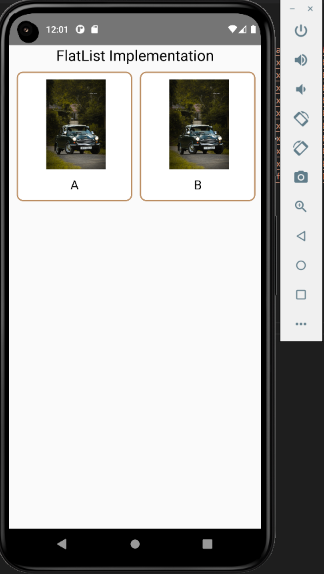
Here, I have commented out the two lines using //at the start of the line and added Horizontal. This will render the scrollable list of images horizontally.
Refer to image 4 for the output.

Image 4
Summary
Given that app development needs complex algorithms, choosing a simple app development framework and executing the same makes the task easier. With the React Native framework, you don't need to create components from scratch. You can take the components from relevant libraries and use them in the codebase to get the desired result. Here, the main component is the FlatList, which we have imported from the react-native library. Also, we have learned how we can change the view of the list in horizontal form with just a basic change in code.
Hope you will enjoy using the FlatList component in React Native app.

A science graduate who has a keen interest to lean about new technologies and research area. With an experience in the field of data analytics and content writing, she aims to share her knowledge among passionate tech readers.