Improve Your Selfie Camera Game: React Native Stopwatch Guide
The utility of React Native as a mobile app development framework is beyond imagination. The simplicity it offers for component reusability has made the framework much more popular among mobile app developers. Here, you will learn about how to level up the game of app development by adding a stopwatch to a selfie camera app. Here, you will use React Native. If you are still unsure about its functionality, you can get into one-to-one consultation with the experts of React Native app development company.
Considering you as an ardent learner, let’s get started with the selfie camera stopwatch-building process.
What are the Prerequisites?
Yes, you have to perform some small steps before starting with the coding section. These are as follows.
- Get the Environment
Here, what you have to do is install the required software you will need for the development.
One of the significant benefits that React Native offers is the choice of CLIs the users can use. Yes, you can use either React Native CLIs or Expo CLIs depending on the customization you want to add to your project. Still, trying to figure out these two CLIs? Visit the linked blog post to get an overview of React Native CLIs and Expo CLIs and the difference between these two CLIs.
If you are thinking that which CLI we are going to use for the current project. It would be Expo CLI. Seems complicated? It won’t. Just follow along. However, first, install all the software required for the Expo CLI. If you are stuck, follow the steps mentioned in the article.
- Build a Project Folder
Before getting into the coding segment, let’s build a project folder for the app. Here, we will do so by using the expo command.
- Open the terminal from a folder, maybe from your local C driver.
- Pass
npm i -global expo-clion the terminal and install the Expo CLI on your system.
As you are done with this step, get the required libraries.
- Install the Third-Party Libraries
Here, you need to install expo/vector-icons, expo-media-library, and expo-camera.
This is the most significant factor for which developers of the React native app development company prefer using this framework over others. They can get custom components from external libraries and don’t have to make them all by themselves from scratch.
Also, in this project, we will use some custom components from react and react-native-library. Install both these libraries.
Now, we will start with the coding section and learn how can you use the components from the installed third-party libraries.
Here, comes the most important part of the project. Get the source code for the entire project from the attached repository.
Codes Embedded in the App.js File
Before going into the App.js file, you have to create the components file Button.jsx, Timer.jsx, usePermission.jsx, and a separate file data.js for the dataset of the timer.
1
2
3
4
5
6
7
import { Camera, } from "expo-camera";
import { Image, StyleSheet, Text, View } from "react-native";
import * as MediaLibrary from "expo-media-library";
import { useState, useRef, useEffect } from "react";
import usePermission from "./src/usePermisson";
import Button from "./src/components/Button";
import Timer from "./src/components/Timer";
The code imports all the necessary components from the related libraries.
It imports ‘Camera’ from ‘expo-camera’; ‘Image’, ‘StyleSheet’, ‘Text’ and ‘View’ from ‘react-native; and ‘useState’, useEffect’ and ‘useRef’ from ‘react’.
The (*) in the third line indicates that the code imports the ‘expo-media-library’ and assigns it to the ‘MediaLibrary’ variable.
Lastly, ‘usePermission’, Button’, and ‘Timer’ are imported from other folders created separately.
1
2
3
4
5
6
7
8
9
export default function App() {
  const hasCameraPermissions = usePermission(Camera);
  const [type, setType] = useState(Camera.Constants.Type.front);
  const cameraRef = useRef();
  const [image, setImage] = useState(null);
  const [timerClicked, setTimerClicked] = useState(false);
  const [timer, setTimer] = useState(0);
  const [displayTimer, setDisplayTimer] = useState(timer);
  const [timerOn, setTimerOn] = useState(false);
It defines the key component of ‘App’. Also, the component uses hooks like useRef, useEffect, and useState for easy management of the app state.
Here, useState is used to manage the state of ‘type’, ‘image’, ‘timer’, ‘timerOn’, ‘displayTimer’, and‘timerClicked’.
For the third line: const [type, setType] = useState(Camera.Constants.Type.front);
The initial value of the ‘type’ state variable is set to ‘Camera.Constants.Type.front’ whereas the ‘setType’ is used to update the value of this variable.
White useRef is for adding a reference to the camera.
The code considers a conditional rendering. It depends on the ‘hasCameraPermissions’. If its value is set to true, then it will show a camera view. Otherwise, it will ask for camera permissions.
1
2
3
4
5
6
7
8
9
10
11
12
13
14
  const takePicture = async () => {
    setTimerOn(true);
    setTimeout(async function () {
      if (cameraRef) {
        try {
          const data = await cameraRef.current.takePictureAsync();
          setImage(data.uri);
          setTimerOn(false);
        } catch (error) {
          console.log(error);
        }
      }
    }, timer * 1000);
  };
The ‘takePicture’ is an async function. It sets the ‘timerOn’ to true. The ‘setTimeOut’ function is used to wait for some time till the camera timer appears on the screen.
The ‘setTimeout’takes in an argument in the form of a callback function. Here, it is an anonymous asynchronous function trying to take a snap with the camera reference ‘cameraRef.current.takePictureAsync()’. If it is successful, ‘timerOn’ is set to false, and ‘image’ will denote the URI of the picture.
1
2
3
4
5
6
7
8
9
10
11
12
useEffect(() => {
    if (!timerOn) {
      return;
    }
    setDisplayTimer(timer);

    const interval = setInterval(() => {
      setDisplayTimer((prevTimer) =>
        prevTimer > 0 ? prevTimer - 1 : clearInterval(interval)
      );
    }, 1000);
  }, [timerOn, setTimerOn, timer]);
The ‘useEffect’ is used to update the timer when it starts counting. The code checks if the timer is active. If it is active, it displays the timer as per the value set by the user. If it is inactive, it returns to its initial value.
If the previous value of the timer is 0, it clears the display interval. However, the dependencies of the ‘useEffect’ are on ‘timer’, ‘setTimeron’, and ‘timerOn’. The code re-runs this hook if any of these values change.
1
2
3
4
5
6
7
8
9
10
11
  const savePicture = async () => {
    if (image) {
      try {
        const asset = await MediaLibrary.createAssetAsync(image);
        alert("Image saved!");
        setImage(null);
      } catch (error) {
        console.log(error);
      }
    }
  };
The ‘savePicture’ is an async function. It saves the image to the media library of the device.
‘if (image)’ checks if the ‘image’ value is undefined or not null. In that context, the function will call the ‘MediaLibrary.createAssetAsync(image)’ method and create an asset from the clicked image.
After the asset is created and saved, a message in the form of an alert is shown “Image saved!” and again the ‘image’ is set to null.
1
2
3
4
5
6
7
8
  const onPressTimerItem = (time) => {
    setTimerClicked((prevState) => !prevState);
    setTimer(time);
  };

  if (hasCameraPermissions === false) {
    return <Text>No permission to access camera</Text>;
  }
The function ‘onPressTimerItem’ considers a parameter of ‘timer’. It sets the state of the ‘timerClicked’ to the opposite value of its previous. For this, it uses the ‘setTimerClicked((prevState) => !prevState)’. Then the code sets the state of the timer to the ‘time’ parameter using the ‘setTimer(time)’ syntax.
if ‘(hasCameraPermissions === false)’ checks if ‘hasCameraPermissions’ is false. In that context, the code will return a message “No permission to access the camera”.
1
2
3
4
5
6
7
8
9
10
11
12
13
14
15
16
17
18
  return (
    <View style={styles.container}>
      {timerClicked && <Timer onPress={onPressTimerItem} />}
      {!image ? (
        <Camera style={styles.camera} type={type} ref={cameraRef}>
          <View style={styles.buttonContainer}>
            <Button
              icon={"retweet"}
              title="Flip"
              onPress={() =>
                setType(
                  type === Camera.Constants.Type.back
                    ? Camera.Constants.Type.front
                    : Camera.Constants.Type.back
                )
              }
              color="#f1f1f1"
            />
The ‘return’ syntax returns the ‘View’ component embedding a button and a camera. ‘<Camera>’ component defines the camera and has specific ‘style’, ‘ref’, and ‘type’ properties. A button is defined in the code using the <Button>. It has the title, onPress, icon, and color properties.
The ‘icon’ is set to ‘retweet’, and the ‘title’ is set to ‘Flip’ to switch the camera to the front and back mode. For this, it uses the onPress={() => setType() method. The button of the color is set to #f1f1f1.
1
2
3
4
5
6
7
8
9
10
11
12
13
14
15
16
17
18
  <View style={styles.timerContainer}>
              <Button
                icon={"back-in-time"}
                title="Timer"
                onPress={() => setTimerClicked((prevState) => !prevState)}
              />
              <Text style={styles.timerText}>{timer}s</Text>
            </View>
          </View>
          {timerOn && (
            <Text style={styles.displayTimerText}>{displayTimer}s</Text>
          )}
        </Camera>
      ) : (
        <Image style={styles.camera} source={{ uri: image }} />
      )}

      <View>
Here, the code defines a Button using the <Button> component. It has ‘back-in-time’ as the value of ‘icon’, ‘Timer’ as the value of the ‘title’, ‘#f1f1f1’ as its ‘color’, and ‘setTimerClicked()’ method used for the event handler ‘onPress’.
It uses the if /else statement to check whether the timer is active. For this, it uses the ‘timerOn’. If it is active, it will show the ‘{displayTimer}s’. Styling for the button is set to ‘styles.displayTimerText’.
As we are done with the key segment of App.js, let’s check the source code to learn how to create different styling properties. For this, you have to create ‘container’, ‘camera’, ‘takenImage’, buttonContainer’, ‘timerText’, ‘timerContainer’ and ‘displayTimerText’.
To Execute the Program
You have not completed the project until you check whether it is running on the emulator.
To do this, open the command prompt and go to the project directory. Then pass the expo start on the terminal. It will activate the development server on the Android emulator.
It will open your selfie camera timer. Using the Expo Go app, you can also open the project on your Android device.
Refer to the below-given gif for the output.
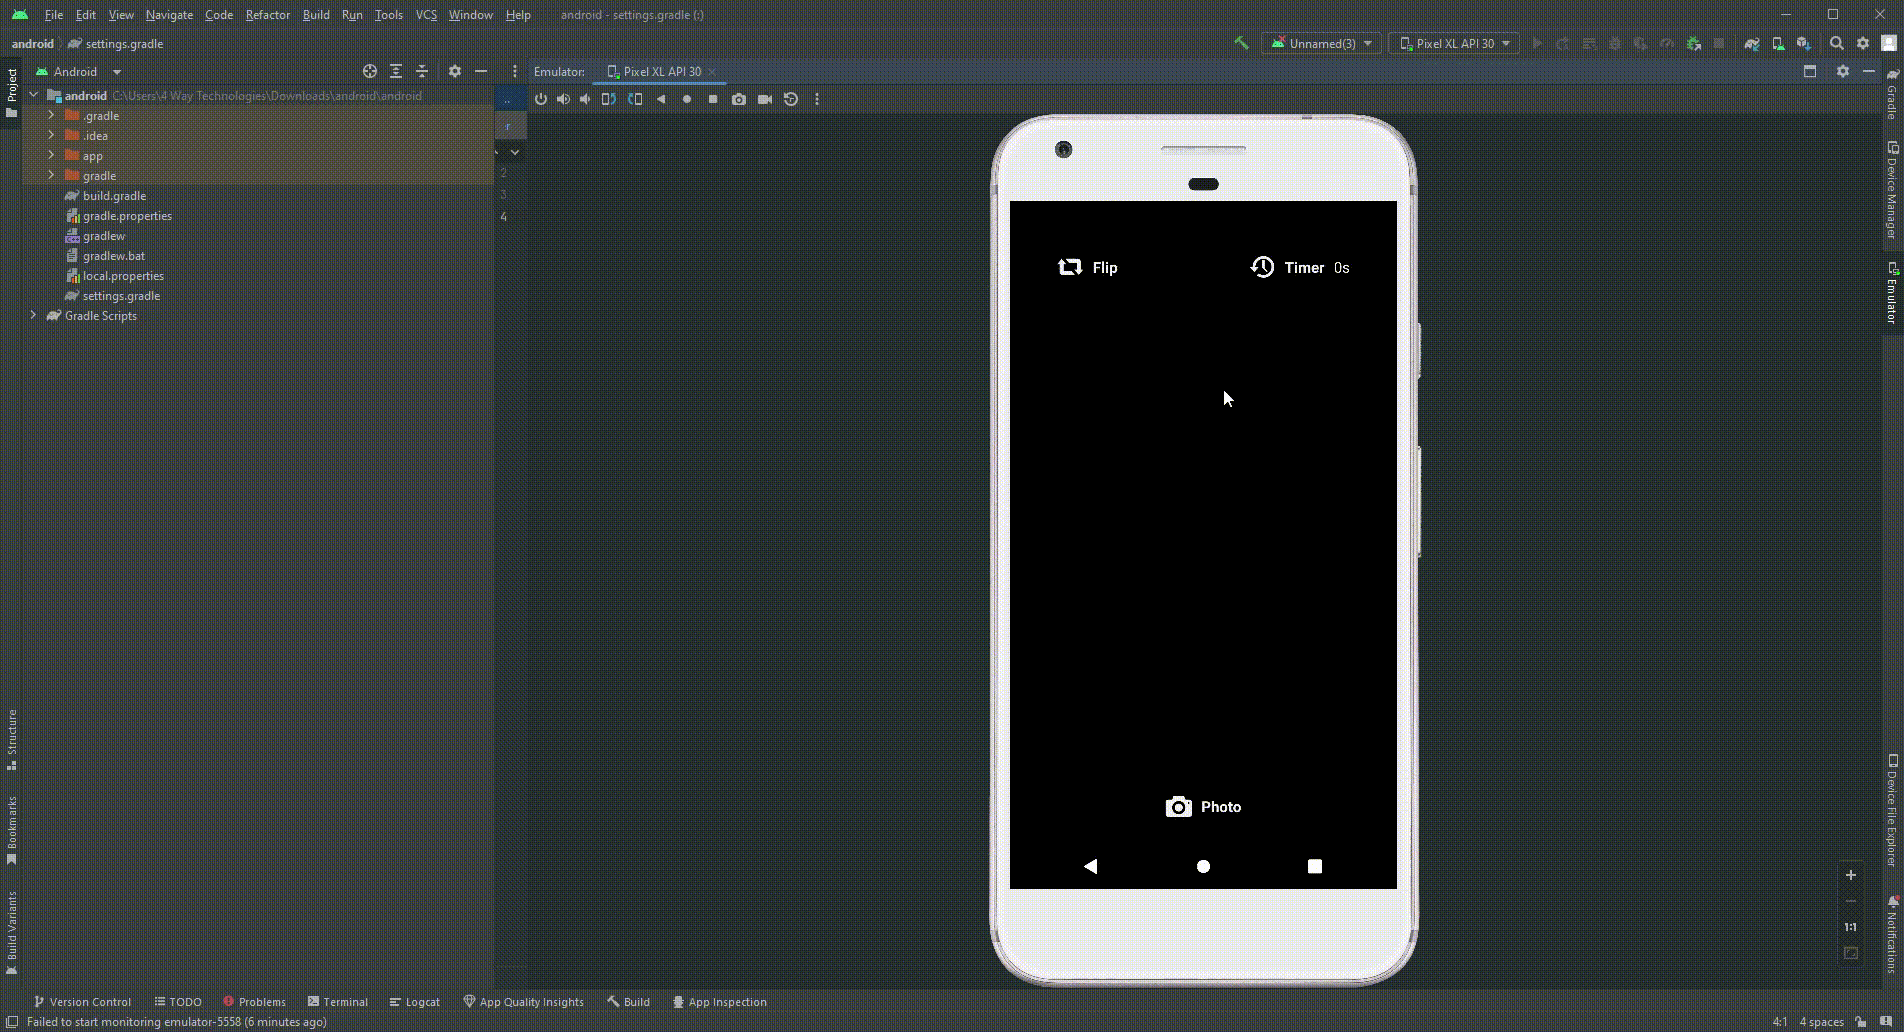
As it shows, users can use the three buttons to click the photo, set the timer, and flip the camera state.
Summary
React Native offers vast functionality in terms of mobile app development. If you have been using the framework for a while, you would have known. Here, the blog guides you to build a selfie camera stopwatch using React Native. Steps may seem confusing if you don't have a basic understanding of how React Native is used.
However, the source code attached in the coding section can assist you. So, without procrastinating and waiting for the perfect time, make ‘now’ the perfect time.

A science graduate who has a keen interest to lean about new technologies and research area. With an experience in the field of data analytics and content writing, she aims to share her knowledge among passionate tech readers.

