How to use AsyncStorage with React Native to manage a login
Managing the information of user login has become much easier with React Native AsyncStorage. With this Async storage, you can also preserve the app state. Let's get familiar with the functionality of the Async storage system and understand its usage in improving the React Native development company process.
What is an Async storage system?
AsyncStorage is a basic, asynchronous, and unencrypted key-value store that can be used to save small amounts of data, such as user preferences or login/logout session information. The term ‘asynchronous’ implies that Async Storage does not obstruct the main thread, allowing you to create a more responsive app.
It is important in React Native because it provides an easier way to store and retrieve data from the device's local storage, which is useful for saving user-generated data. This data can then be accessed by other components in the app, allowing for a seamless user experience
It is considered a lightweight solution for data persistence. This storage system is in action even when the app is inactive.
Considering that you have understood the basic concept of Async storage, we will move forward with the practical project.
The Environment setup for the React Native framework
The process of environment setup will take you a few minutes. Install Node, JDK, Android Studio, React Native CLI, and an IDE. For React Native, you should generally consider the Visual Studio Code editor.
Note that the selection of the software is based on which Development OS, Target OS, and development tool you are considering. Refer to the linked article for detailed assistance.
Building a simple folder in the dev system
You need to build a simple template for every React Native-based project. This acts as the storage for the project files and codes.
Here is how you can perform this step.
- Open a folder from your system and then run cmd from this folder. This will open a terminal.
- Pass
npx react-native init AsyncLogin --version 0.71.2. Here, you are directing the command line to create a React Native folder ‘AsyncLogin’ on the version 0.71.2.
After the folder is built, you can store the third-party library and the project code.
Third-party library setup
In this project, you have to use axios and AsyncStorage. you cannot find these two components in the native library. So, the project needs third-party library support.
These are @react-native-async-storage/async-storage and axios.
The installation process of these libraries is mentioned below.
npm i @react-native-async-storage/async-storagenpm i axios
Build a new terminal from your project and run these two commands on the terminal to get the libraries linked to your project. Now, you can easily import components from these libraries.
As you are already familiar with AsyncStorage, let me give a brief info about Axios. Axios is a JS-based library. It is used to perform HTTP requests from node.js and the browser. In React Native projects, it is used to retrieve data from APIs along with other web services, which makes it an important tool for creating modern mobile apps.
Getting started with the coding section
Here, we will create two separate files for Logout and Login and then we will combine both files and add them to the App.js file. Also, we will use ContextApi to get the desired result. If you want to learn more about the React Native Context API, visit the attached article.
Find the entire source code for the current project in the linked GitHub repo.
Framing the Logout.js file
Let’s start with importing components.
1
2
3
import { Button, StyleSheet, Text, View ,TouchableOpacity} from 'react-native'
import React from 'react'
import AsyncStorage from '@react-native-async-storage/async-storage';
Besides the core components, the code imports the AsyncStorage component.
1
2
3
4
5
6
7
8
9
10
11
12
13
14
15
16
17
18
const Logout = () => {


  const logout=()=>{
   AsyncStorage.removeItem('token')
  }
  return (

  <View>
  <TouchableOpacity onPress={()=>logout()} style={styles.logout_box}>
   <Text style={styles.logout_text}>LogOut</Text>

  </TouchableOpacity>
</View>
  )
}

export default Logout
This code creates a functional React Native component Logout.
The component returns a view that contains a TouchableOpacity component with a text component inside of it.
The text displays "LogOut". When the TouchableOpacity component is pressed, it triggers the logout() function, which removes an item with the key "token" from the device's asynchronous storage using the AsyncStorage.removeItem() method.
the styles for the text and touchable opacity components are defined in an object named styles.
Lastly, the component is exported as the default export.
With the below-given syntax,
1
2
3
4
5
6
7
8
9
10
11
12
const styles = StyleSheet.create({
  logout_box:{
      alignSelf:'center',
      marginTop:380
  },
  logout_text:
  {
    color:'#000000',
    fontSize:22,

  }
})
The code adds some styling parameters to logout_box and logout_text.
Creating the Login.js file
We will start creating the file with the import statement.
1
2
3
4
5
import { StyleSheet, Text, TextInput, TouchableOpacity, View } from 'react-native'
import React, { createContext, useEffect, useState } from "react";
import axios from 'axios';
import Logout from './Logout';
import AsyncStorage from '@react-native-async-storage/async-storage';
It imports useEffect, useState, React, and createContext from the react library.
From the react-native library, it imports View, TouchableOpacity, TextInput, StyleSheet, and Text. Also, imports axios and AsyncStorage from the axios and @react-native-async-storage/async-storage libraries respectively.
Other than this, the code imports Logout from ./Logout and other core components.
1
2
3
4
5
6
7
8
9
const Login = () => {
const [email,setEmail]=useState()
const [password,setPassword]=useState()
    const LoginBtn=()=>{
      var data = JSON.stringify({
        "Password": password,
        "Email": email,

      });
The code snippet defines a functional component in React Login. It uses the React Hook useState to build two state variables, email, and password. The function LoginBtn creates an object data which is a stringified JSON object comprising two properties, Password and "Email". The values of these properties are the current values of the state variables "password" and "email" respectively.
1
2
3
4
5
6
7
8
9
10
11
12
13
14
15
const url= 'https://*******************************/login'
      axios({
        method:'post',
        url:url,
        headers: {
          'Content-Type': 'application/json'
        },
        data :data
      }).then(response=>{

              if(response.status==200){
          AsyncStorage.setItem('token',JSON.stringify(response.data)).then(res=>{console.log("first")})

        }
      })
The code makes an HTTP POST request to the specified URL using the Axios library. As done in the snippet, hide the URL as exposing it to hackers may lead to security threats.
The request includes headers with "Content-Type" set to "application/json", and the body of the request is the defined "data" object.
If the response has a status of 200, the "AsyncStorage'' method "setItem" is called to store a key-value pair in local storage. Here, the key is "token" and the value is a stringified version of the "data" field.
The "then" function logs a message to the console to ensure the completion of this operation.
1
2
3
4
5
6
7
8
9
10
11
12
13
14
15
return (
    <View>
    <View>
    <Text style={styles.titleText}>
    AsyncStorage in React Native to Store Data in Session
  </Text>
    <Text style={styles.loginText}>Login</Text>
            <TextInput placeholder='Email' style={styles.TextInput} value={email} onChangeText={(prev)=>setEmail(prev)}/>
            <TextInput placeholder='Password' style={styles.TextInput} value={password} onChangeText={(prev)=>setPassword(prev)} secureTextEntry={true}/>
            <TouchableOpacity style={styles.button} onPress={()=>LoginBtn()}>
            <Text style={styles.Login_btn}>Login</Text>
            </TouchableOpacity>
    </View>
    </View>
  )
This code snippet in React Native renders a view containing two inner views.
The first inner view contains a text component with a title and two text inputs for email and password, both of which are controlled by state variables email and password, respectively.
The second inner view contains a touchable opacity component that serves as a login button and triggers the LoginBtn() function when pressed.
The styles for the text and input components are defined in an object named styles.
After performing this syntax, export the Login component and then use the relevant stylesheet object. You can find this segment in the GitHub repository.
Returning Login and Logout component in the App.js file
Start with the following snippet.
1
2
3
4
5
6
7
import { StyleSheet, Text, TextInput, TouchableOpacity, View } from 'react-native'
import React, { createContext, useEffect, useState } from "react";
import axios from 'axios';
import Logout from './Logout';
import AsyncStorage from '@react-native-async-storage/async-storage';
import Login from './Login';
export const ContextApi=createContext()
This code imports various components, a create context method from the React library, the axios library for making HTTP requests, the Logout component, the AsyncStorage module from the @react-native-async-storage/async-storage library, and the Login component.
It then exports a constant named ContextApi that is created using the createContext method from the React library. The context is used to share data between different components in a React Native app.
1
2
3
4
5
6
7
8
9
10
11
12
13
14
15
16
17
18
19
20
21
const App = () => {
const [data,setData]=useState(null)
useEffect(()=>{
  AsyncStorage.getItem('token').then(res=>{
    setData(res)
   })

},[data])
  return (
    <ContextApi.Provider value={{data,setData}}>

    <View>
     {data==null?<Login/>:<Logout/>}

  </View>

    </ContextApi.Provider>

  )
}
export default App
This is a code snippet for the main component of a React Native app named App. It uses the useState hook to create a state variable named data with an initial value of null.
It then uses the useEffect hook to retrieve an item with the key "token" from the device's asynchronous storage using the AsyncStorage.getItem() method.
The retrieved value is then passed to the setData function to update the state.
The component returns a View component that is wrapped in a ContextApi.Provider component, with the data and setData state variables being passed as the value prop.
The view component conditionally renders either the Login component or the Logout component based on the value of the data state variable. If data is null, the Login component is rendered, otherwise, the Logout component is rendered.
How to execute the program on a device?
Program execution is an important step where you have to check the accuracy of your code by running the program on a device. Here I want to consider an emulator for the code execution.
Open the Command prompt from your local folder. This is a terminal where you can run any command line but first, you need access to the project folder. Type cd AsyncStorage on the terminal. Then you have to run two command lines. The first one is npm install and the next one is npx react-native run-android. It will enable the emulator and the app as well. Consider image 1 for the project output.
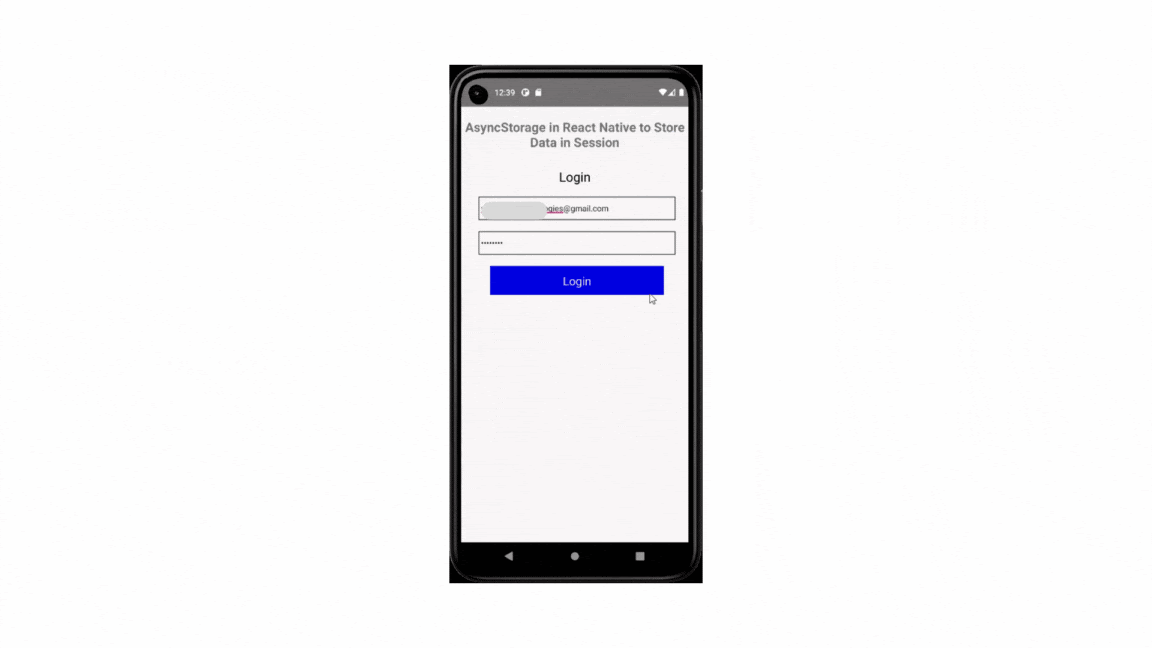
Image 1
Summary
Using the AsynStorage system simplifies project the development process, in a way, that you can store a small volume of data that may be needed during app launches; thereby providing access to data even if the internet status is offline. It also supports faster load time. As the AsynStorage supports data storage in the local system, you can protect your sensitive credentials while retrieving data.
Getting knowledge about the usage of AsyncStorage in a real React Native app may be more beneficial than acquiring theoretical concepts about Async storage. So, here, is the article to guide your way.

A science graduate who has a keen interest to lean about new technologies and research area. With an experience in the field of data analytics and content writing, she aims to share her knowledge among passionate tech readers.

