How to use Context API in React Native?

Sharing state and passing global variables within the code is easier with React Context API. Also, You don't have to rely on third-party dependencies for managing the state. With the context API, you can easily undertake state management. Let’s understand the concept of Context API more in this article. You will also get a practical application of context API in a real project.
Before getting directly into the Context API, let's understand the concept of Context in React Native app development services.
What is a Context in React?
In a React project, data is shared in a top to down sequence (i.e., from parent component to child component). This is done with props. However, this becomes complicated for some props such as UI theme-based or locale preference, where multiple components are nested within the app.
Context is a method that helps in passing data or sharing values between involved components. With Context, you don't have to pass the prop that you were doing earlier through each level of the chain components.
What is Context API?
Context API is a tool used for state management. When you use the Context API in a React Native project, it generates global variables. Users can access this feature after it has been added to the React 16.3 version.
To use this feature in your app, you just have to import createContext from the native react library. Later on, in the codebase, using createContext() as a function returns a provider and a consumer.
Now, you may be wondering what is a Producer and a Consumer in Context API.
The Provider is referred to as a component, used to pass the created state to the consuming (children) components. It is the parent component that bears the ‘state’ (context) in it and this is also called the “container” of all the generated components. State transfer to the final component is easier with the Provider.
You don't have to depend on props and transfer the created state to every child component to get to the final destination. This way, the context API cancels out the prop drilling method and makes the state management or transferring process much faster.
Now, coming to what is a Consumer in React. The Consumer is another component that executes the state after consuming it. Generally, it consumes the nearest context provided by a Provider.
What was the process of managing state before Context API came into existence?
Earlier, developers used to consider prop drilling methods. Let me explain with a practical example.
Earlier when they used to build a project. They had to pass the states to the child component or sub-component. They used to conduct this step using props. However, it became difficult for them to follow this step of moving state to child components when they were into building many complex projects involving 20 to 30 components. This became a major challenge in state management.
Here is when Context API came into existence for better management of created states.
While we are covering the concept of Context API, we cannot skip the discussion of whether the Context API will be used in replacement of Redux.
Will Context API be the replacement for Redux?
No, not in the complete sense.
However, if you want to attain two of the following parameters in your project, you should definitely consider Context API over Redux.
- Overhead- With Redux, adding a minor feature to your project will require updating all the related files. However, in React context API, you can access the data binding feature, also it is a one-way mode. You can easily understand the concept and execute your project, thereby making the state-passing process faster.
- Simplicity- With Redux, you have to define every state and manage them, which gets cumbersome to quite an extent.
- Explaining unrelated contexts- Maybe you have missed defining some contexts and want to establish a link to those unrelated states (context), you can easily do this with Context API.
Now, get some practical understanding of Context API implementation.
A reference project of App Login using Context API
Here, we will build an app interface using Context API. This project is about user login and logout.
First, you have to get through the prerequisite learnings.
What is the prerequisites knowledge for the project
The learnings or knowledge that you need to acquire are the method of React Native environment setup and the process of building a simple template.
- For the setup, you have to install software that is commonly required starting with the React Native framework. Also, there are two options of React Native tools that you have to choose from. The choice of tools also makes the setup process different.Since we are using React Native CLI tools, we have to install software like Node.js, Android Studio, and VS code editor. Also, there are other dependencies and software that you have to get for the environment setup. You can check the entire process in the attached article.
- For building the template, you need to follow the below-given steps.
- Create a folder with a specific name. Create this in the C drive. I have considered it as React-Native_project.
- Run cmd from this folder and type
npx react-native init LogIn --version 0.68.1.It will immediately create the template with the name Login in the React-Native_project folder.
As your template is created, install the required libraries.
Installing Axios using npm
The library that you have to get for the current project is Axios. To install it, you have to execute npm install axios in your project terminal.
It is a JS-based library used for node.js and also for different browsers. You can also refer to it as an HTTP client based on the Promise method.
With Axios API, you can conduct HTTP requests and XMLHttpRequests from node.js and supported browsers respectively. It supports client-side data and protects it from XSRF (a Request Forgery).
It is used for a multitude of tasks. Since we are into covering the topic of Context API, we won't focus much on the usage of the Axios library except for the fact that you have to install Axios for your project.
Codebase for the project
You can find this entire project in the attached GitHub repository.
About.js file
1
2
3
import { Button, StyleSheet, Text, View ,TouchableOpacity} from 'react-native'
import React,{useContext} from 'react'
import { ContextApi } from './App'
Here, the components that you have to import are Button, StyleSheet, Text, View, and TouchableOpacity. It also imports the React library and useContext.
Lastly, the code imports ContextApi components from the App file.
The components imported from React Native will be used to create a user interface, while the React library will be used to create React components and the ContextApi will be used to access data from the App file.
1
2
3
4
5
6
const About = () => {
  const response=useContext(ContextApi)

  const logout=()=>{
    response.setData(null)
  }
This code creates a React component About. It uses ContextApito get a response. It also introduces a logout function that sets the response data to null when the logout button is clicked.
The component About will render a heading and a logout button.
1
2
3
4
5
6
7
8
9
10
11
  return (

  <View>
  <TouchableOpacity onPress={()=>logout()} style={styles.logout_box}>
   <Text style={styles.logout_text}>LogOut</Text>

  </TouchableOpacity>
</View>
  )
}
export default About
This code creates a View component with a TouchableOpacity component wrapped inside it. The TouchableOpacity component has an onPress event handler that will call the logout() function when it is pressed.
The TouchableOpacity component also has two style props, styles.logout_box, and styles.logout_text, which will apply styling to the component. Finally, the code exports the About component.
1
2
3
4
5
6
7
8
9
10
11
12
const styles = StyleSheet.create({
  logout_box:{
      alignSelf:'center',
      marginTop:380
  },
  logout_text:
  {
    color:'#000000',
    fontSize:22,

  }
})
This code creates a style sheet for a logout box and logout text.
The logout box is aligned to the center of the page and has a margin of 380 pixels from the top whereas the logout text is set to black and the font size is set to 22 pixels.
App.js file
1
2
import { StyleSheet, Text, TextInput, TouchableOpacity, View } from 'react-native'
import React, { createContext, useState } from "react";
This code imports components from the React Native library. The components imported are StyleSheet, Text, TextInput, TouchableOpacity, and View.
The code also imports the React library and createContext along with the useState hook.
The context and useState hook will let you create a stateful component and manage the state of the component.
1
2
3
import axios from 'axios';
import About from './About';
export const ContextApi=createContext()
In the first line, it imports the Axios library. It is used to make HTTP requests.
In the second line, it imports the About component from the file './About'.
In the third line, the code creates a context object called ContextApi using the createContext() function taken from React.
The code uses this context object to pass data between components in a React application.
1
2
3
4
5
6
7
8
9
10
const App = () => {
const [data,setData]=useState(null)
const [email,setEmail]=useState()
const [password,setPassword]=useState()
    const LoginBtn=()=>{
      var data = JSON.stringify({
        "Password": password,
        "Email": email,

      });
This code creates a React component App. It uses the useState hook to build three state variables, data, and emailand password.
It also has a function called LoginBtn which is activated when the user clicks on the Login button. This function sends a POST request to the '/api/login' endpoint with the email and password entered by the user.
The response from the server is then stored in the data state variable.
1
2
3
4
5
6
7
8
9
10
11
12
const url= 'https://*****************************/users/login'
      axios({
        method:'post',
        url:url,
        headers: {
          'Content-Type': 'application/json'
        },
        data :data
      }).then(response=>{
        setData(response.data)
      })
    }
This code syntax makes an API call to the URL provided using the Axios library.
Here, a 'post' request method is used, which means that data is being sent to the URL.
Note that, I have hidden the URL for privacy protocol.
The headers are being set to 'Content-Type': 'application/json', which specifies the type of data (JSON) being sent. The data being sent is stored in the variable 'data'.
Once the request is complete, the response data is stored in the variable 'setData'.
1
2
3
4
5
 return (
    <ContextApi.Provider value={{data,setData}}>
    <View>
   {data==null?<View>
    <Text style={styles.loginText}>Login</Text>
This code uses the Context API to create a login/logout feature.
It uses the ternary operator (?) to check if the data is null.
If the data is null, it will render a view with text that says "Login".
If the data is not null, it will render a view with a text that says "Logout".
The Context API is used to store the data and setData variables, which will be used to determine if the user is logged in or not.
1
2
3
4
5
6
7
8
9
10
11
12
13
14
<TextInput placeholder='Email' style={styles.TextInput} value={email} onChangeText={(prev)=>setEmail(prev)}/>
            <TextInput placeholder='Password' style={styles.TextInput} value={password} onChangeText={(prev)=>setPassword(prev)} secureTextEntry={true}/>
            <TouchableOpacity style={styles.button} onPress={()=>LoginBtn()}>
            <Text style={styles.Login_btn}>Login</Text>
            </TouchableOpacity>
    </View>:<About/>}

  </View>
    </ContextApi.Provider>

  )
}

export default App
The code creates a login form with two text inputs. It will allow the user to enter their email and password.
The TextInput components have placeholder text, styling, and a value that is set to the email and password variables.
The onChangeText prop is an event handler that sets the email and password variables to the value of the text input.
The TouchableOpacity component creates a button with the styling of Login_btn. It displays the text ‘Login’ on the button.
The onPress prop is another event handler that calls the LoginBtn function.
The code also has a ternary operator (:) that renders either the login form or the About component.
Lastly, you have to export the App component so that you can use the entire code designed in this file in the About.js file by importing the App component.
1
2
3
4
5
6
7
8
9
10
11
12
13
14
15
16
17
18
19
20
21
22
23
24
25
const styles = StyleSheet.create({
  loginText:{
    color:'#000000',
    fontSize:22,
    alignSelf:'center',
    marginTop:20
  },TextInput:{
    width:340,
    height:40,
    borderWidth:1,
    borderColor:'#000000',
    marginHorizontal:30,
    marginTop:20
  },button:{
    width:300,
    height:50,
    backgroundColor:'blue',
    marginHorizontal:50,
    marginTop:20,
    alignItems:'center',
    justifyContent:'center'
  },Login_btn:{
    color:'#ffffff',fontSize:20
  }
})
This code syntax designs a style sheet for the login page.
It defines the style for the text, text input, button, and login button.
The loginText is colored with #000000 (black). It has a font size of 22 pixels and is centered with a margin of 20 pixels from the top.
The textInput has a width of 340, a height of 40, a border width of 1, and a black border color. It also has a margin of 20 pixels from the top and 30 pixels from the sides.
The button has a width of 300, a height of 50, a blue background color, and a margin of 20 pixels from the top and 50 pixels from the sides.
The login button has white text and a font size of 20.
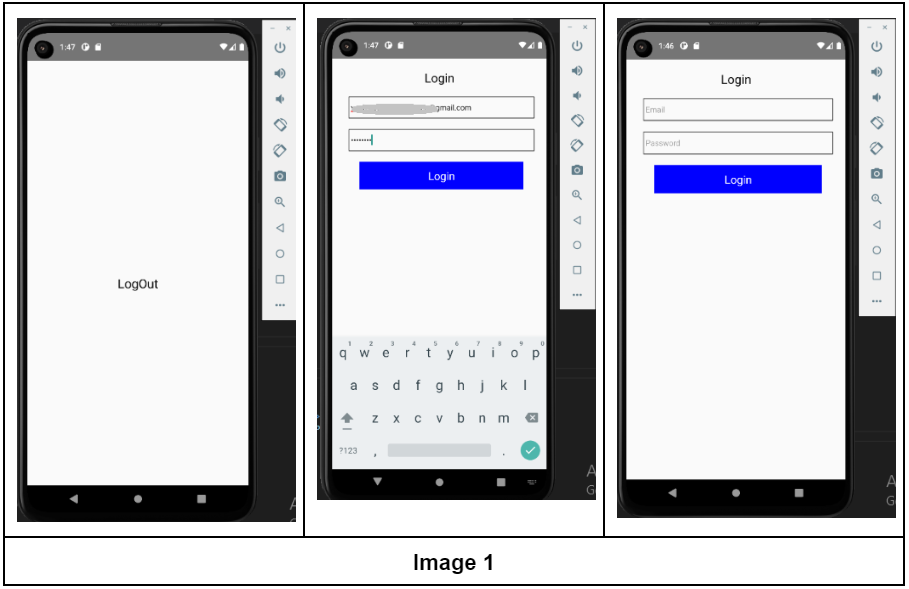
As we have completed the codebase, let's see how the entire app interface will be rendered on the emulator.
The output of the built program on the emulator
This is the section where we can run the program on a device.
So, let's start with it.
- Go to the command prompt on your system
- Type cd Login on the command prompt. This is the template that you created at the start of the project.
- As it directs you to the template file, type npm install. This command will install all the important packages.
- Then pass
npx react-native run-android. It will start the emulator after some time.
To wrap up
Context API is quite a useful tool to manage created states. Not only in a specific React Native project but you can use the tool and the concept of React Context in large projects. It can make the way of passing states or data much easier eliminating the need of using props.
Here, in this tutorial blog, I have undertaken a simple project of using Context API in-app login and logout. Practice the project and get your concepts clear so that you can easily use them in other React projects.

A science graduate who has a keen interest to lean about new technologies and research area. With an experience in the field of data analytics and content writing, she aims to share her knowledge among passionate tech readers.

