How to make a custom video player app using React Native?
Playing a video from an app may be possible with a single click but creating a custom video player may be a complex task. However, being a React Native developer, you know how easier the app development task gets with this cross platform app development framework.
To make you familiar with the process of building a custom video player app, I have brought a detailed blog.
Prior-needed knowledge
Since you need to work with the React Native framework, you have to get all the software required for creating the codebase and running the app on a virtual device. Thus you have to be acquainted with the setup process of React Native environment. Don't worry if you have no idea about the setup process. You can easily follow and learn the steps from the attached link.
Note that, you have to install all the software mentioned under both the Expo and React Native segments.
The other segment in which you have to acquire knowledge is building a React Native app. With this, you can understand the utility of React Native components. Also, you can learn about the process of importing RN components and use them later in the codebase to get desired results. You can visit the attached tutorial blog on ‘How to create and run React Native app on Android phone’.
Third-party React Native package: expo-av
It is the utility of different third-party packages that makes the life of a developer much easier. You may be thinking in what sense? It is because you don't have to create a component completely by yourself. You just need to install the required package and get components from the library. However, you have to use the import statement to use the component in your codebase.
So, here we have used the expo-av package or module useful for Video and Audio playback.
Let's see how you can install the package and add the same to the npm dependencies.
Open the cmd from your project folder and run npx expo install expo-av. This will add the package to your project’s package-lock.json folder.
As you can see from image 1, I have installed expo-av of the 13.0.2 version.
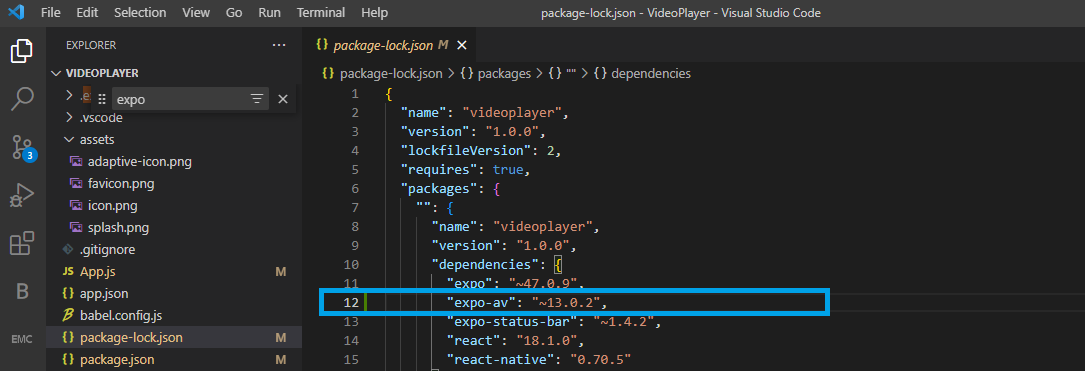
Image 1
As it is done, we will start with framing the codebase in the app.js folder.
How to create the codebase in the App.js folder?
For the complete codebase of this project, you can check the attached GitHub link.
Note that before starting with this codebase, you have to create a basic React Native app and embed the below-given code in its App.js folder.
Start the codebase importing components. Here is the way, how you can execute this.
1
2
3
import * as React from 'react';
import { View, StyleSheet, Button } from 'react-native';
import { Video} from 'expo-av';
The ‘* as React’ syntax is a way of importing the entire library and assigning it to the variable ‘react’. This will let you use the React library in your code.
Also, import the React Native components such as View, Button, and StyleSheet from react-native.
Here, import is the JavaScript ES6 statement. Lastly, you have to use this statement to import the Video component from the expo-av.
Here, the component video is a React component used to play videos in your React Native app.
Now, define a function App to move further in the codebase.
1
2
3
export default function App() {
  const video = React.useRef(null);
  const [status, setStatus] = React.useState({});
The function is using React hook useRef to create a reference to a video element and a state variable called status. As you can see useRef is set as null, which implies that the reference is currently indicating a null state.
The code uses the video reference to access the video element in the DOM, and the status variable to hold information about the video, such as its current playing status.
setStatus is used to update the status of the video.
Now, you have to specify the source of the video. The below-given is the code syntax for executing the same.
1
2
3
4
5
6
7
8
9
10
11
12
13
14
15
return (
    <View style={styles.container}>
      <Video
        ref={video}
        style={styles.video}
        source={{
          uri: "http://commondatastorage.googleapis.com/gtv-videos-bucket/sample/ElephantsDream.mp4",
        }}
        useNativeControls
        resizeMode="contain"
        isLooping
        onPlaybackStatusUpdate={status => setStatus(() => status)}
      />

    </View>
Here, the code uses React Native to render the Video component. The Video component has a specific source http://commondatastorage.googleapis.com/gtv-videos-bucket/sample/ElephantsDream.mp4. You can change the video playing in your app by adding other sources of video files.
Also, the video playback is designed in such a way that the Video component uses native controls and loops when it reaches the end. It is also resized to fit the container.
Here, the function onPlaybackStatusUpdate is considered to update the video status.
Use the StyleSheet component to design the video player app. Start with styling the container.
1
2
3
4
5
6
const styles = StyleSheet.create({
  container: {
    flex: 1,
    justifyContent: 'center',
    backgroundColor: '#ecf0f1',
  },
Here, the style sheet object holds a container with props like flex, justifyContent, and backgroundColor. As you can see, the value of flex is set as 1, which implies that the container will cover all the available space. Its content is justified at the center and the color code #ecf0f1 is used as its background color.
1
2
3
4
5
video: {
    alignSelf: 'center',
    width: 320,
    height: 200,
  },
Here, the code syntax shows how the property video is designed. It uses props alignSelf, a width of 320 pixels and a height of 200 pixels.
The following syntax is focused on designing the button with which the app users will play the video.
1
2
3
4
5
6
 buttons: {
    flexDirection: 'row',
    justifyContent: 'center',
    alignItems: 'center',
  },
});
The codebase formation is successfully done. Let’s see if the app is running properly.
Executing the codebase on the emulator
In this step, you need to run two commands.
However, before this, open the command prompt from your project.
The commands that you have to run in your project terminal are as follows.
npm installnpx react-native run-android.
It may take some time to bundle. After it is done, your video player will start on the emulator. Refer to image 2 for the output on the emulator.
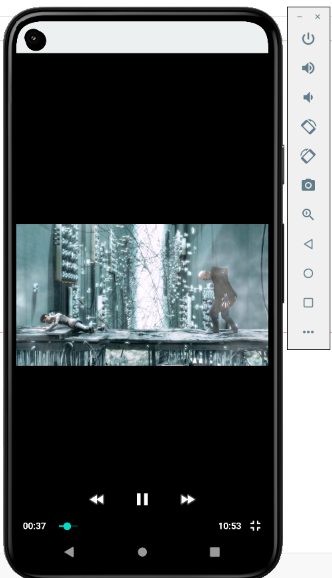
Image 2
It is a scene from the video shown in image 2. You can notice the stop, forward and backward buttons on the emulator screen.
Final Notes
Creating a custom video player app is not that complicated. Isn’t it? All you need to do is install the third-party package expo-av and get started with the codebase. Also, make a key emphasis on the designing part, or else the app won't be rendered on the user’s screen.
These are the key segments that you have to focus on while undertaking this project.

A science graduate who has a keen interest to lean about new technologies and research area. With an experience in the field of data analytics and content writing, she aims to share her knowledge among passionate tech readers.

