How to get Stripe payment interface in your React Native app?

The increasing usage of online payments has swayed the pathway to different online payment apps and payment processing platforms. One of which includes Stripe, largely accepted by merchants. Given the surging demand for Stripe among merchants, a React Native developers can easily integrate the Stripe payment interface with the React Native framework. You don't know how? Then follow the blog to get a detailed knowledge of this.
As you already know about the significance and utility of Stripe Payment gateway, we would not be discussing the same here, in this blog. Let's straight understand the prerequisites context.
Pre-acquired knowledge required
You may be thinking that you need to know a lot about the cross-platform app development framework, React Native. This is not true. Some basic knowledge would work. What is more important is to understand the steps of setting up the RN environment in your system. Since we are using the React Native CLI tool and not the Expo CLI tool to build this platform, you have to only download the software like Node.js, Android Studio, and VS Code editor required for the React Native CLI tool. In the attached blog, you will see a section on the Expo CLI tool and the one on React Native CLI tool. You have to focus on the section of React Native CLI tool while setting up the environment.
The other thing that you should learn is to build a React Native app. You can visit this linked tutorial blog where I clearly explained the step-by-step process of creating a real app. Note that there are two sections on the attached blog tutorial. One is on React Native CLI and the other one is on Expo CLI. As we will be using React Native CLI to build the Stripe payment interface in our React Native app, you need to follow the steps mentioned under the section of React Native CLI tool.
Third-party React Native plugin support
For this current project, you have to install a third-party React Native library named @stripe/stripe-react-native. Here, we have installed @stripe/stripe-react-native of version 0.21.0 based on the compatibility of the React Native version we are working on.
To get this library, you need to run the following command on the project terminal.
npm i @stripe/stripe-react-native.
What exactly you are doing with this library is using the SDKs of @stripe/stripe-react-native to create a useful payment interface in your React Native app. This SDK is compatible with both native iOS and Android apps.
Most importantly, this is an open-source library, which means that you can build your project by taking resources from the projects of experienced developers.
Now you have to install another native Node library, stripe. It is an official library that you can use to access the API of Stripe and ensure its accessibility from your built server. This is from the server side and the command line for its installation is
npm install stripe --save
Note that you have to run this command in your app terminal.
Going forward with the Client-side context, you need to get an RN SDK of Stripe. For this, you have to consider the npm command. Open your project directory and create a terminal. Run the following command in it.
npm install @stripe/stripe-react-native
Now we will see the number of .js files that you need to create in your project. .js files are important as you have to store the codebase for the project. Here, the main files that you need to create are Stripe.js, PaymentScreen.js and App.js.
Let’s see how you can create these and what are the codebase in each of these files.
Framing the codebase
You can find the entire project in the attached GitHub repository.
In Stripe.js
First, open the code editor from your project and create a folder named ‘Payments’.
- Here, in this folder, you have to create a file named Stripe. It should be in the format of .js.
- Then, you have to add the following codebase as I proceed.
- You have to start with importing the components.
- Apart from the native third-party React Native libraries, you have to import a component from a folder of the current project.
- You will find the initial lines of Stripe.js files as follows.
1
2
3
import { StripeProvider } from '@stripe/stripe-react-native';
import React from 'react';
import PaymentScreen from '../PaymentScreen';- You have to take the components
StripeProviderandReactfrom@stripe/stripe-react-nativeand react respectively. However, take thePaymentScreenfrom./PaymentScreen. - The concept of importing a component from a different folder of the same project is that you have to create the component in the folder from which you are calling the component. Later on, you need to export the same component to make it available for use in other files.
We will learn how you can create the component PaymentScreen in the PaymentScreen.js folder.
- Now, you have to initialize the Stripe interface within the created React Native app. You need to use the
StripeProvidercomponent. Let’s see how you can do this.
1
2
3
4
5
6
7
8
9
10
11
12
13
export default function Stripe({route}) {

  return (
    <StripeProvider
      publishableKey="hide the key (get it from the Publishable type"

      merchantIdentifier="merchant.identifier"
      urlScheme="your-url-scheme"
    >
   <PaymentScreen />
    </StripeProvider>
  );
}
The StripeProvider component is being passed a publishableKey, a merchantIdentifier, and a urlScheme. The component is used to create a payment screen for users so that users can enter their credit card information.
The merchantIdentifier is specifically for Apple Pay. This is required if you want to use Apple Pay in your app. The urlScheme is used for bank redirects and 3D secure.
The PaymentScreen component is then rendered inside the StripeProvider component.
- Note that, in the above code syntax, I have linked a site from where you can get the
publishableKey. - Here, you are using the API key only for the purpose of testing. Consider live mode keys at the time of publishing the app.
You are done with creating the Stripe.js file, let’s move forward. Ensure that you have saved the complete process.
In the PaymentScreen.js
Here, you have to create the PaymentScreen component and call it in the Stripe.js file.
- Like other
.jsfiles, start creating the file and importing the relevant components. Following is the code syntax you need to consider.
1
2
3
4
5
6
7
8
9
10
11
12
13
14
15
16
17
18
19
import {
  CardField,
  useStripe,
  CardFieldInput,
  PaymentMethod,
  PaymentIntent,
} from '@stripe/stripe-react-native';

import React from 'react';
import {
  Button,
  Text,
  View,
  StyleSheet,
  TouchableOpacity,
  Image,
  Modal,
  Dimensions,
} from 'react-native';
As you can see, you have to import components from the Stripe React Native library. The components are CardField, useStripe, CardFieldInput, PaymentMethod, and PaymentIntent. These components are used to build a payment form and process payments using the Stripe payment platform.
Following this, you have to import some other core React Native components Button, Text, View, StyleSheet, TouchableOpacity, Image, Modal, and Dimensions. These will be from the react-native library.
- Now, you have to define a function named
PaymentScreen. You have to use this to return a View component with aTextcomponent. You can export this functionPaymentScreenin other segments of the code. There are some styling parameters that you have to consider to design both the text element and the view element. Given below is the code syntax.
1
2
3
4
5
6
7
8
9
10
11
12
13
14
15
16
17
18
19
20
21
22
23
24
export default function PaymentScreen() {
  return (
    <View style={{flex: 1, backgroundColor: '#ffffff'}}>
      <View>
        <View
          style={{
            flexDirection: 'row',
            alignItems: 'center',
            marginHorizontal: 20,
            marginTop: 10,
          }}>
          <Text
            style={{
              marginHorizontal: 20,
              color: 'black',
              fontSize: 23,
              fontFamily: 'Poppins-Medium',
              fontWeight: '500',
            }}>
            Payment
          </Text>
        </View>
        )
          };
The text component will show the text “Payment”. The styling parameters used to style the text elements are marginHorizontal, color, fontSize, fontFamily, and fontWeight.
For the View component, styling parameters used are flexDirection, alignItems, marginHorizontal and marginTop.
As you can notice, the main container, i.e., the app screen is colored with the code #ffffff and has a f
lex value of 1.
- For the image of credit cards, you have to store some images in the assets folder. Refer to image 1 for the assets folder of the current project. You simply need to download a relevant image and create a folder named assets\card. Then save the image under this folder with any name like Card_both.png. Note that it has to be in png format. This image will be shown on the user’s screen when they will open their Stripe account.
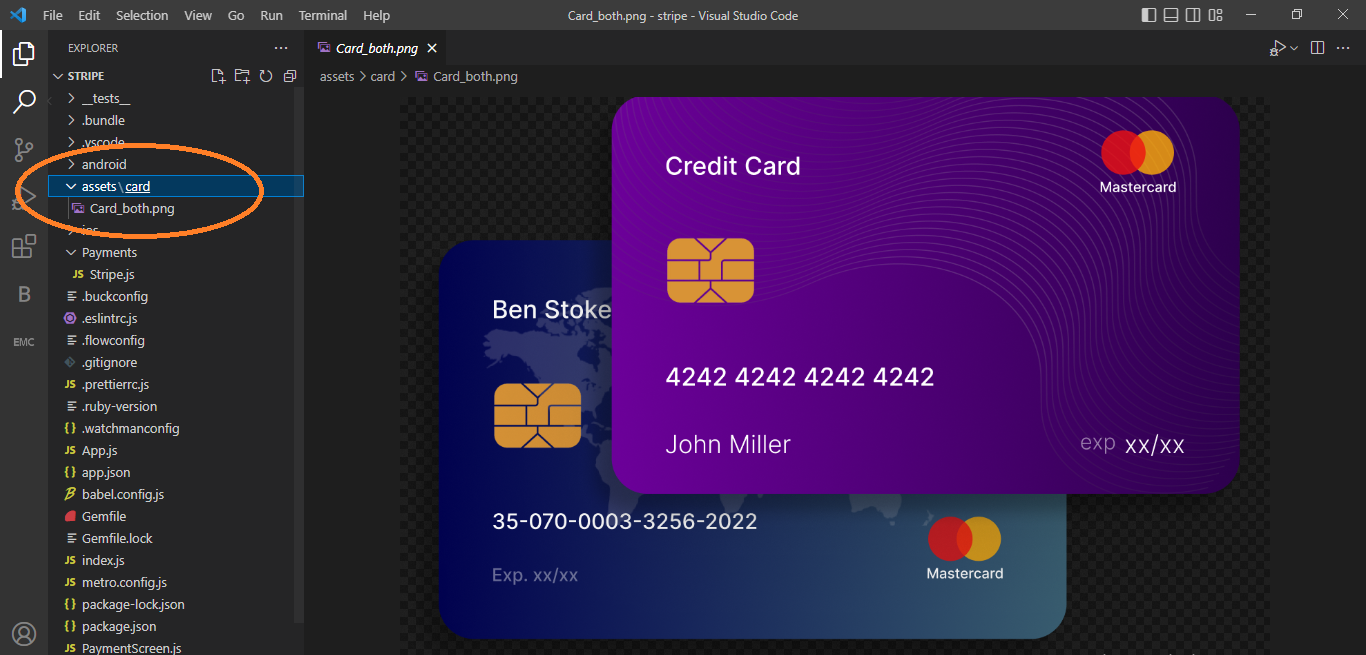
Image 1
- The reason behind explaining the process to create the asset folder is that you have to specify the image source in the
PaymentScreen.jsfolder. Below is the syntax.
1
2
3
4
5
6
7
8
9
<Image
          source={require('./assets/card/Card_both.png')}
          style={{
            alignSelf: 'center',
            width: '100%',
            height: 250,
            marginTop: 20,
          }}
        />
Here, I have called the Image source and also included some styling parameters like alignSelf, width, height, and marginTop.
- Now add another text element
“Payment Amount”. For this use the following syntax.
1
2
3
4
5
6
7
8
9
 <Text
          style={{
            fontSize: 18,
            color: '#565656',
            marginHorizontal: 20,
            marginTop: 20,
          }}>
          Payment Amount
        </Text>
You will see the text ‘Payment Amount’ on the Stripe payment gateway screen.
You also have to use styling objects to design the text. Refer to how I have done.
- For another text “$123” to be displayed on the screen, you have to use the blow code syntax. This is the transactional amount that users want to pay to the merchant.
1
2
3
4
5
6
7
8
9
 <Text
          style={{
            fontSize: 18,
            color: '#000000',
            marginHorizontal: 20,
            marginTop: 20,
          }}>
          $123
</Text>- For using the CardField, we have to use the below-shown syntax.
1
2
3
4
5
6
7
8
9
10
11
12
13
14
15
16
17
18
19
20
21
<CardField
          postalCodeEnabled={true}
          placeholders={{
            number: '	',
          }}
          cardStyle={{
            backgroundColor: '#FFFFFF',
            textColor: '#000000',
          }}
          style={{
            width: '100%',
            height: 50,
            marginTop: 30,
          }}
          onCardChange={cardDetails => {
            console.log('cardDetails', cardDetails);
          }}
          onFocus={focusedField => {
            console.log('focusField', focusedField);
          }}
        />
Let’s understand its operations in detail.
This code creates a CardField component. It enables postal code input, sets placeholders for the card number, and sets the background and text color of the card. Also, it sets the width and height of the card to 100% and 50 respectively.
It also sets a callback function and a prop namely, onFocus and onCardChange and respectively. It will log the focusedField and cardDetails respectively when they are called.
The code will print the cardDetails: {placeholders: { number: '4242 4242 4242 4242' } } to the console. It is the basic placeholder value that the user will see on their placeholder. It will change as they input their own card number.
- To create the ‘Pay’ button, you have to use the TouchableOpacity component. Here is how you can create the ‘Pay’ label.
1
2
3
4
5
6
7
8
9
10
11
12
13
14
15
16
17
<TouchableOpacity
          style={{
            backgroundColor: '#233B08',
            width: 260,
            height: 48,
            justifyContent: 'center',
            alignItems: 'center',
            alignSelf: 'center',
            borderRadius: 30,
            marginTop: 20,
          }}>
          <Text style={{color: '#ffffff'}}>Pay</Text>
        </TouchableOpacity>
      </View>
    </View>
  );
}
The button has a background color of #233B08, a width of 260, a height of 48, and a border radius of 30. The text inside the button is white. The button is also centered and has a margin of 20 pixels from the top.
- You have to use the StyleSheet component to make a style object named RedioBox. As you can see, I have used this style object to set the width of the component to the width of the screen minus 65, the height to 196, the background color to white, and the margin to 35 horizontally and 230 vertically. Also, sets the border radius to 15, the shadow opacity to 0.25, the shadow radius to 3.5, and the elevation to 10. Consider the following syntax for creating this style object.
1
2
3
4
5
6
7
8
9
10
11
12
13
const styles = StyleSheet.create({
  RedioBox: {
    width: Dimensions.get('screen').width - 65,
    height: 196,
    backgroundColor: '#ffffff',
    marginHorizontal: 35,
    borderRadius: 15,
    marginVertical: 230,
    shadowOpacity: 0.25,
    shadowRadius: 3.5,
    elevation: 10,
  },
});
In the App.js
This is the main file of the current project. It is because the operations executed in this file will be displayed on the app screen.
- Let’s understand the codebase.
1
2
3
import { StyleSheet, Text, View } from 'react-native'
import React from 'react'
import Stripe from './Payments/Stripe'
Apart from the core React Native components StyleSheet, View, Text, and React, you have to import Stripe. Unlike the other components that we have taken from native React Native libraries, You have to take the Stripe component from the Stripe.js file.
- Now, with the line
const App = () => {, introduce a React component named App. - With the use of a JS library, return a
Viewcomponent. Moving forward, wrap the Stripe component with the<View></View>component. This way, you can reindeer the Stripe component inside the View component. The following snippet shows how you can do this.
1
2
3
4
5
return (
    <View>
    <Stripe/>
    </View>
)- You cannot complete the codebase without the
exportstatement. - Add
export default Appto export the App component. This is how you can import the App component and use it in different files. Also, this is practiced in every JavaScript project to share code syntax between multiple files.
How to execute the project on the emulator?
To run the project, you have to pass two commands on your project terminal.
- npm install
- npx react-native run-android
Wait till the complete bundling is done. As your emulator starts, you will see your app screen on the emulator. Refer to image 2 for the final output.
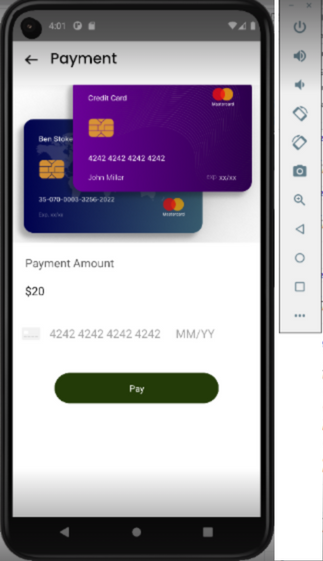
Image 2
As you can see, it has all the text elements and buttons that we have created in three different files.
Final words
If you are a beginner in using React Native framework, the steps may seem to be complicated for you but as you take small steps and learn the process, you will get the hang of it. Consider the following points as the key tasks for the project and start working on them.
- Set up a React Native environment.
- Learn small React Native app-building steps
- Open your code editor and start making three different files: Stripe.js, PaymentScreen.js, and App.js.
- The code starts by declaring a function called onCardChange.
- This function is passed the cardDetails object and will be executed when that object changes.
- The code then declares an event listener for the onFocus event, which will execute its callback whenever the focusedField property of this component changes.
- onCardChange={(cardDetails) => { console.log('cardDetails', cardDetails); } } onFocus={(focusedField) => { console.log('focusField', focusedField); }}
- The code is used to log the card details when a user clicks on the "Change Card" button.
- onCardChange={(cardDetails) => { console.log('cardDetails', cardDetails); }}

A science graduate who has a keen interest to lean about new technologies and research area. With an experience in the field of data analytics and content writing, she aims to share her knowledge among passionate tech readers.

