How to get custom fonts in React Native app?

While designing the app interface, font style plays a crucial part. Keeping default fonts every time will make your app interface boring. With React Native, you can deal with this issue and custom fonts as per your preference.
Note that, if you are not customizing fonts, it will render Roboto fonts for android devices and san Francisco style for iOS devices. However, if you want to customize fonts and are struggling with the same, Hire React Native developers or this tutorial blog can help you.
Prerequisites learnings
- You should know how to set up the React Native environment in your dev system. You need to install Node.js, JDK, an emulator, a Virtual device, and Android studio. Visit this article and check how you can set up the entire React Native environment. Since I am using React Native CLI to build the project, you can skip the section on the Expo CLI in the article.
- Get a basic idea of building a react Native app. Go straight to the React Native CLI section of the article on ‘How to create and run react native app in android phone. Learning about customizing the fonts of the app content without knowing how to build an app will be useless. Right? So get fundamental knowledge on this front and Let's start with the design of the code syntax.
Code syntax- detailed explanation
Check the GitHub repository to get the entire directory of this app. Now let’s start.
import {StyleSheet, Text, View} from 'react-native';
import React from 'react';
- This is a Javascript code that imports the StyleSheet, Text, and View components from the react-native library. It also imports the React library.
- Importing is the method of getting codes and using them from other files.
- You need to import React to use Javascript XML syntax.
const App = () => {
- Here, App is the function with no parameters. It only returns the JSX code.
1
2
3
4
5
 return (
    <View style={styles.container}>
      <Text style={styles.text}>HELLO TANUSREE</Text>
    </View>
);- Here, View and Text components are used to render a text element “HELLO TANUSREE” on the app screen.
- A styling object is used under the View component to style the container holding the text.
};
export default App;
- With this function, you can export the built component: App
1
2
3
4
5
6
const styles = StyleSheet.create({
  container: {
    flex: 1,
    justifyContent: 'center',
    alignItems: 'center',
},- It defines the use of StyleSheet that I have imported from the react-native library.
- Here, styles are the constant variable. It holds an object, which further has two properties namely text and container.
- The first property container has three objects in it. You can consider these three objects (flex, justifyContent, and AlignItems) as the value of the container.
- Flex is set as 1. It implies that all the space available to the container is occupied by the View component. However, you can have integrated numerous components under a parent component. In that case, you can use flexbox to share the available space evenly among the child components.
- justifyContent is set as ‘center’. Here, it implies that all the child components included under the View component are given the center position along the main axis (from the left side to the right).
- alignItems is also set as ‘center’. Any child component integrated into the View component is provided the center position along the ross axis (i.e., from the top side to bottom).
1
2
3
4
5
  text: {
    fontSize: 50,
    fontFamily: 'Marhey-Regular',
  },
});- It is the main part of the codebase, where you will understand the process of customizing fonts.
- Here, the text is the second property of the Container. It has keys and respective values. fontFamily and fontSize are the keys or objects. The value of fontSize is 50 pixels and that of fontFamily is Marhey-Regular.
You might be thinking if you can just add a random font from the web to the fontFamily and customize the fonts. The answer will be NO.
Let’s move further to get a detailed insight.
Adding font library to the root directory of the app
In this section, I will guide you on how you can add the different font style libraries to your app root directory.
- For getting a different font style for the app interface, you have to go to https://fonts.google.com/about and click on the ‘Fonts’ option located at the bottom of the page.
- Search for any fonts you like to add to the page interface. You can go for multiple fonts. For the current project, I have added three different font styles: Marhey-Regular, YatraOne-Regular, and RubikBubbles-Regular.
- So what you need to do is search for the fonts and download its library.
- Extract its file to your local folder. Go to the folder which stores the font style. Copy all the files and paste them into the project’s android/app/src/main/assets/fonts.
- Refer to image 1 to find all my saved font styles.
- Now you can put the name of these fonts in the app.js file under the section fontFamily. Save and see the changes in the emulator.
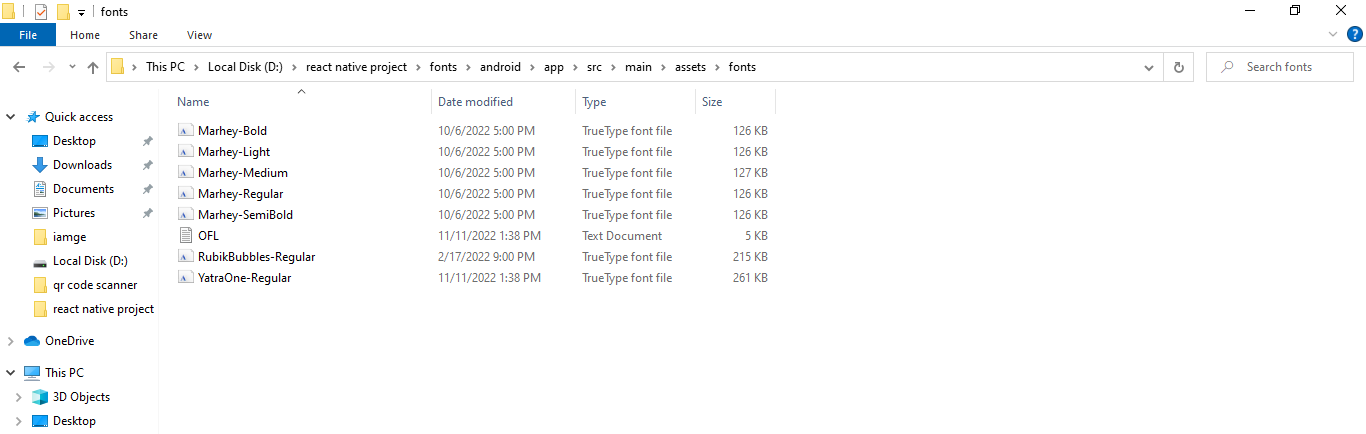
Image 1
Starting the emulator
- Open a new terminal from your project and run the command npm install.
- After all the dependencies are installed, run npx react-native run-android. It will start the emulator.
- You can see the defined texts in the defined font style. Here, I have included the text “HELLO TANUSREE” in Marhey-Regular font style. Refer to image 2 for the output.
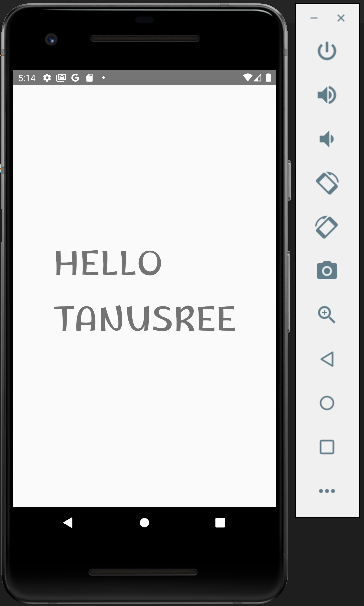
Image 2
- You can change the font style. Refer to image 3 for different output after I change the font style to YatraOne-Regular.

Image 3
- However, you can only change the font style to the fonts you saved in your root directory.
Conclusion
Customizing fonts with React Native framework has become much simpler. The only thing that you need to learn is to build a React Native app. Now a few steps can get you the fonts you like to display.

A science graduate who has a keen interest to lean about new technologies and research area. With an experience in the field of data analytics and content writing, she aims to share her knowledge among passionate tech readers.

