How to embed a Razorpay Payment Integration Interface in React Native apps?

Increasing demand for digital transactions has made users look for a safe app using which they can make hassle-free money transactions. Not only that, but while buying products from an online store, you want to use a payment-oriented app to ensure that the seller receives the money. On this note, you can use a Razorpay payment app to get the transaction done. So, let’s understand how you can build such an app using React Native framework.
Before getting into the key content, we need to understand the prerequisite criteria of this project.
What are the prerequisite specifications?
There are two learnings that you should be acquainted with.
The first one is to understand the steps of getting the React Native environment in your system. Here, you have to download packages, dependencies, and software. If you are not familiar with these set-up procedures, check the blog on ‘How to set up the React Native environment’.
The second one is to learn the significance of the API calling approach. As embedding the Razorpay interface in React Native app is about generating API keys and storing the same in the root directory, you should have your concept clear on the API key and the API calling method.
Here is a blog on ‘How to make a GET request to an API from a React Native app’ where you can learn about the concept of API.
So, now, we will develop app with React Native development services and get into the code syntax for the Razorpay Payment interface. Lastly, we will see the execution process of the created codebase.
How to create a React Native app?
You need to follow the below-given steps and you will land a basic React Native app in no time.
- Go to your home screen on your system and create a folder. You can give it whatever name you like. I have given it React-Native-built-project.
- Go to the folder and run cmd from this folder.
- Now to create a React Native project, you have to run a command:
npx react-native init RazorPay --version 0.68.1. 0.68.1is the version of React Native that you will be using. ‘RazorPay’ in between the command line is the name of the app that I have given to it. If you want to give it a different name, you have to simply substitute this word with some other name. - Wait for some time till the build is complete. Now you will see a folder named RazorPay is created under the folder React-Native-built-project.
- Now, you have to edit the App.js folder from the chosen code editor and frame the entire RazorPay Payment gateway.
- Open your code editor from the created RazorPay project and follow the next section.
Consideration of third-party React Native library
Here, you have to get a third-party Plugin to execute the app-building operations. It is the react-native-razorpay. For installing this library, you need to run the following command on your project terminal.
npm install --save react-native-razorpay
As it is installed, you have to import RazorpayCheckout from react-native-razorpay. We will discuss it later in this tutorial blog.
It is crucial to note that, if you are using the Expo CLI tool, you cannot install this third-party library. For its installation, you have to use the React Native CLI tool. Here, I have considered the same tool to build our current project.
The main reason behind it is that this third-party React Native plugin is based on native SDK and thus it is not compatible with the Expo CLI tool.
Framing the codebase in the App.js file
Get the entire project on the linked GitHub repository. Let’s get into its explanation.
First, you have to consider the import statement to import the relevant React Native components. You can use the following syntax.
1
2
3
import {View, Text, Button} from 'react-native';
import React from 'react';
import RazorpayCheckout from 'react-native-razorpay';
I have imported the View, Button, and Text components from react-native libraryand the most important RazorpayCheckout component from the third-party React Native library react-native-razorpay. Also, you need to import the entire React component from the react library.
1
2
3
4
5
6
7
8
9
10
11
12
13
14
15
16
const App = () => {
  const payNow = () => {
    var options = {
      description: 'Credits towards consultation',
      image: 'https://i.imgur.com/3g7nmJC.png',
      currency: 'INR',
      key: 'rzp_test_ZXKvfH48PobplE', // Your api key
      amount: '101',
      name: 'foo',
      prefill: {
        email: 'void@razorpay.com',
        contact: '9191919191',
        name: 'Razorpay Software',
      },
      theme: {color: '#F37254'},
    };
Here, the above syntax configures the payment gateway. It starts with introducing a function App. It returns an object options which has all the details for the payment gateway.
When the user presses the button “Pay Now” defined below, the code will execute the payNow() function.
You can also consider the options as a variable. It has ten properties: description, currency, image, key, amount, name, prefill, email, contact, and name.
The property key is the API key needed for the payment gateway. You can access the key from your account created on the Razorpay website.
You can activate the API keys from the linked site.
Note that: This is only the test key. You cannot make a real money transaction. For the actual transaction, you have to consider live API keys.
Here, the image is in the dimension of 256*256 pixels and it will specify your product. It will be displayed on the checkout page of the user's RazorPay account.
Currency is in the form of INR (Indian Rupees).
The amount, here, 101 is in the form of paise. It is in the smallest denomination.
The property, name: ‘foo’is the merchant’s name. Users will see the name on the checkout page of their Razorpay payment gateway. They will also receive this name through sms and email along with the other information about their payment.
The other properties are optional. You can either add to your codebase or not.
1
2
3
4
5
6
7
8
9
    RazorpayCheckout.open(options)
      .then(data => {
        // handle success
        alert(`Success: ${data.razorpay_payment_id}`);
      })
      .catch(error => {
        alert(`Error: ${error.code} | ${error.description}`);
      });
  };
It is a function that opens the Razorpay payment gateway. The function considers the object options as an argument and later it returns a promise. If the transaction is successful, the promise resolves to an object with the payment details, otherwise, if it fails, it is rejected with an error object.
The error object has two properties: a code and description. The code is an integer that represents the type of error. The description is a string that explains the error in more detail.
The above syntax has three parameters namely: options, data, and error. These three actually are the objects that are received as parameters. Further, you need to run the catch() function if the promise is rejected. Also, there is a parameter error attached to the catch() function.
Here, the data represents the data that is returned by the promise. It is an object with a property razorpay_payment_id which contains the payment id of the transaction.
1
2
3
4
5
6
7
8
9
10
11
return (
<View style={{flex: 1, justifyContent: 'center', alignItems: 'center'}}>
<Text
style={{
fontSize: 25,
alignSelf: 'center',
marginVertical: 20,
color: '#000000',
}}>
100
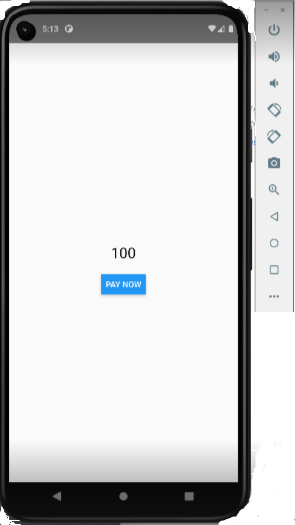
</Text>The syntax renders a view with text inside it. The view has flex: 1, justifyContent: 'center', alignItems: 'center' which means the view will cover all the space available to it and center the items or their children.
Here, ‘100’ is used as the text element. The text element is styled with a specific font size of 25, center alignment, and 20 as its vertical margin.
Lastly, you have to add a Button and export the App function. You have to add the following syntax for the Button and the export App.
1
2
3
4
5
6
<Button title="Pay Now" onPress={payNow} />
    </View>
  );
};

export default App;
The Button will have the title “Pay Now”. Also, with the onPress prop, it will call the payNow function and will further open the Razorpay payment gateway.
How can you run the app on a virtual device?
The virtual device is the emulator that you need to activate while setting up the React Native environment. So, if you still have not set up your system, you cannot execute this step.
However, if you have, follow as I proceed.
Open a terminal from your project and run npm install. This will download all the necessary packages. After this command, you need to run npx react-native run-android. After some time, the emulator will start and it will start your app. Refer to image 1 for the first screen of your Razorpay app.
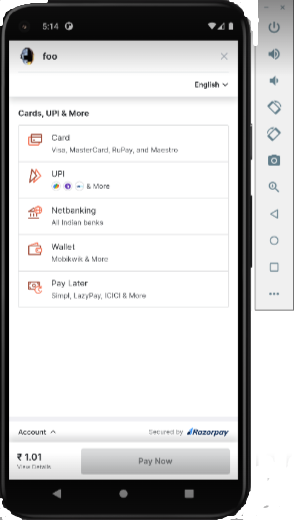
After you click on the blue button ‘PAY NOW’ on your emulator, it will direct you to the next screen. Refer to image 2 for the second screen on the emulator. Since you have used a test key, the payment will not proceed further.
Summary
The key points of this tutorial blog that you need to emphasize are given below.
- Set up the React Native environment.
- Learn about a basic React Native app.
- Learn about the API calling process.
- Understand the use of React Native third-party plugins.
- Learn about the codebase.
- Get familiar with the app testing techniques on the emulator.

A science graduate who has a keen interest to lean about new technologies and research area. With an experience in the field of data analytics and content writing, she aims to share her knowledge among passionate tech readers.

