How to build the UI interface of file access with React Native?

Accessing files or documents from your local drive is a regular task. Right? Have you ever wondered what React native developers take to create such an interface so that users can access their files in one click and upload them wherever needed? Here, I have framed this tutorial to explain the entire process of how you can use React Native to create a ‘TAKE DOCUMENT’ option on your app.
Let’s get a basic understanding of the third-party plugins and prerequisites needed for developing this React Native app with help of React Native development services.
What are the prerequisites needed?
There are some prerequisite criteria that you should meet before starting with the project.
- Set up react native development environment- Check out the tutorial blog to get guided direction on how you can install the required dependencies and packages. Since you will be using React Native CLI, go directly to the section of React Native CLI.
- Get a basic idea of How to create and run a React Native app- Visit the tutorial blog to build a basic React Native app from scratch. This will not only let you become acquainted with the framework but you will gain detailed insight into its components, props, and hooks.
Third-party plugin support
First of all, if you are into software or app development, you will definitely fall in love with the framework of React Native due to its third-party library support. With these libraries installed in your project, you can render important native features which may not be available within the React Native features. You only need to import the components from the packages at the beginning of the code.
You might be thinking about how it is useful. These third-party plugins are useful in a way that it makes your app small in size. You don't have to unnecessarily burden your app with features that may not be required. Using these third-party React Native libraries, you can be selective in integrating only those features that are needed.
You might be thinking why I am into discussing the significance of third-party React Native library support. This is because you will be using a third-party plugin named ‘react-native-document-picker’ to build this project. With this library, you can use a DocumentPicker component in your codebase, which will further render you the option to select any type of file or document. In layman’s terms, this DocumentPicker component will allow you access to your local documents or files.
The other third-party plugin that has been installed in this project includes react-native-camera and react-native-image-crop-picker, react-native-pager-view, react-native-permissions, react-native-safe-area-context, and react-native-screens. However, given the requirement of the project, you only need to use the react-native-document-picker plugin. If you are curious about the devDependencies integrated with my project, you have to go to the package.json folder of the project.
Now, let's start with the explanation of code lines.
Explanation of codelines
Get the entire code in the GitHub repository. For a guided explanation, follow along.
1
2
3
import {Button, StyleSheet, Text, View, Image, Dimensions} from 'react-native';
import React, {useState} from 'react';
import DocumentPicker from 'react-native-document-picker';- Here, I imported six React Native components:
Button, StyleSheet, Text, View, Image,andDimensionsfrom ‘react-native’.
You need a Button component to import a Pressable button in your app. The StyleSheet component will be used for styling the page and the clickable button. You use the Text component to get a text element in the app. Here, you need a View component to integrate the Button Title, file, and image source. I used the Image component to allow users to pick not only documents but also image files if needed. Lastly, you need a Dimension component if you want to make your app responsive to different screens.
- Imported useState hook from react. You need to use this hook to set the state of the considered variable.
- Lastly, the most important React Native component DocumentPicker from react-native-document-picker.
1
2
3
4
5
6
7
8
9
10
export default function File() {
const [file, setFile] = useState();
const doce = async () => {
// DocumentPicker.pickSingle(options)
const res = await DocumentPicker.pick({
type: [DocumentPicker.types.allFiles],
});
console.log(res, '8');
setFile(res);
};- This is a function that returns a component called File.
- The component has a state variable called file, which can be changed by calling the function
setFile. - The initial value of the state variable is undefined.
- With const doce = async () => {} a function is called when the button is pressed. It uses the DocumentPicker component to access the local file explorer and lets you select a file.
- Using type: [
DocumentPicker.types.allFiles] you define the type of files that can be accessed with the button created. console.log(res, 8)function is used to print the value of res in the console. You can use res for debugging purposes.setFile()function sets the state of the file to res. The function uses DocumentPicker to pick a document from the device and then set it as the state of the file.
1
2
3
4
5
6
7
8
9
10
11
12
13
14
console.log(file, '12');
  return (
    <View>
      <Button title="Take Document" onPress={() => doce()} />
      {file && (
        <Image
          source={{uri: file[0].uri}}
          style={{width: 100, height: 100, borderRadius: 50}}
        />
      )}
    </View>
  );
}
const styles = StyleSheet.create({});console.log()function is used to print the value of the file to the console. You can use this for debugging purposes. Here, the value of the file is a string. It's either "12" or undefined.- I used the
return()function to render View, Button, and Image Component. Here, the Button title displays the text “Take Document”. - The onPress prop is a function that is called when the button is pressed. Here, it will call the function
doce(). onPress{()}function is used to access the file and image source when the user clicks the pressable button.
Navigating the local File folder
Hope that you have understood the use of various props, functions, and components in the codebase, let me now discuss how you can run the application.
- Firstly, open a new project terminal. Run npm install to get all the dependencies specified in the
package.jsonfolder. - After it is done, run the command
npx react-native run-android. This will start the emulator on your dev system. - If you want to reload the emulator, you can run
npm start. This will open another terminal of node.js. Type r on it and you will see it starts reloading. - Once the build is successful, you will see the emulator showing a screen similar to image 1. Click on the blue tab and it will direct you to the file explorer as shown in image 2.
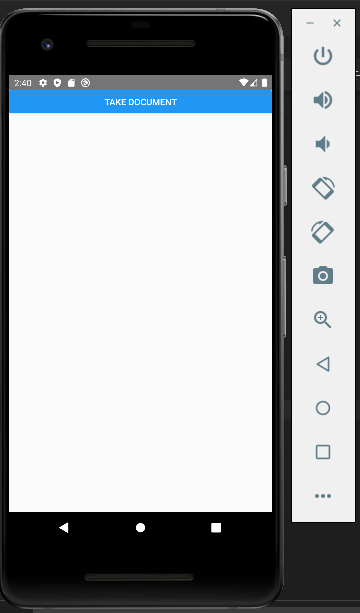
Image 1

Image 2
- You can click on any of the files stored in your local folder.
- Here, as I click on the fourth image (refer to image 2), It will be shown on a new screen as in image 3.
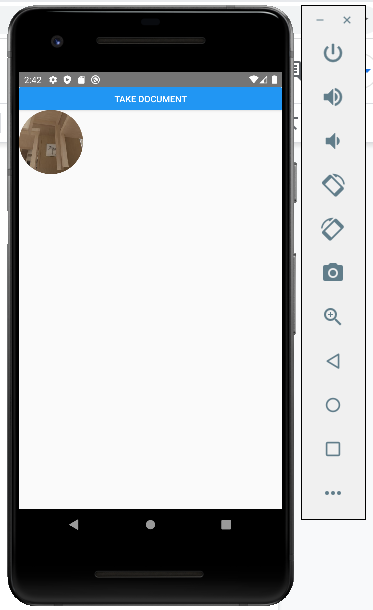
Image 3
Final words
With the less coding formula, React Native has simplified the app development process. You can not only build a basic app but also can add different functionalities such as integrating geolocation, camera access, UPI payment, and others to it. Try this tutorial to add ‘file access’ functionalities in your react native app.

A science graduate who has a keen interest to lean about new technologies and research area. With an experience in the field of data analytics and content writing, she aims to share her knowledge among passionate tech readers.

