How to build an image picker using React Native

While setting profile pictures or cover photos to your social media account, you might have seen an option to choose photos from the gallery. This is what an image picker does. An app also uses image picker functionality when the user wants to share their photos with others. This article will guide you through the process of building an image picker for your app. You can also find the entire codebase @Github.
React Native dependencies- image picker
Designing an image picker can be a major issue because of its undetected errors. React Native development services and the dependencies that you can get into your project have made the task much easier.
Here, I have installed react-native-image-crop-picker and react-native-community/geolocation, which you can find in the package.json folder. Apart from the image-picking option, the dependency react-native-image-crop-picker can allow you to crop the selected image easily. It supports video, multiple images, and configurable compression. For this project, I have used react-native-image-crop-picker of version 0.37.3.
On the other hand, the package react-native-community/geolocation activates the geolocation operation in the app’s background. You may find issues in configuring this package if you are using a react native version of 0.59 or much lower. However, if you are using an advanced version, the auto-linking option of React Native will automate the configuration.
If you are done with installing all the required dependencies, let’s get into the codebase, which you will find in the App.js folder.
Prerequisites to be attained
- You need to set up your development system. By this, I mean that you have to install Android Studio, Node.js, React Native CLI, JDK, a virtual device, or an emulator. Check this article if you want a step-by-step process about how to set up the React Native development environment. For this project, I am using React Native CLI. Kindly consider the section of React Native CLI and not the Expo CLI.
- Get a basic idea of how to build a generic React Native app. For this, check this article.
Building React Native image picker app
Apart from the code lines, I will provide you with a detailed explanation to ensure that you are clear with the components, props, hooks, and states used.
Code snippets and explanation
1
2
3
import { Button, StyleSheet, Text, View, Image } from 'react-native'
import React,{useState,useEffect} from 'react'
import ImagePicker from 'react-native-image-crop-picker';- It imports Button, StyleSheet, Text, View, and Image components from React Native.
- It uses useState to incorporate a state variable “selectedImage”.
- The code uses useEffect to call an effect function. With this, you can change the state of selectedImage.
- Also, it imports ImagePicker from react-native-image-crop-picker.
1
2
3
4
5
6
7
8
9
10
11
12
13
14
navigator.geolocation = require('@react-native-community/geolocation');
const App = () => {
  const [img,setImg]=useState()
  const Handle=()=>{
    ImagePicker.openPicker({
      width: 300,
      height: 400,
      cropping: true
    }).then(image => {

      setImg(image)
    });

}- To activate the geolocation in the background, I used
navigator.geolocation = require('@react-native-community/geolocation'); - The code defines a state variable img and uses the function useState() to design the ImagePicker.
- It also defines a Handle function that will allow you to open the ImagePicker on calling.
- On calling the Handle function, ImagePicker opens up. Here the image will be displayed in width= 300, height=400, and the option of cropping as true.
- After you select an image from your local folder,
setImg()is used to save the image in the state variableimg.
1
2
3
4
5
6
 const cam=async()=>{
 const img=  await ImagePicker.openPicker({
      multiple: true
    })
    console.log(img,'21')
}- It creates a new async function called cam to take a callback as its parameter.
- This is done by using the
async()=>{...}syntax. - Here, the code snippets are designed to open the ImagePicker and choose an image.
1
2
3
4
5
6
7
8
9
10
11
12
13
14
15
16
17
  return (
    <View>
    { img &&
      <Image source={{uri:img.path}} style={styles.img}/>
    }

     <View style={styles.oneImage}>
     <Button title='take one Image' onPress={()=>{Handle()}}/>
     </View>
      <View>

</View>


    </View>
  )
}
export default App
- The code renders an Image and a Button component.
- The button has an onPress function which will be called when the user presses it.
- The title of the Button will show 'take one Image'. It is done with
<Button title='take one Image' onPress={()=>{Handle()}}/> - export default App implies that the code snippet is stored in the App.js folder of the project.
1
2
3
4
5
6
7
8
9
10
11
12
const styles = StyleSheet.create({
  oneImage:{
    marginVertical:20,
    width:200,
    height:35,
    marginHorizontal:100
  },img:{width:200,
    height:200,
    borderRadius:50,
    marginVertical:10,
    marginHorizontal:100}
})- The code here creates a
StyleSheetobject with two styles, one for the oneImage and one for the img tag. - For the
oneImage{}, the vertical margin is set as 20 pixels, width is 200 pixels, the height is 35 pixels and the horizontal margin is set as 100 pixels. - For the img tag, the horizontal margin is set as 100 pixels, the vertical margin is set as 10 pixels, the border of the radius is 50 pixels, height and width both are 200 pixels.
Running the image picker app on the emulator
Running an app is the most crucial task to ensure the build's performance. Here, I will use an emulator to guide you through the steps of testing the image picker app.
- Open the command prompt from your project and run
npm install. This will allow you to download all the required packages and related dependencies. - After the dependencies are installed, run the command
npx react-native run-androidand wait for some time till the emulator starts. - You will be directed to the following screen. Follow along once the bundling is done.

Image 1
- Click on ‘TAKE ONE IMAGE’. Here, If you don't have any images saved in your gallery folder, you can directly download the image from google on the emulator.
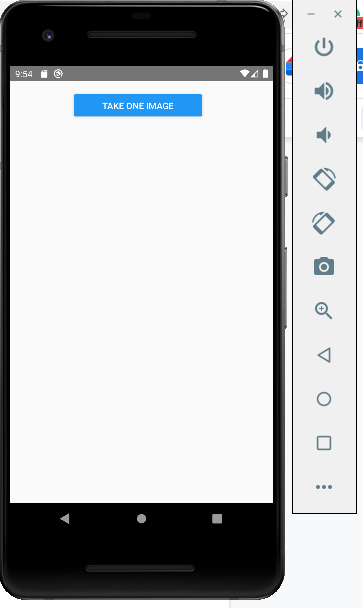
Image 2
- To access google chrome web, you have to sign in to the chrome using your email id and password.
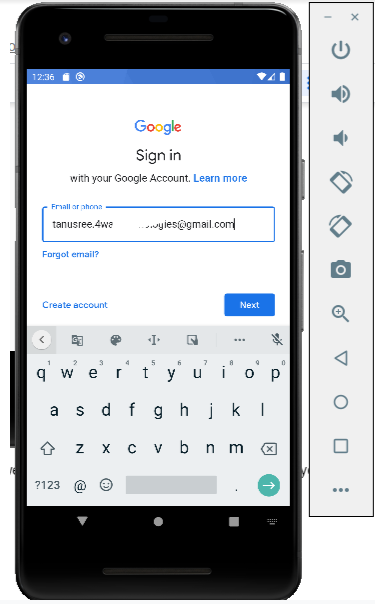
Image 3
- Here, as I want to download a dog’s image to my gallery folder, I will simply type ‘dog image download’ on the web search of the emulator and click on the ‘free download’ option. Refer to the marked section in the below image.
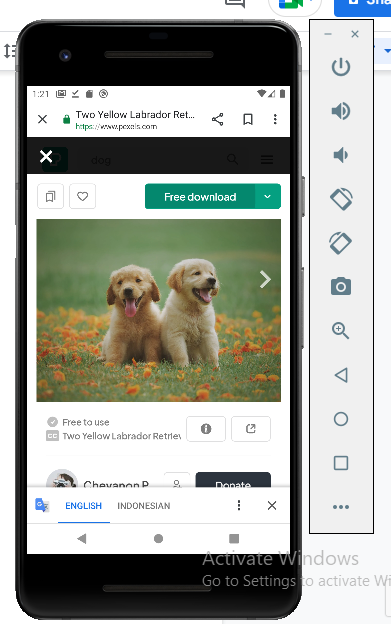
Image 4
- You can find the image in the ‘files’ folder. Refer to the below-given image for finding the saved image.
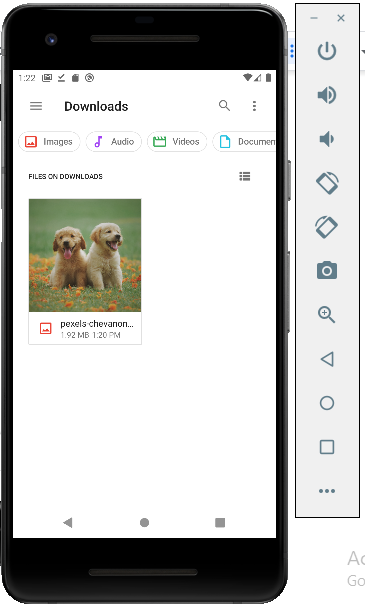
Image 5
- After downloading the image, you may face issues while running the app. In that case, close all the emulators and command prompt. Again open the cmd from your project folder and
run npx react-native run-android. It will take some time but will eventually open up the emulator. Click on ‘TAKE ONE IMAGE’ on the emulator to go to the folder where you saved the image. - Select the image and it will take you to a screen where you can resize the app. Refer to image 6.
- It is similar to what you do while setting your profile picture on Instagram, Facebook, or WhatsApp. After you are done, click on the ‘tick’ option in the top right-hand side. Consider image 6.
- And you are done with the image-picking task. Refer to mage 7.
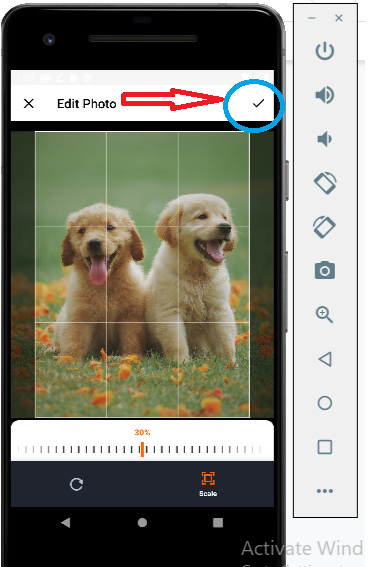
Image 6
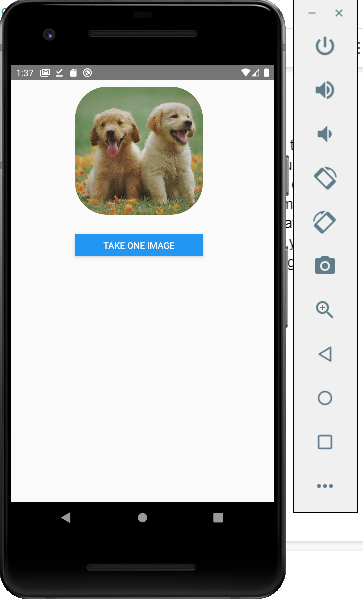
Image 7
Summary
I extended my knowledge to make the process of building an image-picking app easier. If you have not gone through the steps, look at the guided steps for a detailed explanation. With the use of the package react-native-image-crop-picker, the task has become more simplified. Also, get an idea of the use of React Native components: Button, StyleSheet, Text, View, and Image in a project.

A science graduate who has a keen interest to lean about new technologies and research area. With an experience in the field of data analytics and content writing, she aims to share her knowledge among passionate tech readers.

