A Beginner’s Guide: Building Calling Apps with React Native
Every phone has a calling feature embedded in an in-built Phone or calling app. As you know, it lets users make or receive video or audio calls. On every phone device, such apps have their unique user interface for placing calls. Experts of React Native app development company easily build a functional calling app. It is due to the flexibility of the framework they use. So, if you also want to get the expertise and create a calling app, this article is for you. Whether you are an experienced developer or a curious learner, this article will take you through the procedure of building your calling app using React Native.
We will start the project with some conduct you need to perform before designing the codebase.
Considering the Project’s Prerequisites
The Environment Setup
For any framework you use, you have to first set up the environment. As we are using the popular JavaScript-based open-source framework, React Native, you have to proceed accordingly.
If you have already installed the relevant SDK and software in your system, you don’t need to repeat this step and can move forward with the next step. However, if you have not, then follow as I suggest. Note that this environment setup steps are for Windows users and not for Mac users. For those using Mac OS, the approach may vary. You can check the linked article for a detailed understanding of the React Native Environment setup on Windows, Mac, and Linux.
For the current project, we will consider Expo CLI and not React Native CLI. Get in-depth learning on the difference between Expo CLI and React Native CLI from the attached article. So, you have to install npm and Node.js. You can get the software from their official website. Make sure you install the latest version of Node.js and checklist the npm option. Install the Expo CLI globally on your dev system.
To install the Expo CLI, open a command prompt and run npm install -g expo-cli. Check the version of expo CLI using the command expo --version. Run this command on the command prompt.
You also need to install Git on your system and an IDE such as Visual Code Editor. Visual Code is for writing and editing the project code. If you are using an Android or an iOS device, you have to install the Expo Go app on your phone. It will allow you to run the program on your real mobile device. If you want to run the program on your dev system, install the Android Studio and configure its SDKs.
Congratulations! You have set up the environment.
Creating a Folder for the Project
For every React Native project, you have to create a basic folder. This will be saved in your local system. Follow the below-given steps to build one.
- Consider any folder in which you want to store your project folder.
- Open a terminal from this folder.
- Run the command npx create-expo-app Call on the terminal.
- Click on the enter key and your folder will be built.
Find the folder Call saved in your system.
Third-Party Library Installation
Here, you have to install the 'react-native-phone-call'.
Importing components from the third-party library is one of the flexibility offered by React Native. You don’t have to create the component from scratch. Simply import the component from the open-source third-party library. However, before that, you have to install the library.
To get the library, open a terminal from your project folder and pass npm install react-native-phone-call. This library acts as a wrapper letting users make calls in React Native. It uses a basic API and initiates a phone call by triggering the native dialer UI of the phone.
Let’s see how we can use the component from this library and complete the codebase.
Building the Codebase
For the source code, visit the linked GitHub repository. If you want to learn the basics of the project’s codebase, follow along.
1
2
3
import React, { useState } from 'react';
import {SafeAreaView, StyleSheet, View, Text, TouchableOpacity, TextInput} from 'react-native';
import call from 'react-native-phone-call';
First, the code imports relevant components such as SafeAreaView, StyleSheet, View, Text, TextInput, TouchableOpacity, and call. It also imports React and the hook useState from the native react library.
Later in the codebase, you will use the useState to link the state variable to the functional component.
The call component from the react-native-phone-call will provide a basic phone calling interface in the React Native app.
const App = () => {
const [inputValue, setInputValue] = useState('9999999999');
The App is the functional component. The code uses the useState hook to define a state variable inputValue. Another function named setInputValue is used to update the state variable.
As given in the code snippet, the initial value of the state variable (inputValue) is ‘9999999999’. Here the numerical value is presented as a string data type.
As the inputValue changes, the App will re-render and accept the updated value.
1
2
3
4
5
6
7
8
9
10
11
12
13
14
15
16
 const triggerCall = () => {

    if (inputValue.length != 10) {
      alert('Please insert correct contact number');
      return;
    }
        else {

          const prev = {
            number: inputValue,
            prompt: true,
          };

          call(prev).catch(console.error);
        }
  };
Here, triggerCall is added as a function. It is embedded under the App component.
The function triggerCall checks the length of the inputValue.
As shown, it uses the if/else statement. If inputValue’s value is not equal to 10, then it will show an alert message ‘Please insert correct contact number’. If the number provided by the user is equal to 10, the function introduces an object prev.
This object has two properties: number and prompt. The value of the number and prompt is inputValue and true respectively.
Finally, the call component is called from the third-party library and prev is considered as an argument of the call. In case an error takes place during the call, the catch() function is used to log the error to the console.
1
2
3
4
5
6
7
8
9
10
11
12
13
14
return (
    <SafeAreaView style={styles.container}>
      <View style={styles.container}>
        <Text style={styles.titleText}>
          Example to Make a Phone Call in React Native App
        </Text>
        <Text style={styles.titleTextsmall}>Enter Conatct Number to Call</Text>
        <TextInput
          value={inputValue}
          onChangeText={(inputValue) => setInputValue(inputValue)}
          placeholder={'Enter Conatct Number to Call'}
          keyboardType="numeric"
          style={styles.textInput}
        />
The code uses the return statement to define the app’s UI. The main App component uses the View and SafeAreaView to define the style and the layout of the container.
Two Text components are used inside the container. One of them defines the Heading text ‘Example to Make a Phone Call in React Native App’ and the second Text component displays the text ‘Enter Conatct Number to Call’.
A TextInput value is mentioned as inputValue. It implies that the TextInput will display the current value of the state variable (inputValue).
When the user inputs the phone number, the onChangeText event handler will be called with the inserted value. Here, the setInputValue function will update the state of inputValue to the value added by users.
There is a placeholder added with the text ‘EnterContact Number to Call’ and keyboardType is set as numeric.
Styling objects are used to design the text elements, the container, and the placeholder. It is defined later in the codebase.
1
2
3
4
5
6
7
8
9
10
       <TouchableOpacity
          activeOpacity={0.7}
          style={styles.buttonStyle}
          onPress={triggerCall}>
          <Text style={styles.buttonTextStyle}>Make a Call</Text>
        </TouchableOpacity>
      </View>
    </SafeAreaView>
  );
};
It is the continuing section of the return statement. It has a TouchableOpacity component allowing users to make calls by pressing a button.
The value of activeOpacity is kept at 0.7, which means that on pressing the calling button, the button’s opacity will be 0.7. It is a UX-friendly approach making users informed that the button is pressed. The buttonStyle object is used to design this button.
onPress handler is used to call the function triggerCall whenever users press the button. It will initiate the phone call to the number given by users.
The button has a text element ‘Make a Call’. This text has a definite styling defined by the buttonTextStyle object.
1
2
3
4
5
6
7
8
9
10
11
12
13
14
15
16
17
18
19
20
21
22
23
24
25
26
27
28
29
30
31
32
33
34
35
36
37
38
export default App;

const styles = StyleSheet.create({
  container: {
    flex: 1,
    backgroundColor: 'white',
    padding: 10,
    textAlign: 'center',
  },
  titleText: {
    fontSize: 22,
    textAlign: 'center',
    fontWeight: 'bold',
    marginTop:20
  },
  titleTextsmall: {
    marginVertical: 8,
    fontSize: 16,
  },
  buttonStyle: {
    justifyContent: 'center',
    marginTop: 15,
    padding: 10,
    backgroundColor: '#8ad24e',
  },
  buttonTextStyle: {
    color: '#fff',
    textAlign: 'center',
  },
  textInput: {
    height: 40,
    borderColor: 'gray',
    borderWidth: 1,
    width: '100%',
    paddingHorizontal: 10,
  },
});
It is the CSS section, Here the value of all the styling objects is defined. However, before starting this section, the code exports the main App component. You can play with the value to give a unique look to the calling interface.
Running the Program
Structuring the codebase is not enough. You have to check the accuracy of the project by running it on a device. Here, we will run the Call app on a virtual device or an emulator. So, follow the below-mentioned steps.
- Open a terminal from the code editor. Make sure that the terminal is created from your intended project.
- Then, run npx expo install react-dom react-native-web @expo/webpack-config. It will allow you to run the code on the web server.
- Also, run npx expo start to start the development server.
- After activating the development server from the project terminal, you can also run the app on your mobile device using Expo Go.
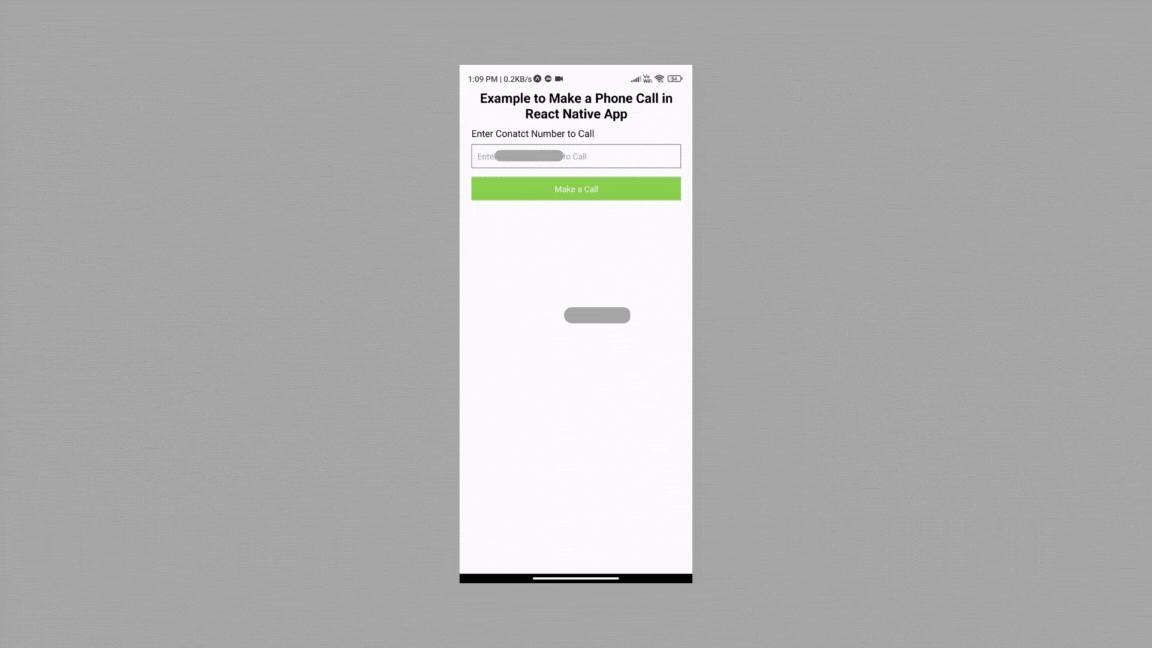
It will take some time to run the project on the emulator. Wait till the time. Consider the following output as the project’s output. You can add the correct phone number and make the call by pressing the green ‘phone-iconed’ button.
Final Words
React Native offers a high-utility framework for creating a cross-platform app. You can also add features like a calling interface taking components from the third-party library. The flexibility of the framework to build apps like phone call applications makes it a popular choice.
Following the guide mentioned in this article, you can easily get started with building a customized phone call app today. Explore new features to add more dynamism to it.

A science graduate who has a keen interest to lean about new technologies and research area. With an experience in the field of data analytics and content writing, she aims to share her knowledge among passionate tech readers.

