Step-by-Step Guide: Implementing a Filter Feature in React Native Search Bar

Looking for some data in your device but unable to search from the huge database? Your device, precisely the app in which you are searching the data may not have the filter option. This is making it difficult to make an easy search. However, there is always a solution.
In this blog post, I bring an easy way to add a filter option that will eliminate all the irrelevant data and show you the exact search result. For this, I use the React Native framework. It is one of the preferable frameworks used by experts of React Native app development company for adding functionalities to the app.
So, let’s see how we can do this.
Build the Environment in Your System
If this is the first project you are trying out with the React Native framework, then you have to set up the React Native environment. Also, you have to make a choice of CLIs you want to use for your project. You can either go for Expo CLI or React Native CLI. There is a difference in size, customizability and ease of usability. Also, the environment setup process is different for each of these CLIs.
As we have used Expo CLI for the present project, set up the environment for the same CLI. Check the further details of the setup from the attached link.
Create a Simple Folder
You will need a folder where you can further store the code, assets and other component files. So, to do this, follow the below-mentioned steps.
- Consider any folder in your system.
- Open the terminal from this folder.
- Pass the command
npm i -global expo-cliand wait till the project folder is built.
Now, as you are done with the folder, install the required libraries.
Install the Libraries
For this project, you only need ‘expo/vector-icons’ this will allow you to add any icons available in this third-party library. So, you don’t have to create the vector icons all by yourself and prioritize optimizing the code.
This is one of the reasons that React Native mobile app development framework is preferable by most experts.
Get Started with the Coding
This is the most vital part. Check the source code in the linked repository. Here, you have to create three component files, namely List.js, SearchBar.js, Home.js and the main file App.js. Also, store the data in the Data.js file.
Coding Section of the List.js
This is the List.js file. Find it under the ‘components’ section of the project. Make this file separately to render the item’s list on the user’s screen and filter them on the basis of users’ search.
Let’s see how you can code for this file.
1
2
3
4
5
6
7
8
import React from "react";
import {
  StyleSheet,
  Text,
  View,
  FlatList,
  SafeAreaView,
} from "react-native";
Firstly, import all the relevant modules or components. You will need ‘React’, StyleSheet, View, Text, FlatList and SafeAreaView.
1
2
3
4
5
6
const Item = ({ name, details }) => (
  <View style={styles.item}>
    <Text style={styles.title}>{name}</Text>
    <Text style={styles.details}>{details}</Text>
  </View>
);
This code specifies the definition of the item in the list form. Here, ‘Item’ is the functional component. It has two props, namely ‘name’ and ‘details’. It renders the ‘View’ component, which further comprises two ‘Text’ components. These ‘Text’ components are used for displaying the name and details of the embedded programming language.
1
2
3
4
5
6
7
8
9
10
11
12
13
14
15
16
17
const List = (props) => {
  const renderItem = ({ item }) => {

    if (props.searchPhrase === "") {
      return <Item name={item.name} details={item.details} />;
    }

    if (item.name.toUpperCase().includes(props.searchPhrase.
    toUpperCase().trim().replace(/\s/g, ""))) {
      return <Item name={item.name} details={item.details} />;
    }

    if (item.details.toUpperCase().includes(props.searchPhrase.
    toUpperCase().trim().replace(/\s/g, ""))) {
      return <Item name={item.name} details={item.details} />;
    }
  };
The ‘List’ is the functional component used in this code. It has a prop named ‘props’. The ‘renderItem’ is another function used to define an object. This object has a property {item} presented as an argument.
The code keeps track of whether the prop ‘searchPhrase’ holds an empty string. If it holds, then the prop returns a component comprising the details and the name. Refer to it as ‘item.details’ and ‘item.name’ respectively.
On the other hand, if the ‘searchProp’ is not empty, it checks whether the ‘item.details or ‘item.name’ has the ‘searchPhrase’ prop. If either of the cases is true, then the prop ‘searchPhrase’ prop returns the component showing the details and name of the user search.
1
2
3
4
5
6
7
8
9
10
11
12
13
14
15
16
 return (
    <SafeAreaView style={styles.list__container}>
      <View
        onStartShouldSetResponder={() => {
          props.setClicked(false);
        }}
      >
        <FlatList
          data={props.data}
          renderItem={renderItem}
          keyExtractor={(item) => item.id}
        />
      </View>
    </SafeAreaView>
  );
};
The code returns a component ‘SafeAreaView’ with a ‘View’ component embedded inside it. This View container holds the ‘onStartShouldSetResponder’ function. When the stat is clicked, ‘onStartShouldSetResponder’ sets it to false.
The code also uses a ‘FlatList’ component. It has three props, namely ‘renderItem’. ‘keyExtractor’ and ‘data’. The ‘data’ comprises the array of list items. The ‘renderItem’uses a function to render each of the items. Lastly, the ‘keyExtractor’ uses a function to get the ‘id’ property from the Data.js file.
As you move forward, export the functional component ‘List’ and use styling elements. Get the source code of the file in the repository.
Storing Search Data in the Data.js File
1
2
3
4
5
6
export default [
  {
    id: "1",
    name: "JavaScript",
    details: "Web Dev, Game Dev, Mobile Apps",
  },
The code exports an array of objects comprising data about different programming languages.
The `export default` syntax assures the availability of this array in other modules. We can import it and use it further.
It has 9 objects in this array. Each object has specific ‘id’, ‘name’ and ‘details’. For the detailed segment of the Data.js, visit the attached repository.
Coding Segment of App.js
1
2
3
4
5
6
7
8
9
10
11
12
13
14
15
import React from 'react';
import { StyleSheet, Text, View } from 'react-native';
import Home from './screens/Home';

export default function App() {
  return (
    <View style={styles.root}>
      <Home />
    </View>
  );
}

const styles = StyleSheet.create({

});
Here, the code frames the basic structure of the app. Initially, it uses the ‘import’ statement to import the relevant modules in the project.
‘React’ is the key library imported for building React components. ‘Text’, ‘View’ and ‘StyleSheet 'components are imported for displaying text, creating a view and defining styles respectively. Lastly, the ‘Home’ component is imported from another file ‘./screens/Home’ of the current project.
The functional ‘App’ component defines the entry point of the project. It specifies the content and the structure of the app’s UI. The ‘App’ returns a ‘View’ element with a ‘style’ prop ‘styles.root’.
Further, the ‘View’ component renders the ‘<Home />’ as the child component.
‘StyleSheet.create()’ defines the app's style. Add further style elements inside the curly {} braces.
How to Execute the Program or Code?
This is the final step of the project. Here, you will check how the app displays on either a real device or the emulator. If you want to run the app on your mobile Android device, install the Expo Go app and scan the QR code from the Expo Go app.
Where would you find the QR code? You will locate the code after you run the project on the terminal and for this, pass expo start on the project terminal.
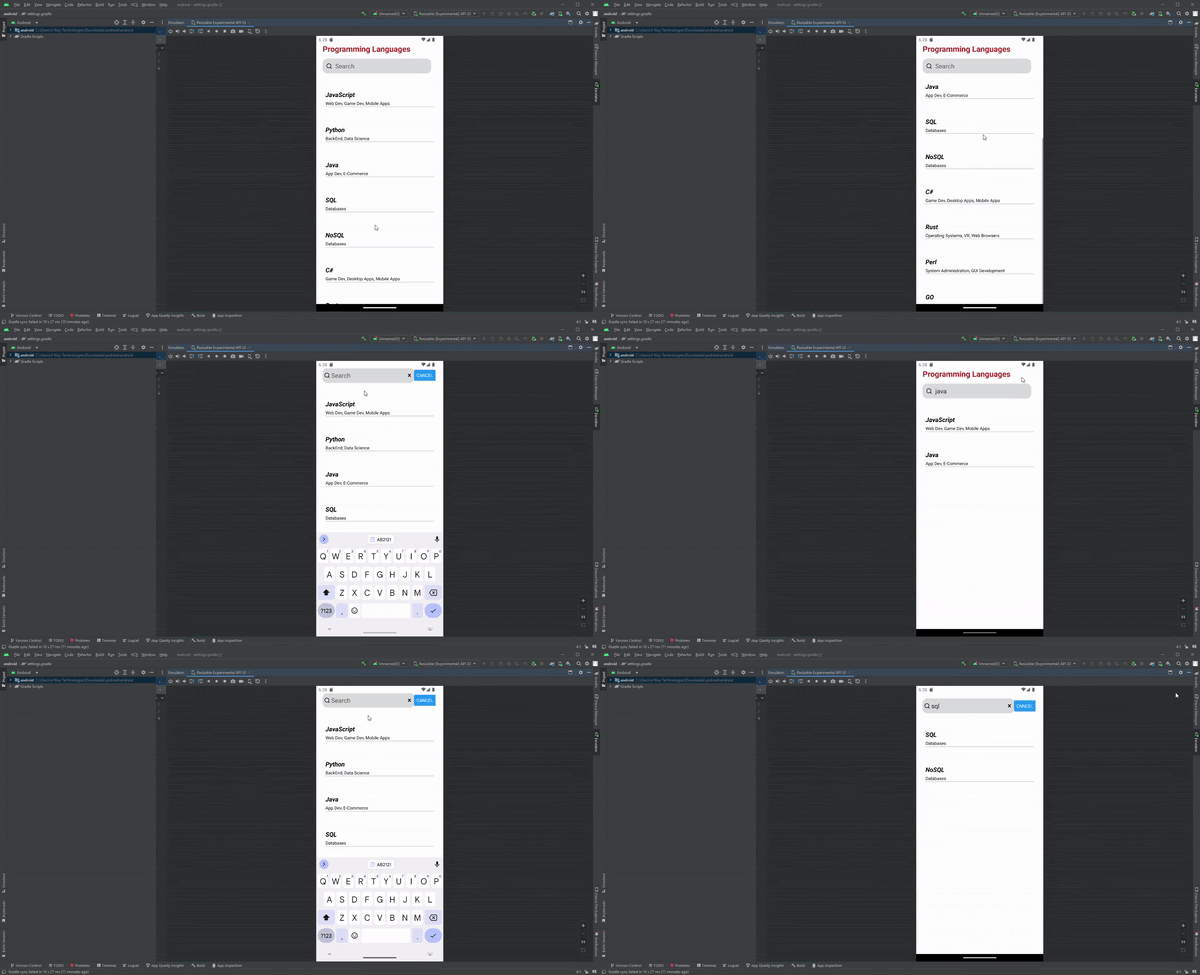
To run the app on the emulator, pass the same command expo start on the same terminal and wait. Here is the project output.

Locate the search bar, search button and all the data of the programming languages displayed in the app interface. You can choose any of the programming languages.
Final Notes
React Native is a popular framework among mobile developers who want to build multi-functionality apps with less effort. The current project is one of the excellent instances to validate this fact. Also, note when you are creating a project, make sure to finally run and test the app to address any glitches in the app.
So, without wasting, get started with creating a filter-based search app with React Native framework.

A science graduate who has a keen interest to lean about new technologies and research area. With an experience in the field of data analytics and content writing, she aims to share her knowledge among passionate tech readers.