Simplifying React Native Colors Selection: Integrating Color Wheels for Intuitive Design

When you are building a program or an app, ‘intuitive design’ is the most vital element in the digital landscape. It is to create a visually attractive and engaging user experience. One major aspect of creating such an experience is the right choice of colors. Adding this functionality in your project may be difficult but React native app development company simplifies the process through the react native framework.
Let's see the process in detail.
If you use a dull color for your interface, would you think it can engage your users? No, right? With React Native, a popular cross-platform mobile app development framework, you can simplify the color selection process by incorporating color wheels in the app.
To be swift in creativity, the professional React native app development company integrate color wheels into React native projects.
So, let’s discover the process from the start.
Prerequisites Parameter
Here, it mentions a quick pre-requisite that you need to perform before getting into the coding.
Setting up the Environment
To start with a new development framework, you must install the necessary software and modules. So, install React Native CLI, NPM or Node.js, Android studio and VS code editor. The installation process is quite simple. Check the blog on “How to set up the React Native Development Environment” which gives detailed information on its installation.
Ensure that you focus on the ‘Reaction Native CLI’ section of the attached article. The current project is based on Android. So, consider it accordingly.
A Folder for the Project
Create a folder where you can save all the assets and codebase of the project. Open the cmd from any folder you want to save the current project. Pass npx react-native init COLORPICKER --version 0.71.1 on the terminal. Your project will be built.
Now, you can install any external libraries and start working on the codebase.
Installing External Modules
Here, you need two libraries from external sources. These are ‘react-native-wheel-color-picker’ and ‘react-native-color-picker’.
Both libraries offer custom-made color picker components for React Native projects. ‘React-native-color-picker’ is compatible with both iOS and Android. On the other hand, ‘react-native-wheel-color-picker’ is considered for three platforms, namely Android, iOS and Web.
Creating the Main File
Let’s start coding. We will create three different files: ColorsPicker.js, WheelColor.js and App.js.
Get the source code for the project in the GitHub repository.
ColorsPicker.js
First, import the components from the relevant libraries. Let’s check the complete code.
1
2
3
4
5
6
7
8
9
10
11
12
13
14
15
import { StyleSheet, Text, View } from 'react-native'
import React from 'react'
import { ColorPicker } from 'react-native-color-picker'
const ColorsPicker = () => {
  return (
    <ColorPicker
    onColorSelected={color => alert(`Color selected: ${color}`)}
    style={{flex: 1}}
  />
  )
}

export default ColorsPicker

const styles = StyleSheet.create({})
The code uses the ‘react-native-color-picker’ library to create a color picker interface.
The code imports ‘StyleSheet’, ‘Text’, and ‘View’ components from the ‘react-native’ library. It also imports the ‘React’ object from the ‘react’ library. Also, the code imports the ‘ColorPicker’ component from the ‘ react-native-color-picker’ library.
Here, the ‘ColorPicker’ component is passed different props:
The ‘onColorSelected’ is considered a callback function. It is called when a color from the given range is selected in the color picker interface.
After the user selects a color, it will show an alert specifying the selected color.
The ‘style’ object is used to apply styling to the ‘ColorPicker’ component. Here, it sets the flex value to 1, allowing the interface to expand and fill the space.
As you can notice, the code exports the ‘ColorsPicker’ component as the default component.
WheelColor.js
1
2
3
import React, {useState} from 'react';
import {SafeAreaView, StyleSheet, View} from 'react-native';
import ColorPicker from 'react-native-wheel-color-picker';
For this file, we have to import ‘React’, ‘useState’, SafeAreaView’, ‘View’, ‘StyleSheet’and ‘ColorPicker’ components. Ensure that you remember the components list available in the libraries.
1
2
3
4
5
6
const WheelColor = () => {
  const [color, setColor] = useState('');

  const onColorChange = color => {
    setColor(color);
  };
The 'WheelColor' component is a functional component used in this code.
Going forward, the code declares two variables ('color' and 'setColor' ) Inside the component. The 'useState' hook is used to specify the initial state of the variable. it has an empty string as the variable's initial value.
The 'setColor' is a function used to update the value of the 'color' variable. The onColorChange function uses a 'color' parameter.
The 'setColor' function is called inside the 'onColorChange' function. This updates the value of the 'color' variable with the new color value.
1
2
3
4
5
6
7
8
9
10
11
12
13
14
15
16
17
 return (
    <SafeAreaView>
      <View style={styles.sectionContainer}>
        <ColorPicker
          color={color}
          onColorChange={(color) => onColorChange(color)}
          onColorChangeComplete={color => alert(`Color selected: ${color}`)}
          thumbSize={40}
          sliderSize={40}
          noSnap={true}
          row={false}
        />

      </View>
    </SafeAreaView>
  );
};
The code returns a JSX markup. It renders a color picker component within the 'SafeAreaView' and 'View' components. The color picker component receives several props, including the current color value and callback functions for color change. It also has completion events and options for customizing the size and behaviour of the color picker. The 'SafeAreaView' ensures that the content is rendered within the safe area of the device screen, and the 'View' component provides the main container for the color picker.
Overall, the code builds up a user interface for selecting and displaying colors using the color picker component.
After the main part of the file, make a separate section for the ‘StyleSheet’.
App.js
This is the main file, where you have to simply import the previously built components. Below mentioned is the code snippet from the file.
1
2
3
4
5
6
7
8
9
10
11
import { StyleSheet, Text, View } from 'react-native'
import React from 'react'
import ColorsPicker from './Component/ColorsPicker'
import WheelColor from './Component/WheelColor'
const App = () => {
  return (
<ColorsPicker/>
  )
}
export default App
const styles = StyleSheet.create({})
The code exports the 'App' as the default module. It forms the main component of the app. The defined 'styles' object is empty and does not have any usage.
How to Execute the Program
To check the interface of the app, you have to execute the program on your dev system. Open the terminal from your project folder and run two commands simultaneously. They are as follows.
- npm install
- npx react-native run-android
Wait for some moments till the project runs. Refer to the below-given gifs for the output.
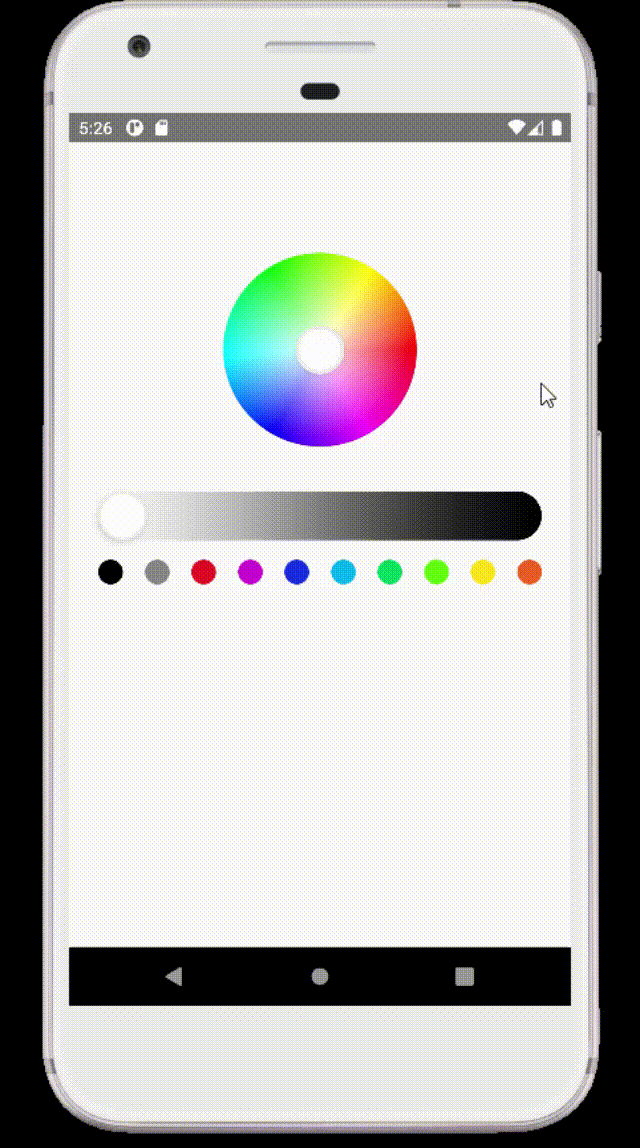
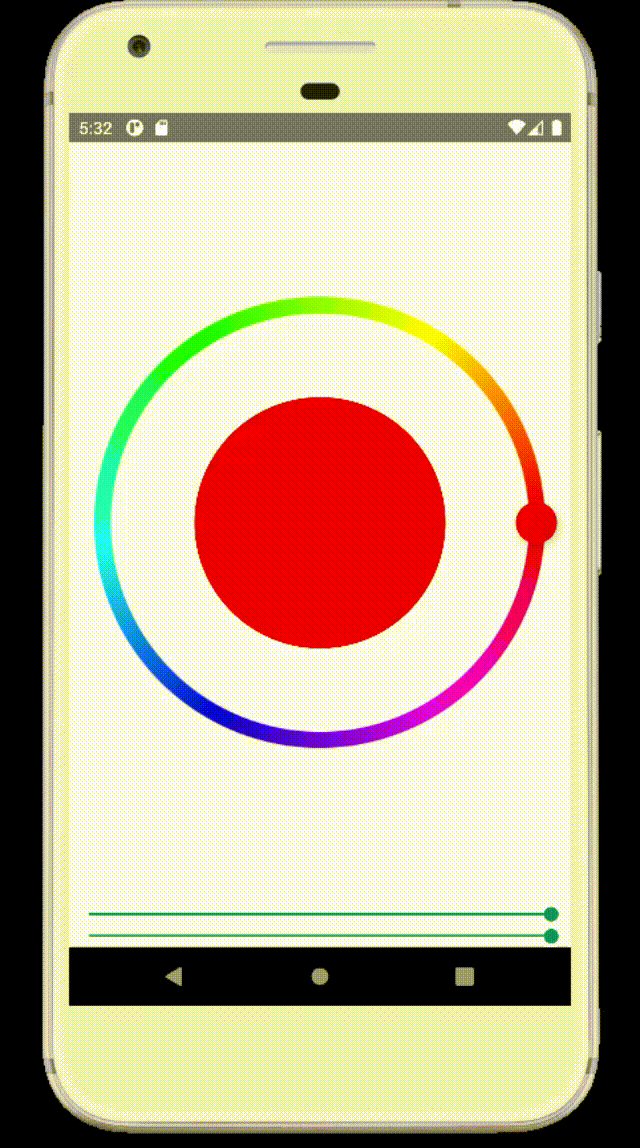
As users select any tone on the color wheel, the selected ccolor with the color code will appear on the interface.
Final Thoughts
Building an app with an intuitive design takes a broad parameter. One of the significant elements includes the right choice of color. If you are using React Native, you are in a win-win position. With minimal effort, you can integrate color wheels as guided in this project.
Don’t forget to get all the necessary software installed in your dev system.

A science graduate who has a keen interest to lean about new technologies and research area. With an experience in the field of data analytics and content writing, she aims to share her knowledge among passionate tech readers.

