Implementing Pinch-to-Zoom Functionality in React Native
React Native has different functionalities that you can easily add to your app. One of the useful functionality includes the ‘Gesture Responder System’. Curious to know more about the system and the steps to add Pinch to the Zoom gesture in your app? Stay with this blog article till the last. Trust me, you will be able to add the same functionality to your app.
Let’s start without much delay.
Getting Started with the Prerequisites
Before setting up the coding file, experts of React Native app development company perform the three following actions. It applies to the current project as well.
- Get the Relevant Environment- When you are using React Native or any other framework, you must install the basic software to get started with the development. Here, you need Expo CLI, Node.js, Android Studio, and Visual Studio Code Editor. For details information, check out the blog “How to Set up the React Native Development Environment”.
Note: Check the ‘Expo’ section as we are heading with the Expo CLI tool and not the React Native CLI tool. Also, this project is based on Android. If you wish to develop the project on Mac, consult with the competent React Native app development company for comprehensive assistance.
- Build a Project Folder- Install the Expo CLI using the command
npm i -global expo-cli. Pass this command on the terminal. After you have installed Expo CLI globally in your system, create a project folder for the app.
For this, select any folder in your local C drive and open the cmd from the folder. Then, run expo init ZOOMIMAGE. Here, ‘ZOOMIMAGE’ is the project’s name. You can give it any other name.
- Get the Third-Party Modules- This is one of the significant reasons experts prefer using React Native framework. They can install the libraries and import the required component from the libraries.
In this project, you need to install ‘expo-status-bar’, ‘react-native-reanimated’, ‘react-native-web’ and ‘react-native-gesture-handler’.
As we have performed all the prerequisites, let’s get into the coding segment.
Working on the Coding Segment
To make the project clutter-free, you can split the segments and make different files for distinct functionalities.
This project has 9 files, namely FlingGesture.js, LongPressGesture.js, PanGesture.js, PinchToZoom.js, PullToRefresh.js, SwipeGesture.js, TapGesture.js, App.js and styles.js.
Check the source code in the GitHub Repository.
Creating the FlingGesture.js
The code establishes a ‘FlingGestureHandler’ that is used to detect the fling gesture in a particular direction and activate the event handler ‘onFlingGesture’.
1
2
3
import React from 'react';
import { Directions, FlingGestureHandler, State} from 'react-native-gesture-handler';
import { View, StyleSheet } from 'react-native';
First, it imports the native and custom components as shown in the code syntax. The custom components ‘Directions’, ‘State’ and ‘FlingGestureHandler’ are imported from the ‘react-native-gesture-handler’ library.
1
2
3
4
5
6
7
8
9
10
11
12
13
14
15
16
17
export default function FlingGesture() {
  const onFlingGesture = (event) => {
    console.log('fling');
    console.log({ event });
    if (event.nativeEvent.state === State.ACTIVE) {
      alert('I was flinged');
    }
  };
  return (
    <FlingGestureHandler
      direction={Directions.DOWN | Directions.UP}
      onHandlerStateChange={onFlingGesture}
    >
      <View style={styles.box} />
    </FlingGestureHandler>
  );
}
The above-given syntax defines a functional component named 'FlingGesture'. Inside the component, it defines an event handler function called 'onFlingGesture' that logs a message and checks if the fling gesture is in the 'ACTIVE' state. If it is, an alert is triggered.
The code then renders the 'FlingGestureHandler' component. It takes two props, namely 'direction' and 'onHandlerStateChange'. The direction prop specifies the allowed fling directions (Directions.DOWN | Directions.UP), allowing fling gestures in both the downward and upward directions.
Creating the LongPressGesture.js
In this file, you can add the Long Press touch Gesture so that users can use the long press to zoom in or zoom out the image.
Start creating the file with the ‘import’ statement.
1
2
3
import React from 'react';
import { View, StyleSheet } from 'react-native';
import { LongPressGestureHandler, State } from 'react-native-gesture-handler';
The code imports ‘View’, ‘StyleSheet’, ‘LongPressGestureHandler’, ‘State’ and ‘React’.
1
2
3
4
5
6
7
8
9
10
11
12
13
14
export default function LongPressGesture() {
  const onLongPress = (event) => {
    if (event.nativeEvent.state === State.ACTIVE) {
      alert("I've been pressed for 800 milliseconds");
    }
  };
  return (
    <LongPressGestureHandler
      onHandlerStateChange={onLongPress}
      minDurationMs={800}
    >
      <View style={styles.box} />
    </LongPressGestureHandler>
  );
This code defines a function 'LongPressGesture' that represents a long-press gesture in a user interface. When this gesture is detected, it triggers a callback 'onLongPress' function. The purpose of this code is to display an alert message when the user presses and holds on to a specific element for at least 800 milliseconds.
Creating the PinchToZoom.js
This is the file where you can store the pinch-to-zoom gesture for your app. Later, it is called in the App.js file.
The main component in this file is the ‘PinchGestureHandler’ imported from the ‘react-native-gesture-handler’.
1
2
3
import React, { Component } from 'react';
import { View, Image, StyleSheet, Animated } from 'react-native';
import { PinchGestureHandler, State } from 'react-native-gesture-handler';
The code gets all the components.
1
2
3
4
5
6
7
8
9
10
11
export default class PinchToZoom extends Component {
  baseScale = new Animated.Value(1);
  pinchScale = new Animated.Value(1);

  scale = Animated.multiply(this.baseScale, this.pinchScale);
  lastScale = 1;

  onPinchGestureEvent = Animated.event(
    [{ nativeEvent: { scale: this.pinchScale } }],
    { useNativeDriver: true }
  );
The code syntax defines a class "PinchToZoom" used to enable pinch-to-zoom functionality in the user interface. The 'baseScale' and 'pinchScale' values are used to calculate the overall scale, and the 'onPinchGestureEvent' function is called whenever the pinch gesture occurs, updating the scale value accordingly.
1
2
3
4
5
6
7
  onPinchHandlerStateChange = (event) => {
    if (event.nativeEvent.oldState === State.ACTIVE) {
      this.lastScale *= event.nativeEvent.scale;
      this.baseScale.setValue(this.lastScale);
      this.pinchScale.setValue(1);
    }
  };
The code defines a method 'onPinchHandlerStateChange' that considers an object 'event' object as its parameter. This method is triggered when the state of the pinch gesture changes.
There is a conditional statement inside the method. It checks if the previous state of the pinch gesture was ‘ACTIVE’. The ‘ACTIVE’ state indicates that the pinch gesture was in progress.
The overall syntax keeps track of the cumulative scale changes that occur during a pinch gesture. When the gesture ends, it updates the base scale to incorporate the accumulated changes and resets the pinch scale to prepare for the next pinch gesture. This allows the pinch-to-zoom functionality to work smoothly and accurately.
1
2
3
4
5
6
7
8
9
10
11
12
13
14
15
16
17
18
  render() {
    return (
      <PinchGestureHandler
        onGestureEvent={this.onPinchGestureEvent}
        onHandlerStateChange={this.onPinchHandlerStateChange}
      >
        <Animated.View
          style={[
            styles.pinchableImage,
            {
              transform: [{ perspective: 1 }, { scale: this.scale }],
            },
          ]}
        ></Animated.View>
      </PinchGestureHandler>
    );
  }
}
This code sets up a pinch gesture handler to detect pinch gestures performed by users. When the program detects a pinch gesture, the syntax calls a method 'onPinchGestureEvent' to update the scale of the pinchable image.
It further calls the 'onPinchHandlerStateChange' when the pinch gesture is performed. The image is rendered inside an 'Animated.View' component, and its scale is dynamically updated based on the current value of 'this.scale'. This allows the user to pinch and zoom the image.
What’s the Code in the Main App.js File
This is the main file where you have to import the gesture files defined separately in the project. I have only imported the ‘PinchToZoom’ component from the PinchToZoom.js file. This will enable the pinch-to-zoom functionality.
You can import all the files and add them to the App.js file. This will allow your users to perform all the defined gestures.
Let’s see how can you enable one gesture file.
1
2
3
4
5
6
7
8
9
10
11
12
13
import React, { Component } from 'react';
import { StyleSheet, View } from 'react-native';
import PinchToZoom from './components/PinchToZoom';

export default function App() {
  return (
    <View style={styles.container}>

       <PinchToZoom />


    </View>
  );
This way, you can add the other gesture and make the app more dynamic.
To Execute the Program
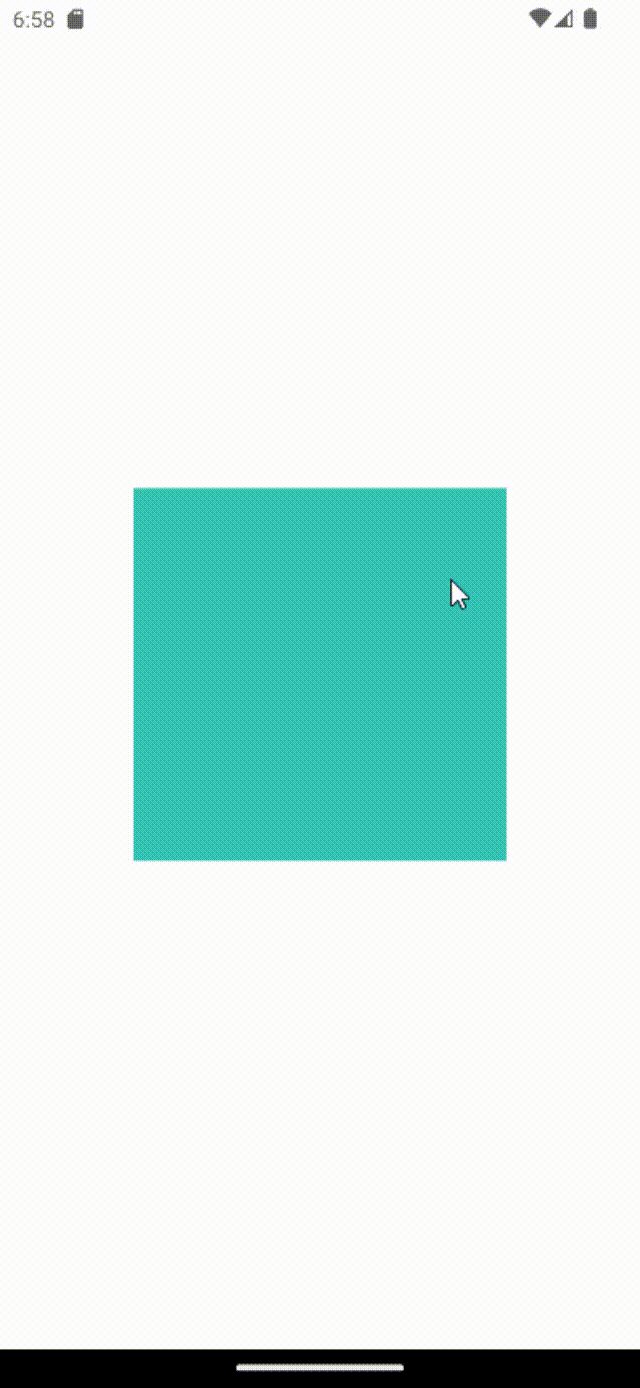
Now, let’s check whether the pinch-to-zoom functionality is correctly added to the React Native app.
Open the project folder and then run the cmd to open the terminal. Pass the command expo start on the terminal. This will run the program on the emulator.
You can also execute the program on your Android mobile phone. All you need to do is scan the QR code generated on the terminal using the Expo Go app.
Refer to the below-given gif for the project output.
Implementing Pinch-to-Zoom Functionality in React Native
Final Words
Incorporating pinch-to-zoom functionality in your React Native application allows users to intuitively interact with images, maps, and other visual elements. By leveraging the power of gesture-handling libraries like React Native Gesture Handler, you can provide a seamless and immersive zooming experience. Whether it is about enhancing image galleries or enabling detailed exploration of maps, implementing pinch-to-zoom functionality brings an added level of interactivity to your app, delighting users and elevating the overall user experience.

A science graduate who has a keen interest to lean about new technologies and research area. With an experience in the field of data analytics and content writing, she aims to share her knowledge among passionate tech readers.

