Implementing Phone Number OTP Authentication in React Native

The term ‘OTP’ may not be unfamiliar to you. Whether you want to make payments or log in to an account, you are asked to verify your number using the One-Time-Password (OTP). Isn’t it? You are asked to fill in the OTP field even if you provide your password. This additional step of providing OTP reduces the possibility of fraud and makes the login seamless.
So, in this blog, we will learn to implement phone number verification with OTP in React Native. Here, we will use Firebase authentication for the additional configuration.
Let’s check it out in detail.
Setting up the Firebase App for the React Native OTP Authentication
To set up the Firebase app for React Native OTP authentication, follow these steps as guided by your trusted React Native development company.
- Open the Firebase Console and click ‘Add project’ to add your new project.
- Give a suitable project name and click on ‘Continue’. This will create your project on the Firebase platform.
Note: In step 3, select the ‘Default Account for Firebase’. Refer to image 1.

Image 1
- Go to the ‘Build’ option and select ‘Authentication as highlighted in image
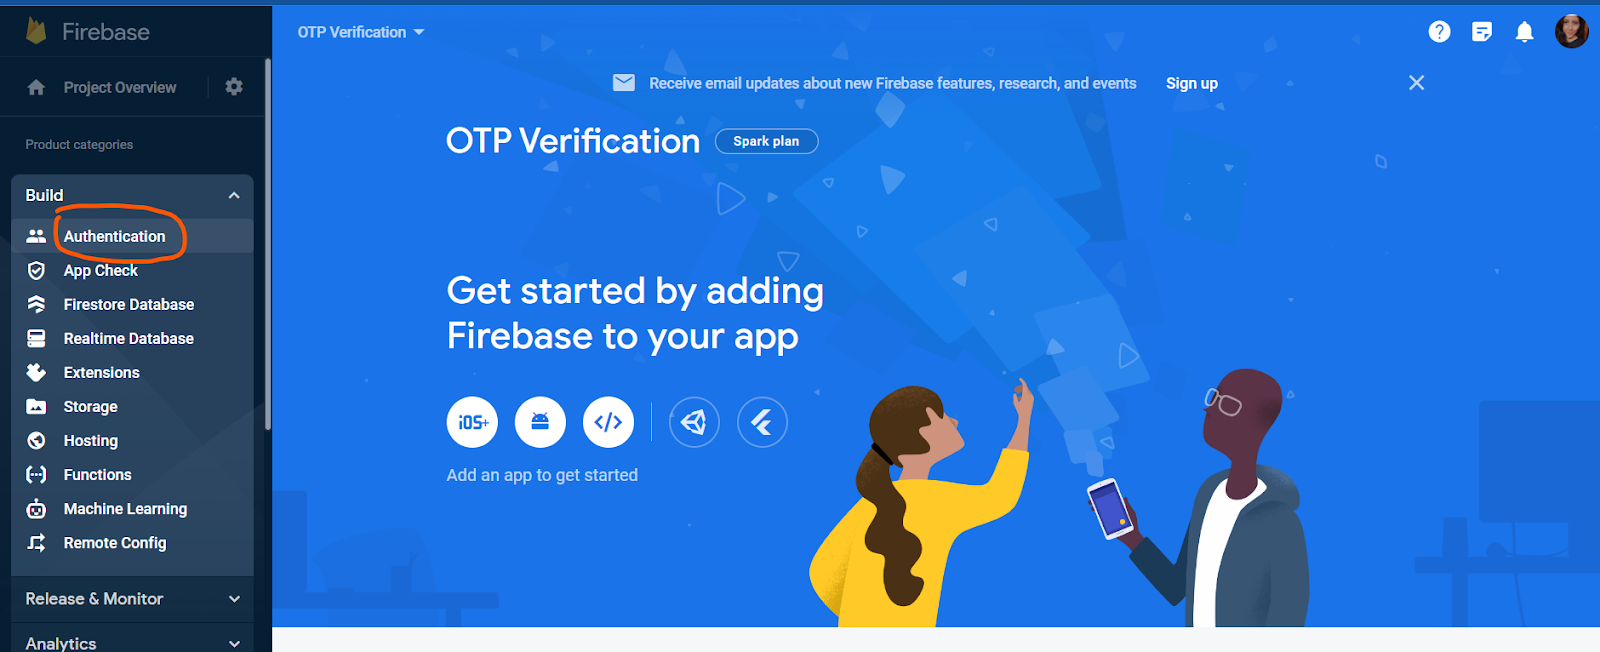
Image 2
- Click the ‘Get Started’ button.

Image 3
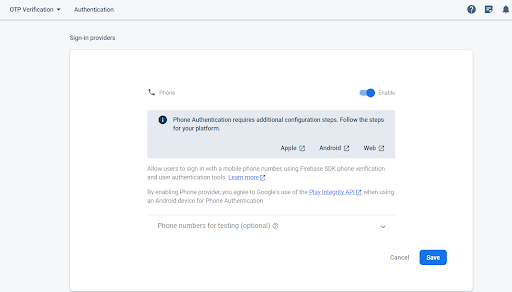
- You will have several options. As you want to get the phone number authentication. Click on the ‘Phone’ icon.
- Enable Phone as a sign-in provider and save the process. Refer to image 3.
And it is done. You have added your project to the Firebase platform. Let’s proceed forward to perform the pre-requisites.
Get the Pre-requisite Done
In this step, you have to perform two tasks. The first includes the environment setup, and the other is creating a project folder.
For the environment setup, visit the blog ‘How to set up the React Native Development Environment’.
Note: As we will use React Native CLI for the current project, follow the related section.
For creating the project folder, open a terminal from your dev system and pass npx react-native init PHONEOTP --version 0.68.1. As the file for the project is created, you can add the code section and execute the program.
Also, you have to install @react-native-firebase/auth. It is a third-party library supported by React Native framework. Firebase Authentication makes authentication systems secure and enhances the sign-in experience for users.
Embedding Code in the Project
This section is about adding the code-base file. Check the source code attached. Here, we will create App.js, OtpVerification.js, and SignInWithEmailPassword.js. Let’s check how we can o this.
Creating the OTP Verification Screen
Here, we will create the screen to display the placeholder and the button, clicking which the users will get their OTP on the given phone number.
1
2
3
import React, { useState,useEffect } from 'react';
import { Button, TextInput } from 'react-native';
import auth from '@react-native-firebase/auth';
Start with importing the components and the required modules. As you can notice, the code imports ‘useState’, ‘useEffect’, ‘Button’ and ‘TextInput’.
Lastly, it imports ‘auth’ from the ‘@react-native-firebase/auth’ library in React Native framework. This library is used to create an interface enabling interaction with Firebase authentication services. Adding these services to your built mobile app, you can allow users for easy authentication through different methods such as phone number, Facebook Login, Google Sign-in, and others.
For the current project, we have considered phone OTP authentication.
1
2
3
4
5
6
7
8
9
const OtpVerification = () => {

const [confirm, setConfirm] = useState(null);

const [number, setNumber] = useState(null);

const [user, setUser] = useState(null);

const [code, setCode] = useState('');
The code snippet defines a function ‘Otperification’. It further uses the ‘useState’ hook to define state variables, namely ‘code’, ‘user’, ‘number’ and ‘confirm’. Each of these state variables has two elements. One is the value of the current state, and the second element is a function used to update the value of the defined state variable.
The current value of all the defined state variables is ‘null, except that of the ‘code’, which is kept as an empty string.
1
2
3
4
5
6
7
8
9
10
11
12
13
14
15
function onAuthStateChanged(user) {

setUser(user);

console.log(user)

}

useEffect(() => {

const subscriber = auth().onAuthStateChanged(onAuthStateChanged);

return subscriber; // unsubscribe on unmount

}, []);
This syntax updates the state of the ‘user’ whenever it encounters a change in the user's authentication state.
Here, the function 'onAuthStateChanged’ has a parameter ‘user’. The code calls the ‘setUser’ function with ‘user’ as its argument. console.log() is used to log the ‘user’ parameter.
Inside the ‘useEffect’ function, the code calls 'auth().onAuthStateChanged(onAuthStateChanged)'. This sets up a listener that tracks changes in the authentication state. Whenever the authentication state changes, the code calls the 'onAuthStateChanged' function and passes the current user object to it.
Further, the code assigns the listener to the 'subscriber' variable. This later unsubscribes or removes the listener.
It returns 'subscriber' from the 'useEffect' hook. This ensures that when the component is removed from the screen, the code snippet cleans up and unsubscribes the listener, preventing unnecessary updates.
1
2
3
4
5
6
7
8
9
10
11
12
13
14
15
16
17
 async function signInWithPhoneNumber(phoneNumber) {
      const confirmation = await auth().signInWithPhoneNumber(phoneNumber);
      console.log(confirmation)
      setConfirm(confirmation);
    }

    async function confirmCode() {
        console.log(confirm.confirm)
      try {
        const result= await confirm.confirm(code);
        console.log(result)
        alert("OTP verified")
        setCode(null)
      } catch (error) {
        alert('Invalid code.');
      }
    }
The code snippet provides two functions: ' signInWithPhoneNumber’ and ‘confirmCode’.
The ‘signInWithPhoneNumber’ function is asynchronous, with the 'phoneNumber' as its parameter.
This function has 'auth().signInWithPhoneNumber(phoneNumber)'. This is a method available in the '@react-native-firebase/auth' package. It initiates the phone number OTP authentication by sending an SMS verification code to the given user number.
The 'confirmCode' function is an asynchronous function that handles the verification of the OTP code entered by the user.
It uses a try-catch block to manage errors that may occur during the verification process.
Furthermore, if the verification is successful, the code snippet logs the 'result' object to the console, displays an alert message "OTP verified," and resets the value of the 'code' variable to null.
If an error occurs during the verification process, the program will catch it in the ‘catch block’ and display an alert message saying, "Invalid code."
1
2
3
4
5
6
7
8
9
10
11
  if (!confirm) {
      return (
        <>
        <TextInput value={number} placeholder="+91-XXXXXXXXXX" onChangeText={text => setNumber(text)} />
        <Button
          title="Phone Number Sign In"
          onPress={() => signInWithPhoneNumber(number)}
        />
        </>
      );
    }
This code block checks whether the confirm variable is false or not. If false, it will return a text input and a button. The text input has a placeholder of "+91-XXXXXXXXXX" and sets the value of the number variable to the user data. The button has a "Phone Number Sign In" title, and if it is pressed, the button will call the 'signInWithPhoneNumber' function.
1
2
3
4
5
6
7
8
9
10
11
12
return (

<>

<TextInput value={code} onChangeText={text => setCode(text)} />

<Button title="Confirm Code" onPress={() => confirmCode()} />

</>

);
This code syntax returns a ‘textInput’ and a button. The ‘textInput’ has a code value and sets the variable value to the user-provided data. The button has the title "Confirm Code". The ‘onPress' is an event handler used with the button to call the 'confirmCode' function whenever the user presses the button.
Creating the App.js File
In this section, simply import the ‘OtpVerification’ component from the OtpVerification.js file and return the component in a tag. Here is what the code would look like.
1
2
3
4
5
6
7
8
9
10
11
12
13
14
import { View, Text } from 'react-native'
import React from 'react'

import OtpVerification from './components/OtpVerification'
const App = () => {
  return (
    <View>
      <OtpVerification/>

    </View>
  )
}

export default App
At last, make sure that you export the main ‘App’ component as default.
How to Execute the Program?
Check whether the OTP authentication works properly on the interface. For this, you have to run the program. Here is how you can perform the task.
- Run the cmd from your project.
- Pass two commands. The first is
npm install, and the second isnpx react-native run-android.
And, if it is created correctly, this is what the app interface on your emulator would look like.

The first screen has a panel where users can add their number with a blue button. Users have to click the button to get directed to some verification page. After which, they would get the OTP.
To Brief
The phone number OTP authentication project may seem complex due to the extra steps of Firebase authentication. However, it gives you an understanding of how the Firebase platform is used. Consider it as learning and growth. Things only can be difficult when you give up.
So, keep on going and happy coding.

4 Way Technologies is a premium IT services company that develops web, mobile, and SMART TV applications using cutting-edge technologies like React, Node.JS, Deno, Go lang, AWS, and AEM. We establish our thought leadership by sharing content and insights around technology.

