How to Send Push Notifications to React Native App Running on an iPhone
Push notifications playa vital role in providing you with timely updates and also allow you to re-engage effectively with customized content. It is a message displayed to you outside of the application’s normal UI whether or not you are using the app. You can create the push notifications with the help of the nodeJS server, which is responsible for sending the notification payload to the Apple Push Notification service (APN).
This article will help you step-by-step to configure a react native mobile application that can receive a push notification on an iPhone. In order to follow this guide, you will require an iPhone/iPad, a Mac, and an Apple developer account.
Let’s begin. Now first understand:
What is a Push Notification?
As mobile app developers, we sent push notifications on the apps installed on the user’s mobile phones. In this article, we will focus on how to send a push notification on a simulator during an iPhone app development. There are mainly two types of notifications; foreground and background notifications.
- A Foreground notification is a type of notification that you will send when the application is currently running.
- A Background notification is a type of notification that you will send whether or not the mobile application is currently running.
Why most mobile app development companies are asked to add push notification services:
- Push Notification is a great tool for a marketing company to engage a user with the mobile application.
- Advertisements/ offers can be sent using push notifications to increase the transaction like the dominos app sends notifications for a special offer to increase sales at non-peak hours.
- Brand recall value can be increased with the help of push notifications.
- They also assist in sending the transaction receipts at a fast rate.
What is Push Notification Architecture in React Native App Development?

Sending Push notifications on react native applications, we need to use APN (Apple Push Notification services). This can be used after creating an Apple ID at the Apple developers forum.
APN is recommended as it can send notifications on iPhone mobile devices without knowing the IP address.
React Native app developers send push notifications in an iPhone app by registering a mobile app to get a push notification token. This token is a long string, which is responsible for uniquely identifying each mobile app device.
In the next step, the token will be stored in a database on the server. Then, you handle the received notification after sending it.
The next step is to store the token in a database server. Then, a notification will be sent to the mobile app.
Now, let us go deeper and follow a step-by-step procedure for sending push notifications on iPhone mobile apps.
How to Register Your iOS App to APNs?
The first step includes the registration process of your already running app to the APNS in order to retrieve the token. This requires some configuration.
1. Enabling Push Notification Capabilities
1.1. In the Apple Developer Account.
In the first step,
- Go to the Apple developer account and find the App ID.
- Enable the push notification capability for App ID.

- Here enable the push notification capability for this Apple ID.
1.2. In Xcode
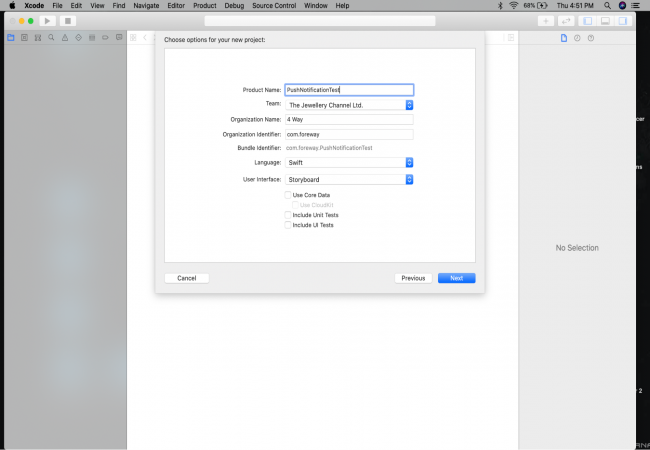
- Open Xcode on your Mac OS and create a new project.

- Select “Single View App” in the “iOS” tab to proceed further.
- Now, enter the “Product Name” along with the choice of iPhone app development languages between Objective-C and Swift.
- Click on the “Signing & Capabilities” tab in order to enable push notifications for your mobile application.
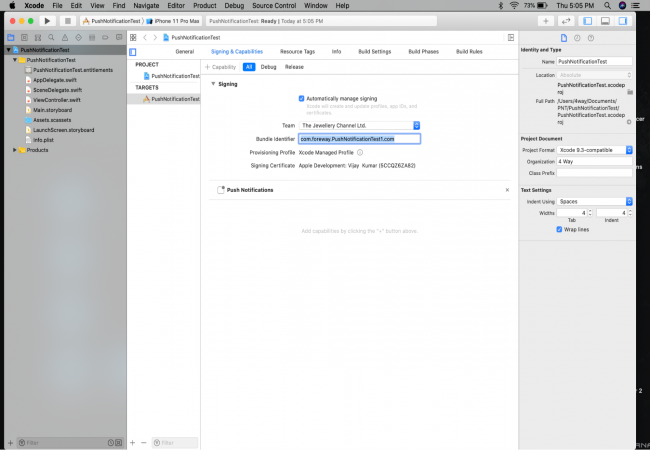
With this, a mobile application push notification is enabled in your mobile application development.
Xcode, during the build phase, automatically adds the APS environment entitlement after analyzing the certificate type used to sign the mobile app.
This entitlement involves two values; Development and Production, which implement conditions to the APNs server for iPhone app development on which the mobile device will try to register.
Development
The Development APS environment is used to create a new push notification feature on a running mobile app signed with a development certificate.
Production
The Production APS environment is used to deploy react native mobile apps in production.
You should also read about the Best database for react native
2. How to Configure App to Retrieve the Token
The process of retrieving a token requires configuring a mobile app by installing React Native notifications.
For that, you use the following code line above your “AppDelegate.m”.
1
- #import "RNNotifications.h"After that, add the below code to monitor the notifications in “AppDelegate.m:
1
2
3
4
5
6
- (BOOL)application:(UIApplication *)application
didFinishLaunchingWithOptions:(NSDictionary *)launchOptions {
[RNNotifications startMonitorNotifications]; // -> Add this line

return YES;
}
The following methods are required to support registration to AppDelegate.m:
1
2
3
4
5
6
7
8
- (void)application:(UIApplication *)application
didRegisterForRemoteNotificationsWithDeviceToken:(NSData *)deviceToken {
[RNNotifications didRegisterForRemoteNotificationsWithDeviceToken:deviceToken];
}

- (void)application:(UIApplication *)application didFailToRegisterForRemoteNotificationsWithError:(NSError *)error {
[RNNotifications didFailToRegisterForRemoteNotificationsWithError:error];
}
Next step is to create a “.tsx” file and at the beginning of that file add the following code:
1
2
3
4
5
6
7
8
9
10
11
Notifications.registerRemoteNotifications();
Notifications.events().registerRemoteNotificationsRegistered(
(event: Registered) => {
console.log(' Push Notification token:', event.deviceToken);
},
);
Notifications.events().registerRemoteNotificationsRegistrationFailed(
(event: RegistrationError) => {
console.log(' Push Notification error', event);
},
);
In the above code, Notifications.registerRemoteNotifications() is calling the function registerRemoteNotifications(), which is the method of UIApplication to request the device token to the APNs. After receiving the response, your mobile app dispatches one of the following events:
- registerRemoteNotificationsRegistered
- registerRemoteNotificationsFailed
If all steps are done correctly, you will get a unique token that is associated with your mobile device and app in your logs. Now, your device is registered to the APNs, and you can use the retrieved token on the server-side in order to send the notification to your iPhone app.
Set Off a New Notification from a NodeJS Provider Server
As you have already registered your device to APNs and your server has all the information needed in order to target the device, let us go through the creation of a secured connection to APNs from your provider server. After that, you will send a notification payload to your device.
1. Initialize a Trusted Connection to APNs
You can set up APNs connections in two ways:
- Token-based connection
- Certificate-based connection
The iPhone app development company recommends the token-based connection because it is faster and stateless.
For token-based connection, generate and download the key which is used to sign your token on the Apple developer account.
Log in to your Apple developer account and go to the keys section:
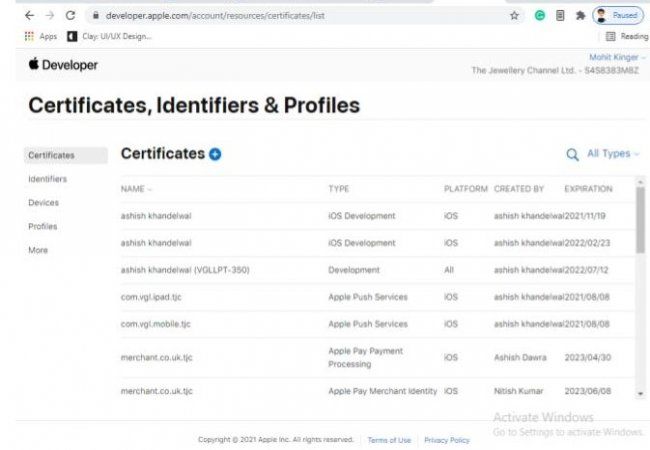
Here, generate a new public/private key pair. Now, download the private key in order to sign your authentication token.
Apple will use the public key to validate and authorize your signed token. The generated token must follow JSON Web Token standard, which is an open and industry-standard RFC7519 method that represents claims securely between two parties. The token should comprise of:
- A header that defines the algorithm used to sign your token and the key identifier that you have retrieved previously.
1
2
3
4
5
{
"alg": "ES256",
"kid": "BG7AK-24J9C-KJ8WE-VG5JU"
}
- A payload that contains the ID of your developer’s team or development company and timestamp of the generated token.
1
2
3
4
{
"iss": "S4S8383M8Z",
"iat": "TimeStamp of Token Generation"
}- Alas! the last is the signature: which is the result in the payload and base64 encryption of the header with the selected key and the algorithm.
Ok, we are very close. now, proceed further and implement the above process in a NodeJS development environment.
1. Create a new NodeJS server.
2. Add the JSON Web Token library that offers you all the needed tools required to generate and sign your token.
3. The code below will help you to generate the token:
1
2
3
4
5
6
7
8
9
10
11
12
13
const authorizationToken = jwt.sign(
{
iss: S4S8383M8Z,
iat: Math.round(new Date().getTime() / 1000),
},
fs.readFileSync(C:\Desktop\test.P8, "utf8"),
{
header: {
alg: "ES256",
kid: BG7AK-24J9C-KJ8WE-VG5JU,
},
}
);
2. Create and Send a New Push Notification Payload
You can create a simple push notification payload and that should look like this:
1
2
3
4
5
6
7
{
"aps": {
"alert": {
"title": " Push Notification Test",
},
},
}
Now, in the next step, send this payload to APNs and for that, you need to set up an HTTP/2 connection. In order to do so, use the “http2” module, which is provided by NodeJS. The final implementation of your server is as follows:
1
2
3
4
5
6
7
8
9
10
11
12
13
14
15
16
17
18
19
20
21
22
23
24
25
26
27
28
29
30
31
32
33
34
35
36
37
38
39
40
41
42
43
44
45
46
47
48
49
50
const app = express()
const port = 3000

const authorizationToken = jwt.sign(
{
iss: S4S8383M8Z,
iat: Math.round(new Date().getTime() / 1000),
},
fs.readFileSync(C:\Desktop\test.P8, "utf8"),
{
header: {
alg: "ES256",
kid: BG7AK-24J9C-KJ8WE-VG5JU,
},
}
);

const http2Client = http2.connect(
IS_PRODUCTION ? 'https://api.push.apple.com' : 'https://api.sandbox.push.apple.com'
);

app.post('/', (req, res) => {
const request = http2Client.request({
':method': 'POST',
':scheme': 'https',
'apns-topic': com.foreway.PushNotificationTest.com,
':path': '/3/device/' + DEVICE_TOKEN,
authorization: `bearer ${authorizationToken}`,
});
request.setEncoding('utf8');

request.write(
JSON.stringify({
aps: {
alert: {
title: "Push Notification Test",
},
},
})
);

request.on('end', () => {
res.send('Push Notification sent !');
});
request.end();
})

app.listen(port, () => {
console.log(`PushNotificationTest app listening at http://localhost:${port}`)
})
Congrats! Now, you have written a lot of code in order to properly handle the communication with APNs so that we can create features including token refreshing, error handling, and notifications badging.
In order to make your code simpler. You can use aps-node by running a code:
yarn add aps
After using aps-node, your server code with apn will look like this:
1
2
3
4
5
6
7
8
9
10
11
12
13
14
15
16
17
18
19
20
21
22
23
24
const app = express()
const port = 3000

let provider = new apn.Provider({
token: {
key: C:\Desktop\test.P8,
keyId: BG7AK-24J9C-KJ8WE-VG5JU,
teamId: S4S8383M8Z
},
production: IS_PRODUCTION
});

app.post('/', (req, res) => {
var note = new apn.Notification();
note.alert = "Push Notification Test";
note.topic = com.foreway.PushNotificationTest.com;
provider.send(note, DEVICE_TOKEN).then( (result) => {
res.send('Push Notification sent !');
});
})

app.listen(port, () => {
console.log(`PushNotificationTest app listening at http://localhost:${port}`)
})
After implementing all the above-mentioned steps, you will receive a pop-up, which will ask permission to allow the push notifications for the currently running React Native app on your iPhone device.
After this, you need to run your server (yarn start command) and create a post request to local host. And you will receive a push notification on your iPhone.
Conclusion
Here, We have implemented one of the most worthwhile methods for configuring both a NodeJS server and a React Native app for sending the Push Notification feature on an iPhone app using APNs. This article provides you with deeper knowledge about using iPhone app services using IDs and Keys. There are various other methods used by react native app development company to send push notifications. However, the method we have used in our article is also valuable and advantageous.

4 Way Technologies is a premium IT services company that develops web, mobile, and SMART TV applications using cutting-edge technologies like React, Node.JS, Deno, Go lang, AWS, and AEM. We establish our thought leadership by sharing content and insights around technology.

