How to get the firebase Google authentication in your React Native app?

You must be acquainted with the fact that whenever you want to sign in to your google account from a new device, you have to get your authentication done. This is for better security. In this regard, you can use the Firebase platform to add Google authentication to your React Native app.
Let’s see how you can achieve this. However, before getting into the codebase, we have to go through some other requirements.
What are the prior-needed learnings?
1. Set up the environment required for React Native
What you will be doing in this project is creating a React Native app and implementing google authentication to it. More or less, you need to work with the React Native framework. So, you have to install all software such as Node.js, VS Code editor, React Native CLI, and others. We won’t be discussing the setup process in this blog. If you need guidance, you can visit the blog and learn further about the steps of ‘React Native environment setup’.
2. Build a Basic React Native Project
You might be wondering why I am asking you to develop React Native app with help of React Native app development services providers. This is because starting with a basic app and adding components will be much easier than starting with a complex approach. Here is how you can build one.
- Create a folder with a name, for instance, ‘React-Native-Project’. Note that, you have to create this folder in your main dev screen.
- Go to the ‘React-Native-Project’ folder and open cmd from this project folder.
- Pass the command npx react-native init signin --version 0.68.1. Here, we will be using React Native of version 0.68.1 and signin will be the name of your project. The name of the project can be as per your choice. However, for this, you just need to add the chosen name in place of ‘signin’ in the command.
- Wait for some time until all the folders of the project are created.
- After it is built, open the code editor from the app folder and start framing the codebase in the App.js folder.
3. Implementing Firebase Authentication
For Google authentication, the most crucial task that you have to conduct is to create a project in the firebase platform. Here, you have to link the app with the created Firebase project. If you are yet to learn the steps, you can check the article in which I have given step-by-step guidance ‘To implement firebase authentication in react native app’.
Now that we are done with the prerequisite part, let’s get into the codebase.
Code snippets: The input parameter in the VS Code
You can find the entire project in the Github Repository. For this app, you have to create different folders such as App.js, Tab.js, Stack.js, and Drawer.js. Although you can find the complete project in the attached GitHub link, here, I will explain the logic behind the considered code snippets. So, get into it.
App.js folder
1
2
3
4
5
import {View, Text, Button} from 'react-native';
import React, {useEffect} from 'react';
import auth from '@react-native-firebase/auth';
import {GoogleSignin} from '@react-native-google-signin/google-signin';
'@react-native-google-signin/google-signin';
- First, you have to import the React Native components that you will be considering in the
App.jsfolder. - In this case, I have imported the basic
Button, Text,andViewfromreact-nativelibrary; anduseEffectandReactfrom thereact library. These are the components that you commonly use in every React Native app. - Now, you have to import some RN components from the third-party library.
- So, here, we will be using
@react-native-google-signin/google-signinand@react-native-firebase/auth. - As you can notice from the syntax I have imported auth from
@react-native-firebase/authand GoogleSignin from the@react-native-google-signin/google-signin library.
Since you cannot find components such as Googlesignin and auth from the core React Native library, you can install the relevant third-party library and get the components.
1
2
3
4
5
6
7
 async function onGoogleButtonPress() {
  try {
    await GoogleSignin.hasPlayServices({showPlayServicesUpdateDialog: true}); // <-- Add this
    const {idToken} = await GoogleSignin.signIn();
    const googleCredential = auth.GoogleAuthProvider.credential(idToken);
    return auth().signInWithCredential(googleCredential);
}- This syntax will let the user sign in with their Google account. The user will call the function immediately after they press the rendered button.
Asyn()function in JavaScript will allow you to write code-oriented promises.- With
GoogleSignin.signIn(), you direct the code to return the information of the user's Google account. On the other hand,you use the await() function to wait for the promises to resolve. auth().signInWithCredential(googleCredential)is used to allow users to sign in with their registered Google account.tryis a block of code that may throw an error.- The
try-catchblock ensures that an error does not occur and with await() function, it waits for a successful response fromGoogleSignin.hasPlayServices(). - If there is no error, then it will use
auth.GoogleAuthProvider.credential(idToken)to get a credential object which can be used to sign in with Google's OAuth 2.0 API
1
2
3
4
5
catch (error) {
    console.log(
      'With high probability, GooglePlayServices are missing on this device',
    );
return;catchis a block of code that will run if an error is thrown in the try block.- Here, it will log the error to the console.
- The error message that the code will log to the console is ‘With high
probability, GooglePlayServices are missing on this device’.
1
2
3
4
const GoogleSignIn = () => {
  const googleSignOut = () => {
    GoogleSignin.revokeAccess();
GoogleSignin.signOut();- The purpose of the code syntax is to sign out the user from Google.
- It revokes access to the GoogleSignIn() function, which was previously called with an argument of "GoogleSignin".
- The code then calls the GoogleSignOut() function, which does not take any arguments and also returns nothing.
1
2
3
4
5
6
useEffect(() => {
    GoogleSignin.configure({
      webClientId:
        '93387758913-7cpfhuc905jj0ebfddv22987jonb02s5.apps.googleusercontent.com',
    });
}, []);- Here, the syntax is trying to configure the
GoogleSigninobject with awebClientId. - This id is used by the library to identify your app when making requests to Google's servers.
- The code is using an anonymous function that takes in one argument, which is a callback function.
- This callback function will be called when the user signs in successfully or fails to sign in.
If you are uncertain about what a webClientId is?
A webClientId is a unique string that identifies your app to Google. It's used for authentication and authorization.
1
2
3
4
5
6
7
8
9
 return (
    <View>
      <Button
        title="Google Sign-In"
        onPress={() => onGoogleButtonPress().then(res => console.log(res))}
      />
      <Button title="Google Sign-Out" onPress={() => googleSignOut()} />
    </View>
);- Start the codebase by importing components.
- In the above syntax, we have used two third-party React Native plugins namely
@react-navigation/nativeand@react-navigation/native-stack. - Since you won’t be able to get the components
NavigationContainerandcreateNativeStackNavigatorfrom the React Native Library, you have to install the necessary third-party library and get the components.
import Material from './Tab';
import ImageCard from './Components/ImageCard';
- Now, we will move forward with importing the
Materialcomponent from the FileTab. This file is located in the same directory as this file. - Again, we will import
ImageCardfrom./Components/ImageCard. This ImageCard displays an image.
1
2
3
4
5
6
7
const Stack = createNativeStackNavigator();
export default function StackNavigation() {
  return (
    <NavigationContainer>
    <Stack.Navigator screenOptions={{
      headerShown:false
}}>- This is a function that returns a stack navigator. A stack navigator is used to navigate between screens in an app. It's the same as that of the browser history, you can go back and forth between screens.
Stackis a variable to which you have to hold thecreateNativeStackNavigator()function.<NavigationContainer>is a component. Using this, you can provide the navigation state and methods to every screen. Also, note that it has to be rendered at the root directory of your project.- Using
<Stack.Navigator screenOptions={{ headerShown:false,you can hide the header.
<Stack.Screen name="face" component={ImageCard} />
<Stack.Screen name="Tab" component={Material} />
- This snippet builds a stack navigator. It enables you to navigate from one screen to the other screen.
- The first screen is
“face”and the second screen is “Tab”. - Here, the first screen will render the ImageCard component and the second screen will render the
Materialcomponent.
Now, close all the tags like the below-given syntax.
</Stack.Navigator>
</NavigationContainer>
You can move forward with the styling element using StyleSheet. Although, I have not proceeded further with the designing part. You can get into the designing part starting with the code syntax.
const styles = StyleSheet.create({})
Now, see what the Tab.js folder will store.
Tab.js folder
1
2
3
4
5
import {StyleSheet, Text, View} from 'react-native';
import React from 'react';
import {createMaterialTopTabNavigator} from '@react-navigation/material-top-tabs';
import FileUpload from './Components/FileUpload';
import FileUploadCode from './Components/FileUploadCode';- When you are framing a codebase in React Native framework, at first, you have to use the import statement and then proceed forward with using the components.
- Other than the core React Native component, you will be importing the
createMaterialTopTabNavigator from @react-navigation/material-top-tabs. This is a third-party plugin supported by the React Native CLI tool. This library is used for getting animated tab components. - Going forward, you have to import the FileUpload and
FileUploadCodecomponents from./Components/FileUploadand./Components/FileUploadCoderespectively. - You can find these components in the Component folder of this app.
const Tab = createMaterialTopTabNavigator();
export default function Material(props) {
- Here, the syntax renders a Material Top tab Navigator. For this, you have to use the Tab variable.
- With the
export defaultstatement, you need to introduce a Material() function to return a component. Also, the props are passed to the component as parameters.
1
2
3
4
5
6
7
8
9
10
11
12
 return (
    <Tab.Navigator
      screenOptions={{
        tabBarStyle: {},
      }}>
      <Tab.Screen
        name="File Upload"
        component={FileUpload}
        initialParams={props.route}
      />
      <Tab.Screen name="File Upload Code" component={FileUploadCode} />
</Tab.Navigator>- The code attempts to create a tab navigator with two tabs. The first one is the “File Upload” and the other one is the “File Upload Code”.
- The Tab navigator takes in two props namely
screenOptionsand children. - The
Tab.Screencomponent that renders the FileUpload component has a name property and aninitialParamsproperty. - The name property is used to display the name of the tab in the tab bar, while the
initialParamsproperty passes props to its child component.
Drawer.js folder
1
2
3
4
5
import {createDrawerNavigator} from '@react-navigation/drawer';
import Face from './Components/Face';
import {NavigationContainer} from '@react-navigation/native';
import React from 'react';
import StackNavigation from './Stack';- In this folder, you have to rely on the third-party React Native component to get the necessary components.
- You will be using two third-party libraries:
@react-navigation/drawerand@react-navigation/nativeto get the components createDrawerNavigator andNavigationContainerrespectively. - Also, you have to import Face and
StackNavigationcomponents from./Components/Faceand./Stackrespectively.
Let’s see how we can use the components in our codebase.
Introduce the Drawer variable to create Drawer Navigator. For this, you can use the line const Drawer = createDrawerNavigator();
1
2
3
4
5
6
7
8
9
function DRawer() {
  return (
    <NavigationContainer>
      <Drawer.Navigator>
        <Drawer.Screen name="Feed" component={StackNavigation} />
        <Drawer.Screen name="face" component={Face} />
      </Drawer.Navigator>
    </NavigationContainer>
);- The aim of this code syntax is to return the navigation container.
- The NavigationContainer is a component that allows you to use other navigators, such as the drawer navigator in this case.
- Here, the
DRawer()function returns the NavigationContainer - The
<NavigationContainer>tag has two elements: the <Drawer.Navigator> and its children. The children are the two <Drawer.Screen>
Lastly, before saving the entire codebase, you have to consider the line export default DRawer; to allow the DRawer function to be used in other files, if needed.
Executing the code and running the app
Here, we will see how we can run the code on the emulator and test whether our app is running or not.
- Open a terminal from your project folder and run
npm install. This will add necessary packages to your project. Refer to image 1.

Image 1
- Then, run npx react-native run-android. The emulator will start. It may take time to bundle.
- Run npm start if the emulator does not start.
- After the app starts running, you will see a screen the same as shown in image 2.
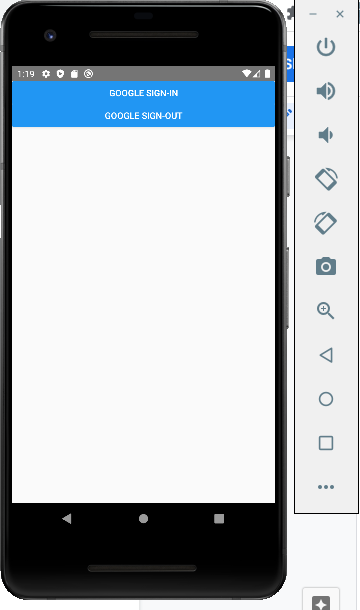
Image 2
- As you move forward clicking on the Google Sign-In button, it will ask you to input your Gmail-id as in image 3.
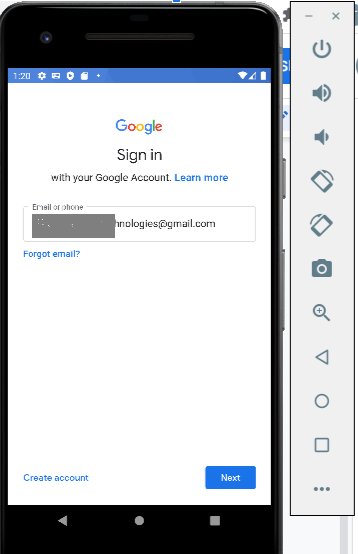
Image 3
- You will get a code, which you have to verify with your linked phone device. Since my account is linked with a Redmi 9A phone device, it will send the two-digit code to that device. Consider image 4.
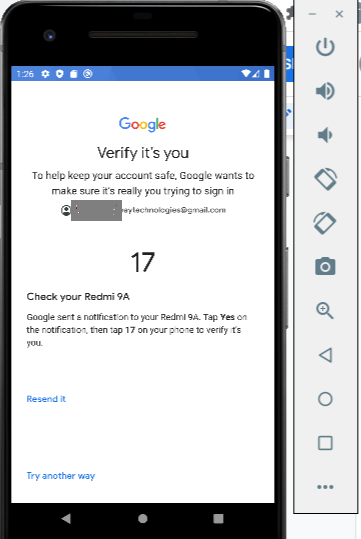
Image 4
- After you verify the code, you will be allowed to sign in to your Google account.
Final Thoughts
Getting the firebase Google authentication in your React Native app not only requires creating a basic app but most importantly, it requires linking the project with the Firebase platform. You have to get the specific webClientID for the project and store it in the app folder. Besides, you have to create different folders for which you need code syntaxes. Go through this article and practice the codebase of App.js folder, Tab.js folder, Stack.js folder, and DRawer.js folder in your VS Code editor.
This can be tricky but not impossible to accomplish. So, practice now and get a stronghold on the process of Firebase google authentication.

A science graduate who has a keen interest to lean about new technologies and research area. With an experience in the field of data analytics and content writing, she aims to share her knowledge among passionate tech readers.

