How to Create A Netflix Card using React Native
While surfing through a Netflix app, you must have noticed its dynamic interface. With different sizes of sliders, it provides an engaging user experience. The responsive hovering effect allows users to identify the content or shows they are located at. Here, in this article, I will explain to you each step to building such a UI of the Netflix app using React Native.
Before starting with the guide, let's give you a TLDR segment so that you can get a brief idea of what segments we need to work on.
TL; DR
- Get the React Native environment in your system if you haven’t set it up earlier.
- A basic template is a must-needed criterion.
- Configuring a third-party library is not needed for this project. You can get the component from the native React library.
- Implement CSS animation logic.
- Build a NetflixCard.
- Work on the App.js file.
- Lastly, run the complete program on the emulator.
Now, let us get into the real task of building the Netflix card. If you are only looking for the complete source code, then the GitHub repository of the project is attached here.
Let’s present the article in the form of steps for a clear understanding. You have to follow these steps sequentially.
Step 1: The Environment setup
If this is your first React Native project, you must set up the environment. In this step, you just need to install SDKs and download some software that React Native developers need to build the code, debug and run the emulator.
You may be thinking that why do we want to develop app with React Native development company? This is basically for improved runtime performance, modularity, and comparatively higher startup speed.
So, let's again get back to the software that you have to install for the environment setup. Here, as we are focusing on the Android platform and React Native CLI tool, you will need JDK, Android Studio, an IDE, Node, and React Native CLI.
The IDE can vary but I will recommend you get the Visual Studio Code editor.
For any further guidance regarding the Environment setup, you can check the linked site.
Step 2: Building a simple React Native template
You need some place to store your codebase. So, first, you have to build the template and then add the codebase, which will complete your entire app or project.
For this, run the command prompt from a folder located in your C drive. You can also create a new folder in your C drive and then run the cmd from the created folder.
Now, pass npx react-native init NetflixCard --version 0.68.1 on the command prompt. Note that, for this project, you are using the 0.68.1 version of React Native.
Click enter and it is done.
Since we don't have to take components from third-party libraries, we will start with the prime segment of the project, i.e., creating the codebase.
Step 3: The Segment of Programming
Here, you have to work on five different files and create a codebase for those files.
Creating demo_data and Video_data constant in the DemoProduct.js file
Check the codebase for this DemoProduct.js file in the attached GitHub link.
Here, what you need to do is create an array of objects for two constants named Video_data and demo_data. This object will represent a unique item (here, it represents the thumbnail of Netflix content). Add five properties: id, name, image, description, and duration to each of the objects. You also have to add some values to these properties.
Here, I have added 11 objects under demo_data and 7 objects under Video_data.
A snippet from the DemoProduct.js file is given below.
1
2
3
4
5
6
7
export const demo_data = [
    {
        id: 0,
        name: 'House Hunter',
        image: 'https://qph.cf2.quoracdn.net/main-qimg-f6c254c92142d55d02f0fa0d382bb91a.webp',
        description: ' a statement that tells you how something or someone looks, sounds,',
        duration: "3:45"
Note that this will make you familiar with the basic construction of the Netflix card. You can change the value of each of these properties and add some other properties as well to give your Netflix card a customised look.
Using the FlatList component in the Live_Video.js file
The flatList component is used to present a video list. Here, the data for the list is taken from the Viedo_data array.
Before executing all these operations, you need to introduce the components in the initial section of the codebase. Let’s see with the help of the codebase itself.
1
2
3
4
5
6
import { Dimensions, FlatList, Image, StyleSheet, Text, TouchableOpacity, View } from 'react-native'

import React from 'react'
import { demo_data, Viedo_data } from './DemoProducts'
const width = Dimensions.get('window').width
const LiveVideo = () => {
As you can see from the code syntax that before defining the constant width and LiveVideo, the code imports Dimensions, FlatList, Image, StyleSheet, Text, TouchableOpacity, and View from the react-native library; and demo_data and Video_data from the path ./DemoProducts.
Then, it sets the width of the app or the Netflix card the same as that of the window. This is a way of making your app responsive and you can use the Dimensions mentioned.
LiveVideo is the main function of this LiveVideo.js file.
Moving forward to complete the codebase, add the below-given syntax in the same file.
1
2
3
4
5
6
7
8
9
return (
        <View>
            <Text style={styles.text_Trending}>Live Videos</Text>
            <FlatList
                data={Viedo_data}
                horizontal
                pagingEnabled
                keyExtractor={(val) => val.id}
                renderItem={({ item, index }) => {
It returns the main View tag under which it embeds a view element, a text element, a TouchableOpacity, an Image element, and a FlatList component.
The text element will display the text ‘Live Videos’ on the screen. The display of this text is based on the styling parameters used for the style object text_Trending. You can find the styling parameters for this object in the StyleSheet segment.
It defines the FlatList component to present the data list of videos below the text ‘Live videos’. The data is obtained from the Video_data variable. The list is horizontal and has pagingEnabled. It means that the user can scroll through the list one item at a time.
The keyExtractor function is used to assign a unique key to each item in the list and extract the id of an object from a larger data set.
Finally, the renderItem function is used to render each item in the list. In this case, it will render a View component with a Text component inside, displaying the name of the item.
1
2
3
4
5
6
7
8
 return (
                        <View style={{
                            width: width - 100,
                            height: 300,
                            marginTop: 5,
                            borderColor: 'red',
                            marginHorizontal: 50
                        }} key={index}>
This code returns a View element. It has a definite width, height, margin at the top, border color, and horizontal margin.
Importance of key={index} in list view
The key in key={index} is a prop used in React Native. This is used to identify elements in an array of objects being embedded in a FlatList or SectionList component.
It is important to use the key prop in presenting listview items because it allows React Native to efficiently update the list when changes occur. For example, when items are added or removed. The key prop has a unique value for each item in the list. Here, the index of the objects of the Video_data variable is used as the value of the key.
Now, add the touchable image element to your LiveVideo.js file
1
2
3
4
5
6
7
8
9
10
11
12
13
14
15
16
17
<TouchableOpacity>

                                <Image source={{ uri: item.image }} style={{
                                    width: width - 100,
                                    height: 300,
                                }} />

                            </TouchableOpacity>
                        </View>
                    )
                }}
            />
        </View>
    )
}

export default LiveVideo
The TouchableOpacity component is used to make the image element respond to user input, such as a tap or press.
The Image component will display the image. The source of the image is set to the item.image, which is the URI of the image. The URI of the image is taken from the Video_data variable. Also, a definite width and height for the images are defined.
Using the export statement is needed. It is always at the end of the referred file before starting the StyleSheet object.
1
2
3
4
5
6
7
8
9
const styles = StyleSheet.create({
    text_Trending: {
        colour: '#ffffff',
        fontSize: 20,
        alignSelf: 'centre',
        marginTop: 10,
        textDecorationLine: 'underline'
    }
})
The above code syntax is the styling parameter for the text_Trending object. It is used to style the text ‘Live Videos’.
Using the FlatList component in the Tv_Video.js file
For the codebase of this Tv_Video.js file, click on the attached link.
This file is created to get the segment shown in image 1. This is a part of the Netflix card that we are headed to build.
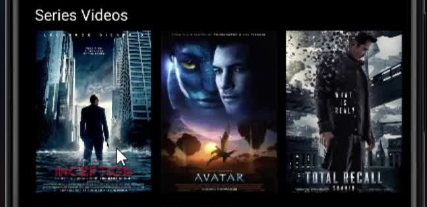
Image 1
Let's get into creating the codebase.
First, use the import statement and introduce all the components. Since you want to create a scrollable list view of the Netflix content, you have to import the Video_data and demo_data components from the DemoProduct.js file.
Following the import statement, add the below-given syntax.
1
2
3
4
5
6
7
8
9
const Tv_Video = () => {
    return (
        <View>
            <Text style={styles.text_Trending}>Series Videos</Text>
            <FlatList
                data={Viedo_data}
                horizontal
                keyExtractor={(val) => val.id}
                renderItem={({ item, index }) => {
The code defines the Tv_Video, a constant. It returns a View, a FlatList, and a Text element.
The View element will create a container, which will hold the list view of the Netflix content and the text element.
The text element is used to display ‘Series Videos’ as shown in image 1. The styling of this text is directed to the styling object text_Trending.
The FlatList view is created using the FlatList component. The data source for the scrollable list of items is set to Video_data. It means that the data stored in the Video_data will be presented on the screen under the section 'Series Videos’. The scrollable view is in the horizontal direction.
1
2
3
4
5
6
7
8
9
10
11
12
13
14
return (
                        <View style={styles.box} key={index}>

                            <TouchableOpacity>
                                <Image source={{ uri: item.image }} style={{ width: 120, height: 170 }} />

                            </TouchableOpacity>
                        </View>
                    )
                }}
            />
        </View>
    )
}
It creates a container using the View element. It is styled using the object box. You can refer to this box in the last section of the codebase.
Similar to the LiveVideo.js file, the code creates a touchable image element using the Touchableopacity and Image components.
For the StyleSheet section, consider the following syntax. It uses two objects. One is the text_Trending and the other one includes the box.
1
2
3
4
5
6
7
8
9
10
11
12
13
14
15
export default Tv_Video
const styles = StyleSheet.create({
    text_Trending: {
        color: '#ffffff',
        fontSize: 16,
        marginHorizontal: 10,
        marginTop: 10
    }, box: {
        width: 120,
        height: 170,
        borderWidth: 1,
        marginLeft: 10,
        marginTop: 5
    }
})
Importing Tv_Video and LiveVideo in NetflixCard.js file
The Tv_Video.js and LiveVideo.js file that you have created will be used in this file to build the main screen for the Netflix card. Get the complete codebase for the NetflixCard.js file in the Github repository.
So import all the components along with the demo_data, Video_data, LiveVideo, and Tv_Video from other files of this project.
1
2
3
4
const NetflixCard = () => {
return (
<ScrollView style={styles.container}>
<Text style={styles.text_Netflix}>NetflixCard</Text>
This code syntax defines the constant NetflixCard which returns a scrollable view and a text element. To get the scrollable view, it uses the ScrollView component and an inline styling referring to the container.
The Text component is used to display the text ‘NetflixCard’ on the main screen. The styling object text_Netflix is used to style the text.
Here, you have to create a section for the ‘Trending Videos’ (refer to image 2). Similar to the section of ‘Series Videos’ and ‘Live Videos’, you have to create the codebase for the segment of the ‘Trending Videos'.

Image 2
Let's have a look at the code syntax.
1
2
3
4
5
6
7
8
9
10
11
12
13
14
15
16
17
18
19
 <View>
                <Text style={styles.text_Trending}> Trending Videos</Text>
                <FlatList
                    data={demo_data}
                    horizontal
                    keyExtractor={(val) => val.id}
                    renderItem={({ item, index }) => {
                        return (
                            <View style={styles.box} key={index}>

                                <TouchableOpacity>
                                    <Image source={{ uri: item.image }} style={{ width: 120, height: 170 }} />

                                </TouchableOpacity>
                            </View>
                        )
                    }}
                />
            </View>
The code defines the text element ‘Trending Videos’, the Flatlist element with the data source taken from the demo_data. The scrollable view of this section is horizontal. A view element is added to hold the container of ‘Trending videos’.
Adding all the elements in the ScrollView
As NetflixCard.js is the main screen, you have to wrap all the elements (text: ‘NetflixCard’, the section of Trending Videos, Series Videos, and LiveVideos) under a ScrollView element.
After building the section of Trending Videos and the text ‘NetFlixCard’, add both the segment of Live Videos and Series Videos. You can do this in the following way.
1
2
3
4
5
6
7
8
9
10
   <View>
                <Tv_Video />
            </View>
            <View>
                <LiveVideo />
            </View>
        </ScrollView>
    )
}
export default NetflixCard
Look at how the code wraps the <Tv_Video /> and <LiveVideo /> with two separate View elements and then closes the ScrollView tag. Also, don't forget to export the NetflixCard.
Now, finally, create the style sheet segment for this file. Here it is.
1
2
3
4
5
6
7
8
9
10
11
12
13
14
15
16
17
18
19
20
21
22
const styles = StyleSheet.create({
    container: {
        flex: 1,
        backgroundColor: 'black'
    }, text_Netflix: {
        color: 'red',
        fontSize: 22,
        alignSelf: 'center',
        marginTop: 10,
    }, text_Trending: {
        color: '#ffffff',
        fontSize: 16,
        marginHorizontal: 10,
        marginTop: 10
    }, box: {
        width: 120,
        height: 170,
        borderWidth: 1,
        marginLeft: 10,
        marginTop: 5
    }
})
Here, I have used four styling objects: box, container, text_Trending, and text_Netflix.
Creating the entry point for the project: App.js file
Yes, the App.js file is the entry point for every React Native project. It renders the main component of the application. It sets up the initial state, renders the important components, and establishes the navigation structure. It plays a crucial role in the app's functionality.
Let's see the codebase for the App.js file.
1
2
3
4
5
6
7
8
9
10
11
import { StyleSheet, Text, View } from 'react-native'
import React from 'react'
import NetflixCard from './Components/NetflixCard'

const App = () => {
  return (
    <NetflixCard />
  )
}
export default App
const styles = StyleSheet.create({})
What the code-syntax does is that it imports the main NetflixCard component from ./Components/NetflixCard path. Then, it renders the prime component of the project, i.e. the <NetflixCard />.
And we have completed the coding section.
Run the program on the emulator
This step is about executing the created program.
You can do this task by creating a new terminal from your project. Do this in your code editor. Run npm install and then pass npx react-native run-android.
This is all you need to start the emulator and display the created app on your emulator. It will show up as shown in image 3.
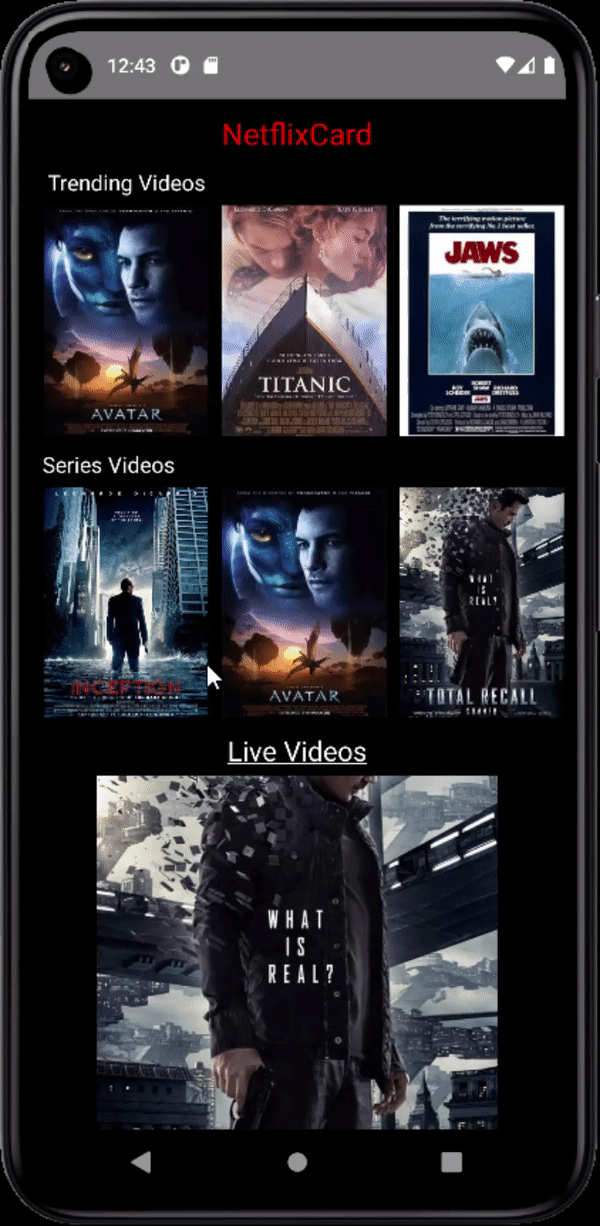
Image 3
Concluding remarks
It is with the use of React that the development team of Netflix has been able to increase its user experience. Stepping into modern UI development can add a uniqueness to how you have been operating your business; thereby increasing the degree of competitiveness. This is a simple way to showcase how you can undertake the frontend development of your app with React Native. There's much more to explore when you are working with such a scalable framework.

A science graduate who has a keen interest to lean about new technologies and research area. With an experience in the field of data analytics and content writing, she aims to share her knowledge among passionate tech readers.

