How to create a custom carousel in React Native app?

With its vast utility, React Native framework can be used to build a carousel interface in mobile apps. The carousel makes it easier for app users to slide between different content and establish a connection between each of the content. In this tutorial blog, we will create a custom carousel using React Native framework.
For the complete project, check the linked GitHub site.
What are carousels?
Carousels are also called sliders. Carousel designs are embedded in apps or webs to present images, texts, and videos in sliding blocks. Hence it is also known as slideshows. It creates a visual link between the contents added on different pages. So, you have to enable the pagination functionality in a carousel.
Use cases of Carousels
One example of a carousel interface are Instagram. You may have noticed the horizontal swiping view while scrolling through a group of images uploaded at a time. Also, scrolling through news articles requires a carousel. Thus, if you are building a news app, you need to learn the build process of a carousel interface.
You can also embed an automatic carousel interface where users don't have to put in effort and scroll through the content. However, the UI of a carousel is not limited to the horizontal view; you can design a vertical view of it.
What are the Prerequisite Learnings?
Since we will be working with React Native CLI, you have to execute the project setup process. With this, I mean to say that if you have not installed software like Android Studio, Code editor (here, I have used Visual Code Editor), and Node.js, you cannot start with any React Native project. This is about getting the environment embedded in your system.
Check the tutorial blog to learn about the environment setup process.
Secondly, you have to create a template (basic app) where you can build the codebase for the current project. For this, I will prefer using React Native Development Services for React Native CLI and not Expo CLI. Using Expo CLI will unnecessarily make the app bigger in size; thereby increasing the load time for the app.
Also, during the setup process, you have to install the software specified under the React Native CLI section.
Let's see how you can create the template app with React Native CLI. Follow along the steps sequentially.
- Go to your home screen in your system. Create a folder named ‘React Native project’. You can name it whatever you want to.
- Go to the React Native project folder. Run cmd from the folder and
pass npx react-native init Carousel --version 0.68.1. Here, the carousel will be the name of your template (app) and you will frame the codebase in this app. As you can see, we are using React Native 0.68.1. - As you go back to the React Native Project folder in your local drive, you will notice that the React Native template
Carouselis created. - Open the code editor from the
Carouselapp and start framing the codebase in the App.js file.
Building the codebase for the project
First, we will get the React Native components from the react and react-native libraries. Consider the following syntax.
1
2
import { StyleSheet, Text, View, ScrollView, Image, Dimensions } from 'react-native'
import React, { useState } from 'react'
For this project, you only need the core RN components namely StyleSheet, View, ScrollView, Text, Dimensions, and Image from react-native. Also, you have to import the React Native hook useState from react.
To build the app and embed different objects, you have to introduce a main React component. Here, it is an App. you can give it any other name you feel like. Lets see how you can proceed further,
1
2
3
4
const App = () => {
  const [imgActive, setImageActive] = useState(0)
  const WindowWidth = Dimensions.get('window').width
  const height = Dimensions.get('window').height
The code is using the useState hook to specify a state variable, imgActive. The initial value of this state variable is set to 0. Moreover, the setImageActive is used to update the state of imgActive when users slide across the images on their app screen.
The Dimensions API is used to get the width and height of the window in which the app will render. It sets them to variables WindowWidth and height.
You have to add the image source you want to present in the carousel. Here is how you can do this.
1
2
3
4
5
  const image = ['https://images.pexels.com/photos/1591447/pexels-photo-1591447.jpeg?auto=compress&cs=tinysrgb&w=1260&h=750&dpr=1',
    'https://images.unsplash.com/photo-1614160859544-177611d11f6b?ixlib=rb-4.0
    .3&ixid=MnwxMjA3fDB8MHxwaG90by1wYWdlfHx8fGVufDB8fHx8&auto=format&
    fit=crop&w=686&q=80',
    'https://s-media-cache-ak0.pinimg.com/originals/40/4f/83/404f83e93175630e77bc29b3fe727cbe.jpg']
You can also add 4 or five images in this carousel. For this, you have to add all the sources for five images (say) separated with comma (,).
1
2
3
4
5
6
7
8
 const onchange = (nativeEvent) => {
    if (nativeEvent) {
      const slide = Math.ceil(nativeEvent.contentOffset.x / nativeEvent.layoutMeasurement.width)
      if (slide != imgActive) {
        setImageActive(slide)
      }
    }
  }
Here, the above code syntax is used to track when a user has changed the slide in a carousel.
The nativeEvent parameter is an event object that is passed in when the user changes the slide.
The code then calculates the slide number by dividing the contentOffset.x (the x-coordinate of the content offset) by the layoutMeasurement.width (the width of the carousel).
If the slide number is different from the current active slide, the setImageActive function is called with the new slide number.
With if (slide != imgActive), the code is checking if the slide is not equal to the active image. If it is not, it will remove the active class from the active image and add the active class to the slide. Then it will set the active image to the slide.
1
2
3
4
5
6
7
8
return (
    <View style={styles.Container}>
      <ScrollView
        horizontal
        pagingEnabled
        showsHorizontalScrollIndicator={false}
        onScroll={({ nativeEvent }) => onchange(nativeEvent)}
      >
Now, the above syntax shows what the program will return. It designs a scrolling view in a horizontal format by setting the horizontal property of the ScrollView component as true.
The pagingEnabled property is set to true, which makes the scrolling view snap to each page when scrolling. The showsHorizontalScrollIndicator property is set to false, which hides the scrollbar.
Also, the onScroll property is set to an object with curly braces. It takes an argument of nativeEvent, to identify when the scrolling view has changed.
1
2
3
4
5
6
7
8
9
{
          image.map((val, ind) =>
            <View key={ind}>
              <Image source={{ uri: val }} style={{ width: WindowWidth, height: height }} />

            </View>

          )
        }
This syntax uses the map method to loop through an array of images. It renders each image in a View component.
The map method further considers parameters, val, and ind. Here, val is the value and ind is the index of each item in the array.
The source of the Image component is set as the value of the item in the object and it indicates the image's URI. The height and width of the Image are set as the height WindowWidth respectively.
Now, you will create a scrollable image list. Here is the code syntax.
1
2
3
4
5
6
7
8
9
</ScrollView>
      <View style={styles.wrapDot}>
        {image.map((val, ind) =>
          <Text key={ind} style={imgActive == ind ? styles.dotActive : styles.dot}>●</Text>
        )}
      </View>
    </View>
  )
}
For this, first create a view and then embed scrollable image lists in it. The view also contains a row of dots that indicate which image is currently active. The image array is being mapped over and a Text component is being created for each item in the array.
The style of the dot is determined by the imgActive variable, which is compared to the index of the current item in the array.
If the index matches the imgActive variable, the dot is given the style of dotActive, otherwise, it is given the style of dot.
Now, with the line export default App, export the App from this App.js file.
1
2
3
4
5
6
7
8
9
10
11
12
13
const styles = StyleSheet.create({
  Container: {
    flex: 1,

  }, wrapDot: {

    flexDirection: 'row',
    alignSelf: 'center',
    marginTop: 20,
    position: 'absolute',
    zIndex: 1,
    bottom: 20
  },
As the main segment of the codebase is done, you have to move forward with creating the style sheet for this React Native app. It has four objects: Container, wrapDot, dotActive, and dot.
The above syntax focuses on Container and wrapDot. The Container has a flex value of 1. Hence, it will occupy all the space available on the screen.
The wrapDot object has a flexDirection of "row". It means the elements inside it will be placed in a row. It also has an alignSelf of "center", which implies all the content inside it will be centered.
The other styling parameters used with wrapDot are marginTop, which isset as 20 pixels, position of the element inside the object is set as absolute. Lastly, the elements inside wrapDot are placed at a bottom of 20 and zIndex of 1.
1
2
3
4
5
6
7
  dotActive: {
    margin: 3,
    color: '#973D00',
    marginTop: 20,
    fontSize: 20

  },
Another style object dotActive is embedded in the code. It has styling parameters of margin, color, marginTop, and fontSize. You have to provide a specific value for each of these parameters. However, for the color, you have to specify a color code and not the name of the colour.
1
2
3
4
5
6
7
  dot: {
    margin: 3,
    color: 'gray',
    marginTop: 20,
    fontSize: 20
  },
})
Lastly, it is the style object dot. The styling parameters used for it are margin, color, marginTop, and fontSize.
As we are done with building the codebase, you need to run the program and see whether it is properly working or not.
Steps to run the program and execute it on the emulator
Follow the steps as I guide.
- Firstly, you have to create a terminal from your project (Carousel) folder.
- Next thing you have to pass npm install.
- Then run
npx react-native run-androidon the same terminal. - It may take some time to complete the bundling process and start the emulator.
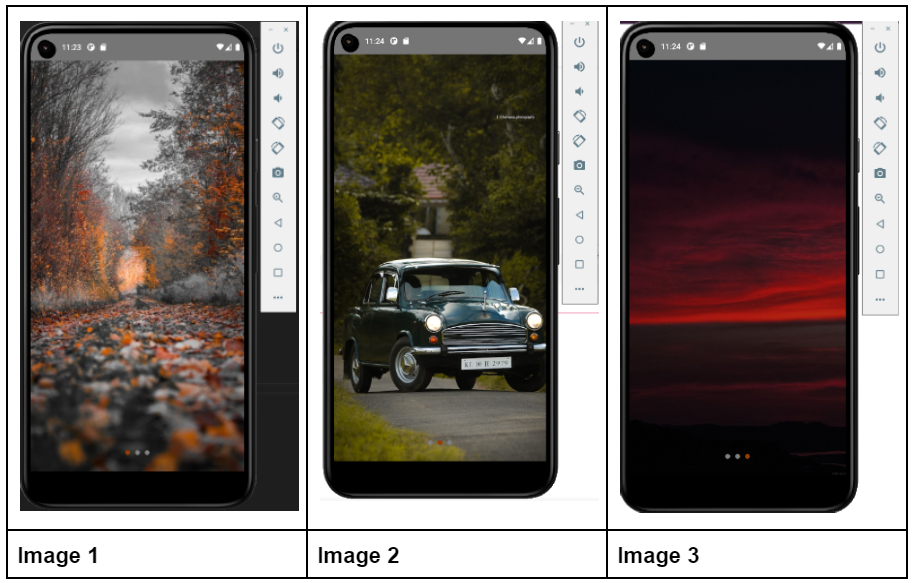
Refer to images 1, 2, and 3 for the carousel interface on the emulator. The number of dots arranged in a row located at the bottom of the screen indicates the number of images added to the carousel. And the red dot indicates the active image. For example, in image 2, the red dot is in the second position, which means that the image added in the second number is active (showing up on the screen).
Conclusion
Creating a carousel interface for your app requires the choice of a proper app development framework. Here, React Native framework is playing the role. The ScrollView component of React Native is the main component using which you can enable the paging functionality and get the horizontal scroll. Making a carousel interface is fun in itself. You should practice it and add unique designs to it.

A science graduate who has a keen interest to lean about new technologies and research area. With an experience in the field of data analytics and content writing, she aims to share her knowledge among passionate tech readers.

