How to build a music app using React Native
In recent years, the popularity of music streaming apps has skyrocketed. Millions of users access music on their mobile devices every day. Building a music app can be a complex task, but with the help of React Native, developers can create a user-friendly and intuitive app with ease. In this blog article, we will explore the steps involved in building a music app using React Native and discuss the various features and functionalities that can be incorporated into the app. Whether you are a beginner or an experienced developer, this guide will provide you with valuable insights to help you build a successful music app.
Let’s get familiar with the tasks that need to be performed before getting into the codebase.
Pre-requisite parameters
Environment setup
You can move forward in the project if you have already set up the environment. However, if you have not, follow along.
First, you have to select the specific OS on which you want to build your project. Here, we will consider Android and Windows. Also, we will consider React Native CLI and not Expo CLI.
So, the software that you will need if you are going with the above preference includes React Native CLI, JDK, Android Studio, Node, and VS Code editor.
Noe, the setup process varies depending on the React Native tool and OS you choose. For further details, click on the linked article.
A template for the app
Here, you have to build a simple template. Select any folder in your dev system and run cmd from this folder. As you open a terminal from the folder, run npx react-native init Music --version 0.71.3 on the terminal. Your template with the name ‘Music’ will be built on your local folder.
Note that, building a template before actually coding is a way to establish the basic structure and layout of the app. It can provide clarity and focus during the development process. This is what experts of React Native development company starts with.
Third-party plugin support
This is the crucial step in a React Native project, which makes the development process much easier. Developers dont have to build components from scratch. They can import the components from the relevant third-party library and use them in the codebase.
Let’s see what plugins we will use in our project.
They are as follows.
- React-native-simple-audio-player
- @react-navigation/native-stack
- @react-navigation/native
To install these libraries, you have to pass commands on your project terminal. Open the VS code editor from your template folder and make a new terminal.
Then pass the following commands on the terminal
- npm i react-native-simple-audio-player
- npm i @react-navigation/native-stack
- npm i @react-navigation/native
We will see its use case later in the article.
Starting with the code-building process
For the entire codebase, here, is the source code attached which you can refer to.
Creating the assets folder
Before getting into the coding part, you have to add an image folder as an asset for the project. These images are the thumbnail for the albums you will add to your music app.
So, make an ‘assets’ folder in your project template and then create an ‘album-arts’ folder in the ‘assets’. You can add as many thumbnails as you prefer.
Refer to image 1 for the assets folder of my project.
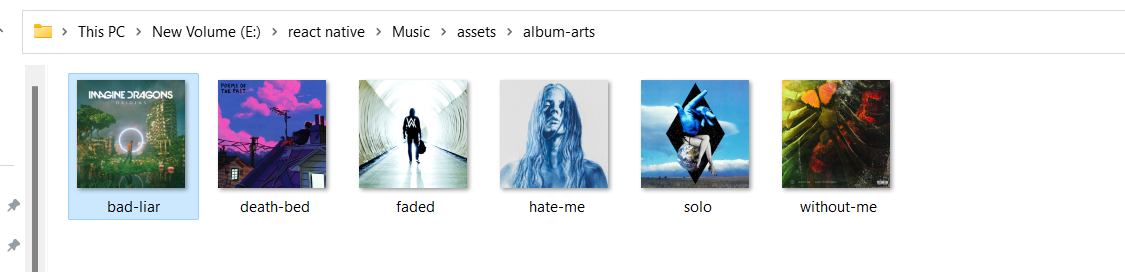
Image 1
Note that you have to add the thumbnail images in the same dimensions.
Now, you have to create a codebase for four. js files namely Data.js, AudioPlayer.js, SongScren.js, and the main App.js file.
Create a ‘Components’ folder in which you have to add the Data.js, AudioPlayer.js, and SongScreen.js files.
A .js folder for storing the data of the music album
Here, you have to create a ‘Data.js’ folder to store the data for the songs you want to display in your music app.
Below mentioned is a part of the codebase that you need to add to your Data.js folder.
1
2
3
4
5
6
7
8
9
const songs = [
    {
      title: 'death bed',
      artist: 'Powfu',
      artwork: require('../assets/album-arts/death-bed.jpg'),
      url: 'https://www.learningcontainer.com/wp-content/uploads/2020/02/Kalimba.mp3',
      duration: 2 * 60 + 53,
      id: '1',
    },
This code defines an array of music tracks, where each track is represented by an object with various properties like title, artist, duration, id, artwork and audio file URL.
Here, the ‘artwork’ is the image file representing the album artwork for the track. It is loaded using the ‘require’ function from a local file path
../assets/album-arts/death-bed.jpg.
Check the complete codebase for the Data.js folder in the linked GitHub repository.
Codebase for the SongScreen.js folder
Open the SongScreen.js folder under the ‘components’ folder.
1
2
3
import { StyleSheet, Text, View,FlatList, Image,TouchableOpacity } from 'react-native'
import React from 'react'
import songs from './Data'
The code mentions the components that will be needed in this SongSccreen.js folder.
StyleSheet, Text, View, flatList, Image, TouchableOpacity, and React are the built-in components.
The keyword ‘songs’ represents the default exported value from the Data.js file.
1
2
3
4
const SongScreen = ({navigation}) => {
  return (
    <View style={styles.container}>
    <Text style={styles.headerText}>Song List</Text>
SongScreen is the functional component. It takes a single parameter ‘navigation’ as a destructured prop.
The return statement inside the SongScreen component returns a View component that contains a Text component with the text ‘Song List’. Styling elements are added to both the View and the Text elements.
1
2
3
4
5
6
7
8
9
10
11
12
13
14
15
16
17
18
19
 <FlatList
 data={songs}
 renderItem={({item,index})=>{
    return(
<TouchableOpacity style={styles.box} onPress={()=>navigation.navigate('AudioPlayers',item)}>
<Image source={item.artwork} style={styles.img}/>
<View style={{marginLeft:15}}>
<Text style={styles.title}>Title :- {item.title}</Text>
<Text style={styles.title}>Artist :- {item.artist}</Text>
<Text style={styles.title}>Duration :- {item.duration}</Text>

</View>
</TouchableOpacity>
    )
 }}
 />
    </View>
  )
}
The above code snippet renders a list of songs using the FlatList component.
Each song item in the list is rendered using the TouchableOpacity component. It has an onPress event handler that navigates to the AudioPlayers screen and passes the selected song item as a parameter.
The renderItem function of the FlatList component is used to define how each item in the list is rendered.
The item parameter represents the data for each song item, while the index parameter represents the index of the item in the songs array.
Inside the TouchableOpacity component, an Image component is used to display the artwork of the song. The Text components are used to display the title, artist, and duration of the song.
1
2
3
4
5
6
7
8
9
10
11
12
13
14
15
16
17
18
19
20
21
22
23
24
25
export default SongScreen

const styles = StyleSheet.create({
    container:{
        flex:1
    },box:{
        width:'100%',
        height:100,
        backgroundColor:'black',
        marginVertical:3,
        flexDirection:'row'
    },img:{
        width:100,
        height:100
    },title:{
        color:'#ffffff',
        fontSize:16,
        marginTop:5
    },headerText:{
        alignSelf:'center',
        fontSize:20,
        color:'#000000',
        textDecorationLine:'underline'
    }
})
This the last segment of SongScreen.js folder where the code exports the Songscreen component and use five styling objects to define the styling parameters used in the SongScreen.js folder.
These styles are applied to a list of songs with corresponding details, creating a visually appealing and organized layout for the user.
Creating the AudioPlayer.js file
Go to the AudioPlayer.js file from the ‘Components’ folder and start coding
1
2
3
import { Image, StyleSheet, Text, View } from 'react-native'
import React from 'react'
import {AudioPlayer} from 'react-native-simple-audio-player';
First, introduce all the components that will be required in this file. This is done using the ‘import’ statement. The most important component is the ‘AudioPlayer’ imported from the third-party plugin 'react-native-simple-audio-player'.
1
2
3
const AudioPlayers = ({route}) => {
    const URL=route.params.url
    console.log(URL)
Here, AudioPlayer is the function component. It has a prop ‘route’ attached to it as a parameter. Using destructuring assignment, it extracts the url parameter from the route prop.
Finally, it logs the value of URL to the console.
1
2
3
4
5
6
7
8
9
10
11
12
13
14
15
return (
        <View
          style={{
            flex: 1,
            backgroundColor: '#313131',
            justifyContent: 'center',
          }}>

          <AudioPlayer
            url={URL}

          />
        </View>
      );
}
The code snippet renders a View component. It has flex value of 1, which implies that it takes up the full screen. It has a background color of '#313131' and aligns its child components in the center.
Here, the child component is an AudioPlayer component that is passed a URL as a prop. It is responsible for playing audio content from the defined URL.
export default AudioPlayers
const styles = StyleSheet.create({})
Embedding all the .js files in the App.js file
1
2
3
4
5
6
import { StyleSheet, Text, View } from 'react-native'
import React from 'react'
import SongScreen from './Components/SongScreen'
import { createNativeStackNavigator } from '@react-navigation/native-stack';
import { NavigationContainer } from '@react-navigation/native';
import AudioPlayers from './Components/AudioPlayer';
As you can notice from the above code snippet, the code imports all the relevant components. Apart from the core components, SongScreen and AudioPlayers are imported from ./Components/SongScreen and ./Components/AudioPlayer respectively.
Lastly, it imports createNativeStackNavigator and NavigationContainer from third-party libraries.
1
2
3
4
5
6
7
8
9
10
11
12
const App = () => {
  const Stack = createNativeStackNavigator();
  return (
    <NavigationContainer>
    <Stack.Navigator>
    <Stack.Screen name="SongScreen" component={SongScreen} options={{ headerShown: false }}/>
    <Stack.Screen name="AudioPlayers" component={AudioPlayers} options={{ headerShown: false }}/>
    </Stack.Navigator>
       </NavigationContainer>

  )
}
Here, the App component creates a stack navigator using the createNativeStackNavigator function.
There is a Stack.Navigator component inside the NavigationContainer component. It has two Stack.Screen. One is the ‘SongScreen’ and the other one is the ‘AudioPlayers’. They have their corresponding components, SongScreen and AudioPlayers, respectively.
Both screen components have their headerShown options set to false. It implies that the header bar will not be displayed on these screens.
Thus, it defines the navigation structure of the music app, with two screens that can be navigated between using the stack navigator. The first screen is the song screen, while the second screen is the audio player screen that will play the song.
export default App
const styles = StyleSheet.create({})
How to run the program on the emulator?
After creating the project, you have to check whether it is properly running on a device. Here, we have considered an emulator. So, here are the steps you can follow to run your program on the emulator.
- Open the cmd from your project.
- Pass npm install
- Pass npx react-native run-android
It will run your built program on a virtual device or emulator. Consider image 2 for the output.
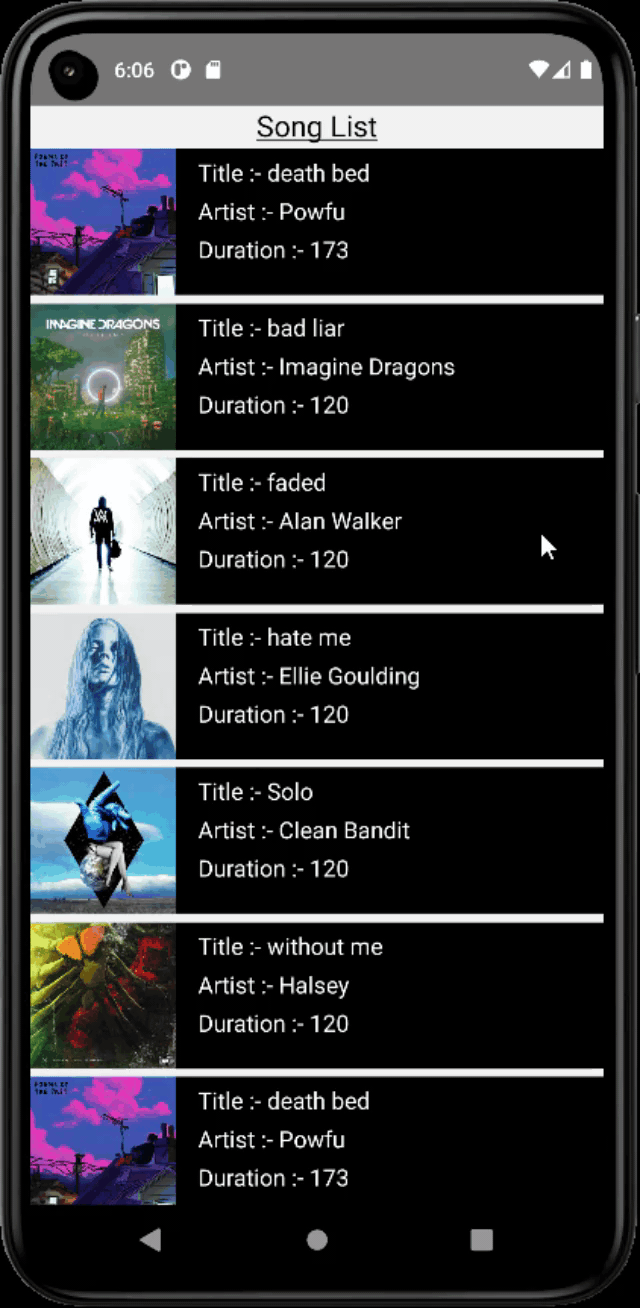
Image 2
To wrap up
Building a music app using React Native can be an exciting and challenging task, but it's definitely worth the effort. By following the steps mentioned in this guide, you can create a functional and user-friendly music app that meets the needs of your target audience.
With its flexibility, ease of use, and ability to run on both iOS and Android platforms, React Native is an excellent choice for developing a music app that can be enjoyed by music lovers everywhere.

A science graduate who has a keen interest to lean about new technologies and research area. With an experience in the field of data analytics and content writing, she aims to share her knowledge among passionate tech readers.

