How to add stack Navigator in React Native app?

Navigating between multiple screens of mobile is easier if you are building the mobile app with React Native. If you are a React Native developer and into front-end development, prioritising React Native framework over other framework is the best choice as it supports several third-party plugins, and reusable components. In this blog, we will learn how to use React Native framework to add stack navigation functionality in our mobile app.
The utility of Stack Navigator
With Stack Navigator, you can allow users to easily transit or navigate between different app screens. What you are doing is placing a new screen over a stack. Although this functionality can be added to both Android and iOS, you have to customise while adding stack navigator to each of these OS. Also, by default, the functionality of stack navigator is designed in such a manner that it has a familiar look for both the OS.
If you are thinking about whether this functionality can be added to web pages, then you are right. Native Stack Navigator provides Web support. However, for this, you have to consider react-native-web.
Note that @react-navigation/native-stack provides native performance on iOS. However, it is not as much as flexible and scalable as @react-navigation/stack. So, I believe, considering @react-navigation/stack, which is a way more dynamic JS-based alternative, you can add uniqueness to your app’s UX.
However, since we are focused on adding a stack navigator to Android-based mobile apps, we will be using @react-navigation/native-stack. Also, we can get native performance to our app interface using @react-navigation/native-stack.
Now, let’s understand the configuration procedures and other requirements in detail.
Prerequisites context
React Native Environment setup
Before getting into the installation of third-party plugins, you have to set the environment of React Native. Since we are using the React Native CLI and not the Expo CLI to build the project, we have set the environment accordingly. Check the attached article and get the detailed steps on the React Native setup process.
Create a basic React Native template
Yes, after the environment setup, you need to make the template where you will link the dependencies and moving forward embed the codebase. This is quite an easy step to follow. I can guide you along if you are willing to.
- Make a simple folder that you usually do in the local drive. Let me explain to you in detail. Go to your home screen and right-click. You will see an option ‘New’, click on it and then click on the ‘Folder’ option. Refer to image 1.
You can give it any name you like. In my case, I have given it the name ‘React-Native-project’.
Run cmd (command prompt) from this folder.
- You have to execute npx react-native init Stack_Navigator --version 0.68.1 in the command prompt. Here, I have named the React Native template as Stack_Navigator and the React Native version I am considering is 0.68.1.
- After passing this command and hitting on the Enter key on your keyboard, your template will be built.
As you are done with the two crucial steps, we will head towards the third pre-requisite context of this project.
Third-party plugin support for the project
The configuration step is about installing third-party libraries. The most useful feature of the React Native framework that I want to bring to your knowledge is that you can import the components that you need to build your project. Even if the react-native library does not have those components, you can get it from the third-party library. All you need to install and link the plugin to your project. This will make your development process much easier.
For the present project, you will need the following dependencies or plugins.
- @react-native-screens- This plugin offers native functionality to present screens. This is way different from that of a screen built with simple View components. This way, you can optimize the UX of your app screen. To install this dependency, run npm i react-native-screens on your project terminal.
- @react-native-masked-view/masked-view- With this plugin, you can get a masked view in which the pixels that intersect with the produced view within the mask element are displayed. To get this dependency, you have to execute, npm i @react-native-masked-view/masked-view from your app terminal. Also, if you are working with React Native of version >= 0.60, you don't have to worry about the manual linking process, it will be auto-linked to your project.
- @react-native-safe-area-context- This plugin is compatible with Android, iOS, and even Web. For the dependency, run npm i react-native-safe-area-context in your project folder.
- @react-navigation/native- This plugin is useful for screen navigation. With this plugin, you can go for tabbed navigation and stack navigation patterns. You have to run npm i react-native-navigation in your project terminal.
- @react-navigation/native-stack- With the plugin, you can get the createNativeStackNavigator component and render a native view to your app screen transition pattern. To install this dependency, pass npm install @react-navigation/native-stack in your app terminal.
Getting started with the codebase
Open the command prompt from your system. Run cd Stack_Navigator on the cmd. As it directs you to the folder Stack_Navigator, run code .. It will open the code editor from your app (template).
If you are looking for this entire project, you can access it through the attached GitHub link.
Creating the Home.js file
Create a file with the name ‘Home.js’ in your code editor and add the syntax given below.
1
2
import { StyleSheet, Text, View,Image,TouchableOpacity } from 'react-native'
import React from 'react'
Import StyleSheet, Text, View, Image and TouchableOpacity from react-native. Also, use the import statement to get the entire React from the react library.
1
2
3
4
const Home = ({navigation}) => {
    const NavigationPage=()=>{
            navigation.navigate('About')
    }
Here, the code creates a React component Home. The Home component has a button that when pressed will navigate to the About page.
The main operation behind navigating to the ‘About’ page is that the code uses the navigation prop that is passed in to the Home component to create a function NavigationPage. This function will navigate to a page ‘About’ when the button is pressed.
1
2
3
4
5
6
  return (
    <View style={styles.container}>
    <View>

    <Text style={styles.Navigation_text}>Navigation Page</Text>
    <Image source={{uri:'https://i.pinimg.com/236x/35/42/7e/35427ec2c245cb70b1424f6ab511ed01.jpg'}} style={styles.image}/>
The code creates a navigation page. The View component is used to create a container for the page, and the Text and Image components are used to display text and an image. The styles.container, styles.Navigation_text, and styles.image are all references to styles used for View, Text, and Image elements.
The image source is an uri to an image on the internet and the text element shows ‘Navigation Page’.
1
2
3
4
5
6
7
8
<TouchableOpacity style={styles.create_btn} onPress={()=>NavigationPage()}>

         <Text style={styles.btn_text}>Open Page</Text>
         </TouchableOpacity>
    </View>
    </View>
  )
}
Here, we are creating a button using TouchableOpacity. The button has a text element ‘Open Page’. On pressing this button, it will enable the onPress prop, which will eventually be set to call the NavigationPage() function and will open the new page.
The style of the button is set using the styles object. The text of the button is set using the Text component, and the style of the text is set using the btn_text style from the styles object.
After creating the Home component, you have to export this component. For this use the line export default Home.
We are done with the main part of the Home.js file. Now for the styling objects, you can consider the below-given code syntax.
1
2
3
4
5
6
7
8
9
10
11
12
13
14
15
16
17
18
19
20
21
22
23
24
25
26
27
28
29
30
31
32
const styles = StyleSheet.create({
    container:{
        flex:1,
        backgroundColor:'#000000'
      },Navigation_text:{
        fontSize:20,
        color:'#ffffff',
        alignSelf:'center',
        marginTop:20

      },image:{
        width:'100%',height:500,
        marginTop:20
      },create_btn:{
        width:340,
        height:50,
        backgroundColor:'#CD5808',
        borderRadius:20,
        alignItems:"center",
        justifyContent:'center',
        marginHorizontal:30,
        marginTop:20
      },btn_text:{
        color:'#ffffff',
        fontSize:20
      },FullBack_width:{width:'100%',
      height:'100%',
      position:'absolute',
      elevation:1,
      backgroundColor:'rgba(0, 0, 0, 0.65)',
      flex:1},
})
Starting with the StyleSheet component, you need to use different styling parameters for the styling objects (container, FullBack_width, btn_text, create_btn, image and Navigation_text).
Creating the Contact.js file
It is a simple Contact screen that will render the text ‘Contact’. Let's see how we can construct the Contact screen.
import { StyleSheet, Text, View } from 'react-native'
import React from 'react'
Get the components react-native library. Here, I have imported StyleSheet, View, and Text from react-native. I have also imported React. This is not a mandatory import. If you want, you can skip it.
1
2
3
4
5
6
7
const Contact = () => {
  return (
    <View>
      <Text>Contact</Text>
    </View>
  )
}
This code defines a function Contact. It returns a View component with a Text component inside it.
The Text and View components are used to create user interfaces of the Contact screen.
The Text component will render a text element ‘Contact’ on the screen.
export default Contact
const styles = StyleSheet.create({})
These are the two codelines that you have to add to export the function App and introduce the StyleSheet component.
Note that StyleSheet is for designing the app further using styling objects and associated parameters.
Creating the App.js file
This is the main file of the project where you need to undertake the pivotal code executions.
1
2
3
4
5
import { createNativeStackNavigator } from '@react-navigation/native-stack';
import About from './About';
import Home from './Home';
import { NavigationContainer } from '@react-navigation/native';
import Contact from './Contact';
The first line imports the createNativeStackNavigator component from the @react-navigation/native-stack library. This component, considered a function, is used to create a stack navigator, which is a type of navigator that allows users to move between different screens in the app.
Also, you have to import the About component from the./About file, the Home component from ./Home file, and the contact component from the./Contact file. These are the files that you created in the above sections and stored in the root directory of your app.
These components will be used as screens in the navigation system.
The fourth line imports the NavigationContainer component from the @react-navigation/native library. This component is used to hold the navigation system and provide access to the navigation functions.
1
2
3
4
5
6
7
8
9
10
11
12
13
14
const Stack = createNativeStackNavigator();

 function App() {
  return (
    <NavigationContainer>
    <Stack.Navigator>
      <Stack.Screen name="Home Page" component={Home} />
      <Stack.Screen name="About" component={About} />
      <Stack.Screen name="Contact" component={Contact} />


    </Stack.Navigator>
    </NavigationContainer>
  );
This code creates a navigation stack with three screens, Home Page, About, and Contact.
The createNativeStackNavigator() function creates a new Stack object that will be used to create a navigation stack. The App() function returns a NavigationContainer component with a Stack.Navigator component inside it.
The Stack.Navigator component has three Stack.Screen child components inside of it. Each has a specific name and a component. The names are Home Page, About, and Contact, and the components are Home, About, and Contact respectively.
To export the App function, consider the line export default App. It is the method of sharing code between files, particularly practiced in JavaScript projects.
Creating the About.js file
Here, we will create the About screen. For this let’s have a look at the codebase for the About.js file.
1
2
import { StyleSheet, Text, View ,Image,TouchableOpacity} from 'react-native'
import React from 'react'
Import the native components from the react-native library. The native components are Text, View, TouchableOpacity, Image and StyleSheet.
1
2
3
4
const About = ({navigation}) => {
    const NavigationPage=()=>{
        navigation.goBack()
    }
This syntax creates a React component About. It is a functional component that takes in a parameter called navigation.
Inside the component, it creates a function called NavigationPage which uses the navigation parameter to go back to the previous page.
This code syntax defines a function NextPage. As this function is called, it will navigate to a page called 'Contact'.
This function uses the navigation object, which is a built-in object in React Native that allows you to navigate between different screens in your app.
1
2
3
4
5
6
7
8
9
10
11
12
13
14
15
16
17
18
return (
    <View style={styles.container}>
    <View>

    <TouchableOpacity style={styles.create_btn} onPress={()=>NavigationPage()}>

    <Text style={styles.btn_text}>Back Page</Text>
    </TouchableOpacity>
    <Image source={{uri:'https://i.pinimg.com/236x/94/52/a4/9452a42c209c8376343989045bd6877a.jpg'}} style={styles.image}/>
    <TouchableOpacity style={styles.create_btn} onPress={()=>NextPage()}>

         <Text style={styles.btn_text}>Next Page</Text>
         </TouchableOpacity>

    </View>
    </View>
  )
}
This code syntax creates a view with two buttons and an image. The first button has the text "Back Page" on it. On pressing this button, it will call the NavigationPage() function. The image is a picture from a web source. You can add any picture you like.
The second button has the text "Next Page" on it. It will call the NextPage() function on pressing.
The styles object is used to style the view, buttons, and image element.
To use this About component in other files, you have to export the component. For this, use the code line export default About.
Going forward with the codebase, we are only left with the designing part. For the About screen, the code defines six styling objects: container, Navigation_text, image, create_btn, btn_text, and FullBack_width. Here is how you can organize the styling objects.
1
2
3
4
5
6
7
8
9
10
11
12
13
14
15
16
17
18
19
20
21
22
23
24
25
26
27
28
29
30
31
32
const styles = StyleSheet.create({
    container:{
        flex:1,
        backgroundColor:'#000000'
      },Navigation_text:{
        fontSize:20,
        color:'#ffffff',
        alignSelf:'center',
        marginTop:20

      },image:{
        width:'100%',height:500,
        marginTop:20
      },create_btn:{
        width:100,
        height:50,
        backgroundColor:'#CD5808',
        borderRadius:20,
        alignItems:"center",
        justifyContent:'center',
        marginHorizontal:30,
        marginTop:20
      },btn_text:{
        color:'#ffffff',
        fontSize:15
      },FullBack_width:{width:'100%',
      height:'100%',
      position:'absolute',
      elevation:1,
      backgroundColor:'rgba(0, 0, 0, 0.65)',
      flex:1},
})
We have completed creating all the four .js files.
Now, you need to check whether it is running as per expectation or not.
Testing the program on the emulator
Testing the program comprises a few steps to consider. You just need to open the command prompt and pass cd Stack_Navigator.
Note that Stack_Navigator is the template name in which I have embedded all the project code. If you have given it a different name, you have to type cd (The name of your project template). This will take you to that project folder.
Now, execute npm install and then npx react-native run-android.
As your emulator will start, you will see the project running on the virtual device. For my project, the output is shown in images 2,3, and 4.
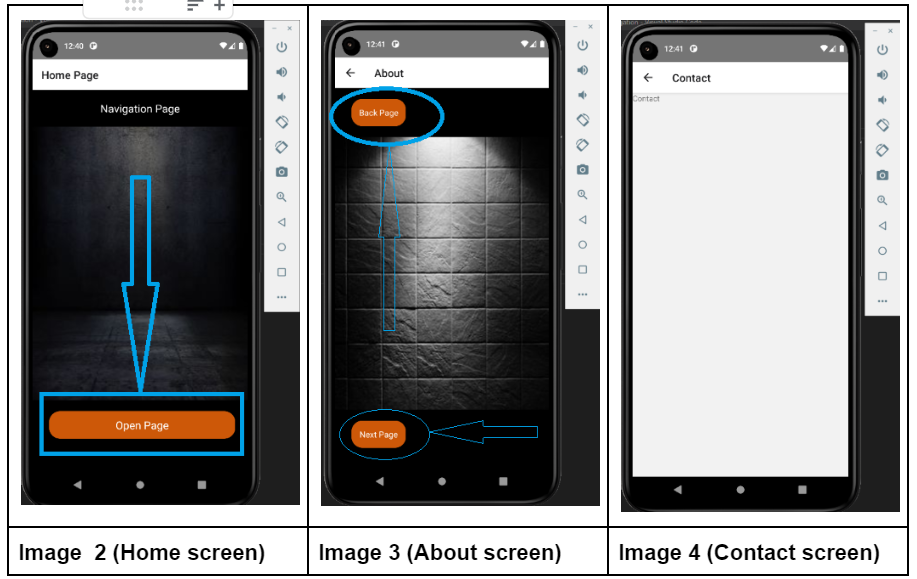
As you click the button ‘Open Page’ on the Home screen (image 2), it will take you to the About screen (image 3). You can either click on the ‘Next Page’ button to go to the next screen, which is the contact screen (image 4), or can press the ‘Back Page’ button to return to the Home screen.
So we have finally completed the project.
Final notes
The key points that you have to keep in mind while undertaking this project are mentioned as follows.
- Set up the environment (React Native)
- Create the template
- Install the third-party plugin
- Build the codebase for four different .js files
- Execute the built program on the emulator.

A science graduate who has a keen interest to lean about new technologies and research area. With an experience in the field of data analytics and content writing, she aims to share her knowledge among passionate tech readers.

