How to add range sliders in react native apps?

Using the React Native framework in the app development process can be fun and at the same time exciting. If you have already been familiar with this cross-platform app development framework, you know that adding features and functionalities to an app is so much easier for a mobile developer React Native framework and if you want to Hire React Native Developers for reusable components which increases the speed of app development.
Continuing with this fact, in this blog, I will explain the process to add range sliders in your React Native apps.
What is a Range slider?
As the term ‘slider’ suggests, a range slider is an element that users can slide through a predefined range as per their choice. It has movable pointers using which users can set the range and search for the products which will lie within the set range. Refer to image 1 for a demo of a variety of range sliders in React Native.
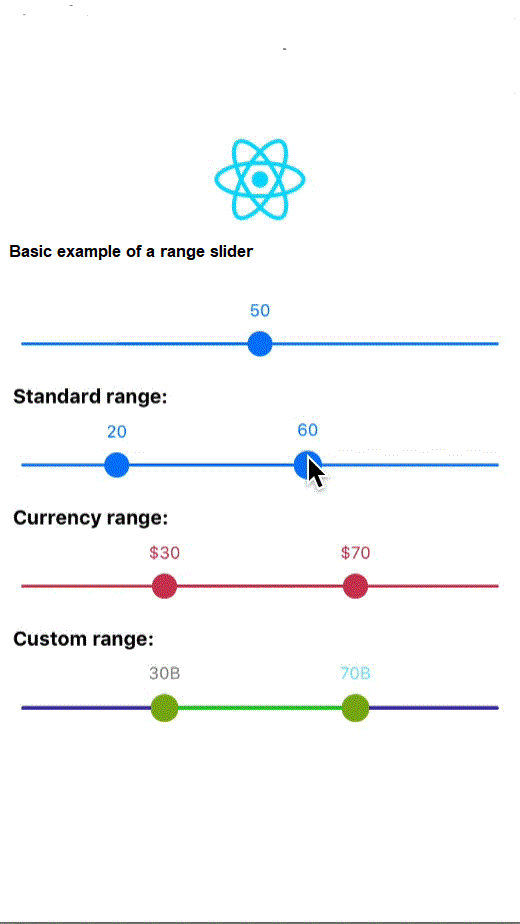
Image 1
This range slider is used for those apps which require some numerical values to deal with such as eCommerce apps. At a much-advanced level, you can also use range sliders to set the range of your product category.
However, in this blog, we will learn about the steps of adding range sliders associated with numerical values.
For this, you need to acquire prior knowledge.
Prior-needed knowledge: What are those?
- First, you have to set up the environment. If you have not done it before or if you are new to starting with the React Native project, you need to get the environment. You cannot go forward in the following explained steps if you have not installed Node.js, Android Studio, an IDE, and other important SDKs. Check the article attached and get detailed learning about its setup process.
Note that, since we are using the React Native CLI tool, you have to go straight to the sections of React Native CLI and not the Expo CLI.
- Following the setup process, you have to create a basic template using this framework. This is about building a simple React Native file. Let's see how you can build this template.
- Create a folder in your C drive. I have named it ‘
RN_Project’. - Open the folder and run the Command prompt from this
RN_Projectfolder. - You have to execute a command line
npx react-native init slider --version0.68.1. slider is the name of my project template. You can change the name if you want. However, for this, you must also change the name from the command line. After running this command, you can find this project template created in your RN_Project folder.
- Now, the knowledge that you have to acquire is about installing the
@ptomasroos/react-native-multi-slider in your project. @ptomasroos/react-native-multi-slideris a third-party plugin or you can consider it as a JavaScript-based RN slider component. It has either single or double markers. Also, you can customise the touch section on the slider and create a customer tracker for the slider; thereby providing a multitude of options for value changes.
To install this plugin in your project, you have to execute a command npm i @ptomasroos/react-native-multi-slider in your project terminal.
Let's start with the main segment of project development, which includes the coding part.
Getting started with the program development
If you want to look at the complete codebase, click on the link attached and access the complete project at GitHub repository.
You have to frame the codebase in the App.js file. Let's understand the code syntax for the project in fragments.
1
2
3
import { StyleSheet, Text, View ,Dimensions,TouchableOpacity} from 'react-native'
import React,{useState} from 'react'
import MultiSlider from '@ptomasroos/react-native-multi-slider';
This code imports different React Native components from the React Native library.
The StyleSheet, Text, View, Dimensions, and TouchableOpacity components are all used to build the user interface for the app.
The MultiSlider component is used to create a slider that allows the user to select a range of values.
The React and useState components are used to create a React component and to store the state of the slider.
1
2
3
4
5
6
7
const App = () => {
  const [value,setValue]=useState({values: [0,37],})
  const multiSliderValuesChange = (values) => {
    setValue({
        values,
    });
}
This code creates a component App.
It uses the useState hook to build a state variable value. It is an object with a key of values and an array of two numbers [0,37] as its value.
The App component also has a function called multiSliderValuesChange which takes the parameter values. This function sets the value of the state variable to the values parameter.
1
2
3
4
5
6
7
8
  return (
    <View style={styles.container}>

    <Text style={styles.slider_Length}>slider</Text>

   <View style={styles.slider_box}>

     <Text style={styles.Text}>slider</Text>
This code uses React Native to build a slider component.
The View component is used to create the container for the slider.
The Text component is used to create a text label for the slider.
The Slider component is used to create the slider itself. It has a minimum value of 0, a maximum value of 100, and a step size of 1. The value of the slider is stored in the state of the component, and when the value of the slider is changed, the state is updated with the new value.
1
2
3
4
5
6
7
8
9
10
11
12
13
14
15
16
17
18
19
20
 <MultiSlider
     values={[value.values[0],value.values[1]]}
     sliderLength={200}
     selectedStyle={{backgroundColor:'#CD5808',}}
     containerStyle={{alignSelf:'center',marginTop:-10}}
     onValuesChange={multiSliderValuesChange}
     markerStyle={{
       ...Platform.select({
         android: {
           height: 13,
           width: 13,
           borderRadius: 50,
           backgroundColor: '#CD5808'
         }
       })
     }}
     min={0}
     max={37}
     step={1}
     />
Here, the code creates a multi-slider component with two values, a slider length of 200 pixels, a selected style of background color #CD5808, a container style of alignSelf and marginTop, and a marker style of height, width, borderRadius, and background color.
It also sets the min, max, and step values to 0, 37, and 1 respectively.
The multi-slider is a type of user interface element that allows the user to select multiple values at once.
The onValuesChange function will be called when the values of the slider change.
1
2
3
4
5
6
7
8
9
10
11
12
<View style={{flexDirection:'row',alignItems:'center',
justifyContent:'center',marginTop:-20}}>
     <Text style={{color:'#DBDBDB'}}>{value.values[0]} min</Text>
     <Text style={{fontSize:20,color:'#DBDBDB'}}> - </Text>
     <Text style={{color:'#DBDBDB'}}>{value.values[1]} max </Text>
     </View>
     </View>
    </View>
  )
}

export default App
This code builds a view component with some styling.
The styling includes flexDirection set to row, alignItems set to center, justifyContent set to center, and a marginTop of -20 pixels.
Inside the view component, there are three text components. All three text components have a color of #DBDBDB and the last text component has a fontSize of 20 pixels.
The text components display values from an array called value.values.
The first text component displays the first value mentioned in the array, the second text component displays a hyphen, and the last or third text component displays the second value specified in the array.
1
2
3
4
5
6
7
8
9
10
11
12
13
14
15
16
17
18
19
20
const styles = StyleSheet.create({
  container:{flex:1,backgroundColor:'#000000'},
  slider_Length:{color:'#ffffff',
  fontSize:22,
  alignSelf:'center',
  marginTop:20},
  slider_box:{width:Dimensions.get('window').width-60,
  height:86,
  marginHorizontal:28,
  backgroundColor:'rgba(255, 255, 255, 0.19)',
  borderRadius:10,
  marginTop:17,
},
Text:{color:'#FFFFFF',
fontSize:20,
marginHorizontal:10,
marginTop:10
}

})
This code creates a styles object used to style components in a React Native app.
The styling objects include container, slider_Length, and slider_box.
The container object sets the flex value to 1 and the background color to black.
The slider_Length object sets the color to white and the font size to 22 pixels, and also sets the alignment of the text to center and the margin-top to 20 pixels.
The slider_box object sets the width and height of the box, the margin horizontal and vertical, the background color, the border radius, and the margin-top.
The Text object sets the color to white, the font size to 20 pixels, and the margin horizontal and vertical to 10 pixels.
Now, we have to check whether the program is running properly or not.
Executing the codebase in an Emulator
In this step, you have to run the cmd from your project template or, you can simply open the command prompt and type cd your project name. In my case, it is cd slider. This will take you to your project from which you have to run two commands.
The first one is npm install and the next one is npx react-native run-android. The first command will download all the dependencies and the next one will activate the emulator.
As soon as your emulator starts, your app interface will be displayed on it.
Refer to image 2 for the output of my project. It has a minimum value of 0 and a maximum value of 37.
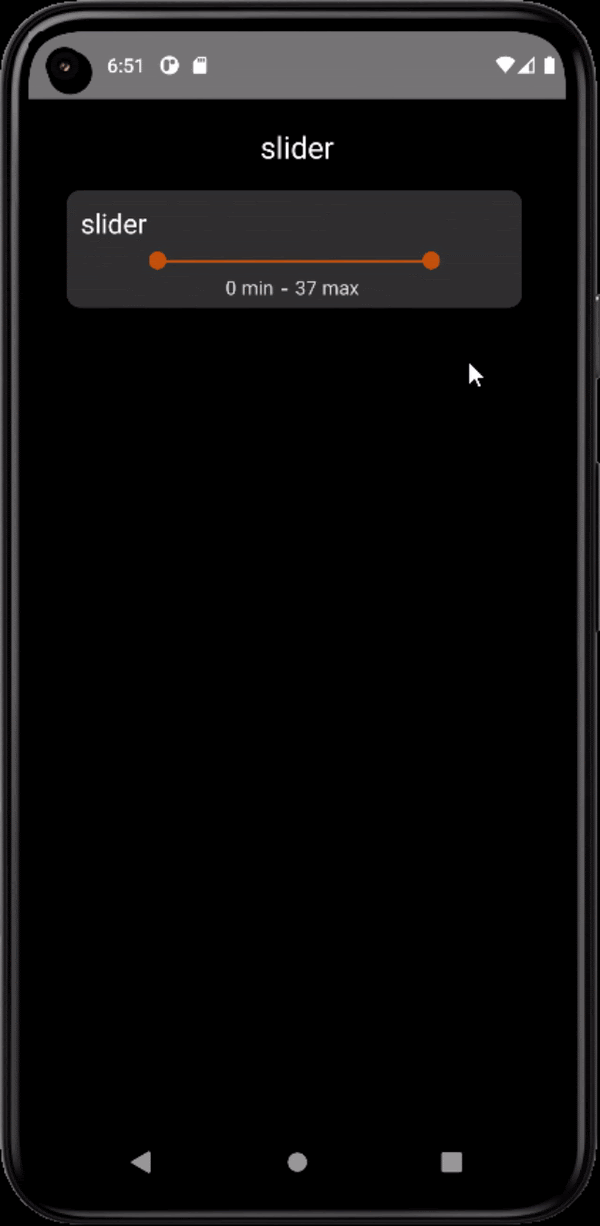
Image 2
Summarising Key points
Building a range slider is quite easy. However, you have to focus on the following points.
- Get the React Native Environment.
- Build a template using the command:
npx react-native init slider --version 0.68.1. - Install and link
@ptomasroos/react-native-multi-slider - Frame the codebase in the App.js file.
- Run the program.

A science graduate who has a keen interest to lean about new technologies and research area. With an experience in the field of data analytics and content writing, she aims to share her knowledge among passionate tech readers.

