Creating Smart Bluetooth Scanning Apps using React Native
Every mobile device has an in-built Bluetooth feature in it. Thus, developers of the Android app development company should learn to create Bluetooth scanning apps. This is the basic feature that you must add to their device.
Here, in this article, we take the easiest approach to help understand the entire operation. So, whether you are a complete beginner or somewhat midway through your development journey, this blog is the perfect resource to build Bluetooth scanning apps using React Native.
Prerequisites for the Project
In a project, you may think that coding is all you have to do. However, this is not the truth. Without setting up the environment, creating a project folder and installing relevant libraries, you cannot get started with the coding part.
So, let’s see how can you do all the steps
Step 1: Environment Setup
If you are a beginner, you may not have set up the environment. However, if you have created a project on React Native, skip this step and move forward to the next.
If you fall under the first category, then let me give you a quick brief. To set up the environment, install npm or node.js globally, Android Studio, VS code editor and React Native CLI. Visit the blog ‘How to set up the React Native Development Environment’ curated by the experts of React Native app development company.
Step 2: Make a Folder for the Project
You need this folder to code and store the third-party libraries, you will need for the project.
So, create a new folder in your local C or E drive. Run the terminal from that folder and pass npx react-native init BlueTooth --version 0.71.11.
Congratulations! You have built the project. Also, you can change the name of the project as per your preference. Here, I have given it ‘BlueTooth’.
Step 3: Installing Libraries
Installing third-party libraries makes it easier for React Native app developers to work on projects. They don’t have to take time out for building every component from scratch. They just need to install the libraries and import the required components from the defined libraries.
Here, you need two such libraries: ‘react-native/Libraries/NewAppScreen’ and ‘react-native-ble-manager’.
‘react-native/Libraries/NewAppScreen’ is used for getting the ‘Colors’ component.
‘react-native-ble-manager’ is a library that provides a JavaScript interface for interacting with Bluetooth Low Energy devices in React Native applications. It allows you to scan for nearby BLE devices, connect to them, and communicate with their services and characteristics.
Step 4: Configuring ‘react-native-ble-manager’
In this step, you have to enable some permissions. Go to the ‘AndroidManifest.xml’ file in your project. You can find this file in the given pathway (android→ app→ src→ main→ AndroidManifest.xml).
Add the following segment in your AndroidManifest.xml file.

Make sure to add this section before the <application></application> tag.
Creating the App.js file
Check the entire source code in the GitHub repository.
1
2
3
4
import React, {useState, useEffect} from 'react';
import {Text, View, Platform, StatusBar, ScrollView, StyleSheet, Dimensions, SafeAreaView, NativeModules, useColorScheme, TouchableOpacity, NativeEventEmitter, PermissionsAndroid} from 'react-native';
import BleManager from 'react-native-ble-manager';
import {Colors} from 'react-native/Libraries/NewAppScreen';
This code syntax is an example of a React Native component that uses various modules and libraries for Bluetooth Low-Energy functionality.
This code sets up a React Native component that interacts with BLE devices. It imports necessary modules and libraries and defines the structure and appearance of the component using React Native's components and styles. The 'BleManager' library is used to handle BLE operations. The Colors object provides predefined colors for the component's UI.
1
2
3
4
5
6
7
8
9
const App = () => {
  const isDarkMode = useColorScheme() === 'dark';
  const backgroundStyle = {
    backgroundColor: isDarkMode ? Colors.darker : Colors.lighter,
  };
  const OnBlueTooth=()=>{
    BleManager.enableBluetooth().then(() => {
      console.log('Bluetooth is turned on!');
    });
This code snippet sets up a component 'App'. It determines the color outline of the device and further sets the background color accordingly. It also defines a function 'OnBlueTooth' that enables Bluetooth. It logs a note to the console when Bluetooth is successfully turned on. For this, it uses the 'BleManager.enableBluetooth()' method.
1
2
3
4
5
6
7
8
9
10
11
12
13
14
15
16
17
18
19
20
21
22
       if (Platform.OS === 'android' && Platform.Version >= 23) {
      PermissionsAndroid.check(
        PermissionsAndroid.PERMISSIONS.ACCESS_FINE_LOCATION,
      ).then(result => {
        if (result) {
          console.log('Permission is OK');
        } else {
          PermissionsAndroid.request(
            PermissionsAndroid.PERMISSIONS.ACCESS_FINE_LOCATION,
          ).then(result => {
            if (result) {
              alert('User accept');
            } else {
              alert('User refuse');
            }
          });
        }
      });
    }
  }
This code snippet checks for the Android platform and its version number. If the platform is Android and the version is 23 or higher, it uses the 'PermissionsAndroid.check()' method to check if the app already has permission to access the device's fine location.
If the permission is already granted (result is true), it logs the message "Permission is OK" to the console.
However, if the permission is not granted (result is false), it uses the 'PermissionsAndroid.request()' method to request permission from the user.
Once the permission request is made, a dialogue box appears asking the user to either grant or deny the permission.
If the user grants permission, the code inside the first 'then()' block is executed, and it displays an alert saying "User accept."
If the user denies the permission, the code inside the second 'then()' block is executed, and it displays an alert saying "User refuse."
1
2
3
4
5
6
7
8
9
10
11
12
13
14
15
16
17
 return (
    <SafeAreaView style={[backgroundStyle, styles.mainBody]}>
      <StatusBar
        barStyle={isDarkMode ? 'light-content' : 'dark-content'}
        backgroundColor={backgroundStyle.backgroundColor}
      />
      <ScrollView
        style={backgroundStyle}
        contentContainerStyle={styles.mainBody}
        contentInsetAdjustmentBehavior="automatic">
        <View
          style={{
            backgroundColor: isDarkMode ? Colors.darker : Colors.lighter,
            marginBottom: 40,
          }}>
The 'SafeAreaView' component is used as the top-level container. It ensures that the content is displayed within safe boundaries on the screen.
The 'StatusBar' component is used to control the appearance of the status bar. It is placed at the top of the screen. The 'barStyle' sets the text color of the status bar depending on the 'isDarkMode' variable. The 'backgroundColor' sets the background color of the status bar.
The 'ScrollView' component is used to create a scrollable area for the content within the component. It allows users to scroll vertically if the content exceeds the available screen space. The 'contentInsetAdjustmentBehavior' determines the scroll view pattern adjusting its content when the keyboard appears or disappears.
1
2
3
4
5
6
7
8
9
10
11
12
13
14
15
16
17
18
<View>
<Text
style={{
fontSize: 30,
textAlign: 'center',
color: isDarkMode ? Colors.white : Colors.black,
}}>
React Native BLE Manager Tutorial
</Text>
</View>
<TouchableOpacity activeOpacity={0.5} style={styles.buttonStyle} onPress={()=>OnBlueTooth()}>
<Text style={styles.buttonTextStyle}>Scan Bluetooth Devices </Text>
</TouchableOpacity>
</View>
</ScrollView>
</SafeAreaView>
);
};
The code snippet creates a user interface with some text and a button.
<View> acts as a container for other components. It helps to group and organize other elements.
<Text> is used to display text on the screen. In this case, it displays the text "React Native BLE Manager Tutorial".
<TouchableOpacity> provides touchable behavior, identical to a button. It has an onPress prop, which specifies the function 'OnBlueTooth()'. This function is called when the button is pressed.
<ScrollView> and <SafeAreaView> are used for scrolling and adding a safe area for content.
const windowHeight = Dimensions.get('window').height;
As this line of code is executed, it retrieves the height of the device's screen or window. Further, it assigns it to the variable 'windowHeight'. This is useful for dynamically adjusting the layout or styling of components based on the available screen height.
Later, the code uses the ‘Stylesheet’ object to design the app.
How to Execute the Program?
To check whether you have successfully created the program, run the program on the emulator.
Open a terminal from the specified project folder. Pass two commands on the terminal.
npm install.npx react-native run-android.
Wait for some time and refer to the below-given final output.
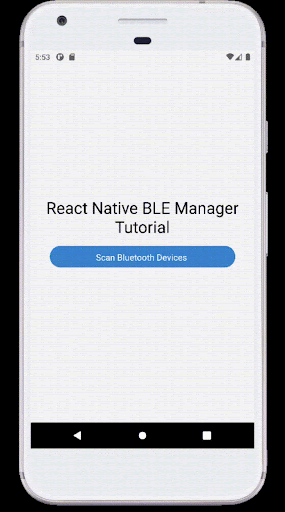
Take a look at what the app interface would seem like.
Final Thoughts
The most important part that you need to consider is the proper installation of the library ‘react-native-ble-manager’. The other thing is much simple. To ensure that you don’t blindly copy and paste the code from the source, this blog provides a detailed explanation of each code segment.
With the intent to make the process much more transparent, this article explains the steps of creating a Bluetooth scanning app from scratch. Get going with the mentioned steps.

A science graduate who has a keen interest to lean about new technologies and research area. With an experience in the field of data analytics and content writing, she aims to share her knowledge among passionate tech readers.

