Creating React Native Swipeable Gesture Handler Navigation in Mobile App
In today's mobile app development landscape, providing intuitive and engaging user experiences is paramount to the success of any application. When creating fluid and interactive interfaces, the ability to incorporate swipeable gestures plays a crucial role. That's where React Native Swipeable Gesture Handler comes into the picture.
React Native Swipeable Gesture Handler is an incredibly powerful library that gives developers like you the ability to effortlessly incorporate swipeable gestures into your React Native applications. It offers a wide range of customizable features, allowing a React Native app development company to create delightful interactions that will truly captivate your users. Picture swipeable cards that effortlessly glide across the screen, or draggable components that respond to your touch with seamless precision. With this library in your toolkit, you will have all the necessary resources to build apps that are not only visually stunning but also incredibly engaging and user-friendly.
In this blog, we will create a swipeable gesture handler motion in an app. So, let’s get started.
Getting Started with the Pre-requisites
This is the most important segment which you cannot miss out on. These are as follows.
Set up the Environment
Make sure that you have set up the environment. However, If you have not, check the blog on ‘How to set up the React Native Development Environment. It won’t take you long to set up the environment. All you need to do is install Android Studio and NPM globally on your system. Also, you have to install the React Native CLI and configure the ANDROID_HOME.
However, if you are entirely new to the development journey, you may need some time to get this thing done.
Build the Project Folder
For every project you build using React Native framework, create a separate folder.
Follow the simple steps mentioned below.
- Open a folder from your system.
Note: Your current project will be created in this folder. So, make sure you remember the folder name and location.\ - Run a terminal from the folder.
- Pass a command npx react-native init Swipe--version 0.68.1. In this command, ‘Swipe’ is the name of the project and ‘0.68.1’ is the version of React Native.
Wait for some time, until it displays ‘your project is created’.
Get the Third-Party libraries
React Native offers third-party support. This implies that you don’t have to build the component but import the relevant components from external libraries and modules.
For the current project, install ‘react-native-gesture-handler’. To install it, run the cmd from your project ‘Swipe’ and pass npm i react-native-gesture-handler.
React Native Gesture Handler is an external library that offers native-driven APIs for managing gestures in React Native applications. Unlike the traditional JS responder system, this library enables gestures to be recognized and tracked directly on the UI thread. As a result, touch interactions and gesture tracking become smoother, more reliable, and predictable.
As we have completed the initial section of the project, let’s get into the primary section, i.e., the coding part.
The Coding Segment
Here, you have to work on two folders, namely SwipeGesture.js and App.js. For your quick reference, here is the source code.
To Create the SwipeGesture.js
Not to make the project complicated, make distinct files for different screens. In this segment, we will be adding the ‘swipeable’ functionality. Let’s get things done.
Importing Components and Modules
1
2
3
import React from 'react';
import {SafeAreaView, StyleSheet, View, Text, StatusBar, FlatList} from 'react-native';
import Swipeable from 'react-native-gesture-handler/Swipeable';
The code imports ‘React’, ‘SafeAreaView’, ‘Text’, ‘View’, ‘StyleSheet’, ‘FlatList’ and ‘StatusBar. It also imports a custom component ‘Swipeable’ from an external library ‘react-native-gesture-handler/Swipeable’. This component enables swipeable gestures.
Creating a List of Tasks
1
2
3
4
5
const todoList = [
  { id: '1', text: 'Learn JavaScript' },
  { id: '2', text: 'Learn React' },
  { id: '3', text: 'Learn TypeScript' },
];
Let's consider you have some tasks to be completed. Here is the list shown in the given code snippet. Each task has a unique ID and a description. The code uses JavaScript objects.
Here are the tasks mentioned below.
Task ID: 1, Description: Learn JavaScript
Task ID: 2, Description: Learn React
Task ID: 3, Description: Learn TypeScript
The 'todoList' variable is an array that saves these tasks. Each task represents an object within the array. The objects have two properties: 'id' and 'text'.
The Use of ‘Separator’ and ‘LeftSwipeActions’
1
2
3
4
5
6
7
8
9
10
11
12
13
14
15
16
17
18
19
20
21
const Separator = () => <View style={styles.itemSeparator} />;

const LeftSwipeActions = () => {
  return (
    <View
      style={{ flex: 1, backgroundColor: '#ccffbd', justifyContent: 'center' }}
    >
      <Text
        style={{
          color: '#40394a',
          paddingHorizontal: 10,
          fontWeight: '600',
          paddingHorizontal: 30,
          paddingVertical: 20,
        }}
      >
        Bookmark
      </Text>
    </View>
  );
};
The code syntax comprises two components, namely 'Separator' and 'LeftSwipeActions'.
The 'Separator' adds a horizontal line to visually separate items in a list.
It uses an arrow function syntax (() =>) and returns a <View> component.
This style object 'styles.itemSeparator' defines the appearance of the separator, like its height, color, or margin.
The component 'LeftSwipeActions' defines the content that appears when a user performs a left swipe on a specific item in the list (e.g., a bookmark action in this case). These components help enhance the user experience and add interactive functionality to the application.
Inside the <View>, a <Text> component is embedded to display the text 'Bookmark'.
Styling objects are added to these two components to add more dynamism to the functionality.
The Functionality Added for ‘RightSwipeActions’
1
2
3
4
5
6
7
8
9
10
11
12
13
14
15
16
17
18
19
20
21
22
23
const rightSwipeActions = () => {
  return (
    <View
      style={{
        backgroundColor: '#ff8303',
        justifyContent: 'center',
        alignItems: 'flex-end',
      }}
    >
      <Text
        style={{
          color: '#1b1a17',
          paddingHorizontal: 10,
          fontWeight: '600',
          paddingHorizontal: 30,
          paddingVertical: 20,
        }}
      >
        Delete
      </Text>
    </View>
  );
};
The 'rightSwipeActions' component creates a container with an orange background colour and positions the 'Delete' text aligned to the right side of the container. This component represents an action that will be initiated when users swipe right on a specific item in the defined list. In this case, the action is to delete the item.
To Display an Alert Message
1
2
3
4
5
6
const swipeFromLeftOpen = () => {
  alert('Swipe from left');
};
const swipeFromRightOpen = () => {
  alert('Swipe from right');
};
The code syntax defines two functions, namely 'swipeFromLeftOpen' and 'swipeFromRightOpen'. These functions display an alert message when users swipe right or left on given items.
These functions are defined as event handlers for the swipe gestures. When users swipe left, the 'swipeFromLeftOpen' function is called showing an alert saying 'Swipe from left'.
Similarly, when users do a right swipe, the 'swipeFromRightOpen' function is called displaying an alert 'Swipe from right'.
Representing Individual Items in the List
1
2
3
4
5
6
7
8
9
10
11
12
13
14
15
16
17
18
19
20
21
const ListItem = ({ text }) => (
  <Swipeable
    renderLeftActions={LeftSwipeActions}
    renderRightActions={rightSwipeActions}
    onSwipeableRightOpen={swipeFromRightOpen}
    onSwipeableLeftOpen={swipeFromLeftOpen}
  >
    <View
      style={{
        paddingHorizontal: 30,
        paddingVertical: 20,
        backgroundColor: 'white',
      }}
    >
      <Text style={{ fontSize: 24 }} style={{ fontSize: 20 }}>
        {text}
      </Text>
    </View>
  </Swipeable>
);
The code syntax defines a 'ListItem' component. It represents an individual item in the given list. The 'ListItem' component uses an arrow function. It further takes a prop 'text', which represents the item's content.
The code wraps the item's content in a <Swipeable> component. Based on users' actions or the direction of the 'swipe', it triggers the corresponding actions. This allows users to interact with the item by swiping and performing actions like bookmarking or deleting.
Setting Up the Structure of the App
1
2
3
4
5
6
7
8
9
10
11
12
13
14
15
16
17
18
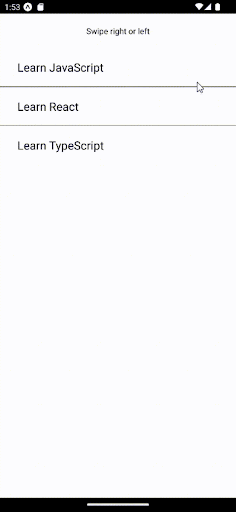
const SwipeGesture = () => {
  return (
    <>
      <StatusBar />
      <SafeAreaView style={styles.container}>
        <Text style={{ textAlign: 'center', marginVertical: 20 }}>
          Swipe right or left
        </Text>
        <FlatList
          data={todoList}
          keyExtractor={(item) => item.id}
          renderItem={({ item }) => <ListItem {...item} />}
          ItemSeparatorComponent={() => <Separator />}
        />
      </SafeAreaView>
    </>
  );
};
The 'SwipeGesture' component sets up the basic structure of the app. It includes a status bar and a safe area for the content. It displays text guiding the user to swipe right or left.
The 'FlatList' component renders a scrollable list of items using the 'ListItem' component. The 'Separator' component act as a visual separator between items.
Defining the Styling Segment
1
2
3
4
5
6
7
8
9
10
11
12
const styles = StyleSheet.create({
  container: {
    flex: 1,
  },
  itemSeparator: {
    flex: 1,
    height: 1,
    backgroundColor: '#444',
  },
});

export default SwipeGesture;
The code syntax specifies the styles for the 'SwipeGesture' component. It encloses the container style, indicating that the view takes up the entire screen. The 'itemSeparator' style creates a horizontal line to separate items.
Finally, this code exports the 'SwipeGesture' component.
To Create the App.js
The App.js renders the primary container with an already-created 'SwipeGesture' component.
1
2
3
4
5
6
7
8
9
10
11
12
13
import React, { Component } from 'react';
import { StyleSheet, View } from 'react-native';
import SwipeGesture from './components/SwipeGesture';

export default function App() {
  return (
    <View style={styles.container}>


       <SwipeGesture />

    </View>
  );
App.js is the main entry of the project. This part of the project uses the 'SwipeGesture' component. It is used in this app to handle swipe gestures. The SwipeGesture component is imported from the file ‘./components/SwipeGesture.js’.
The code syntax encloses a 'SwipeGesture' component inside the <View>.
How to Run the Program on an Emulator?
Before you pack up, check if it is correctly performing. And to do so, you have to run the code on the emulator.
So, how can you do this? Here, is the simple basic steps.
- Open the project folder.
- Run the terminal from the same folder.
- Pass the command:
npm installand thennpx react-native run-android. And it will start running on your dev system.
Refer to the given gif as the project’s output.
Key Takeaways
Adding a Swipeable Gesture in a React Native app is so easy than it seems. You only have to keep patience and practice until you succeed it. Coding and creating dynamic apps become difficult only if you give excuses and try to memorise the steps. It has to be performed in a flow.
Try now, and build your own React Native app with Swipeable items.

A science graduate who has a keen interest to lean about new technologies and research area. With an experience in the field of data analytics and content writing, she aims to share her knowledge among passionate tech readers.

